Do-it-yourself moonshine still: basic elements and production. The process of making a moonshine still from improvised means How to make a good moonshine still with your own hands
Having tried many varieties of vodka at a price of 100-600 rubles per bottle, I realized that high-quality moonshine is much better. After all, unfortunately, it is simply impossible to drink current vodka, and it is quite difficult for an ordinary person to buy real Russian vodka. For all these reasons, I decided to make a homemade device for the production of moonshine.
Nowadays, real grain alcohol is rarely used to produce vodka. Vodka producers can even obtain alcohol from natural gas. The most disgusting store-bought alcohol tinctures - “With Honey” and “Lingonberry” - contain artificial additives that overcome the terrible smell of bad alcohol, but do not relieve a severe hangover the next morning.
To produce good moonshine at home, you need to get some utensils for mash. There is a simple rule: the larger its volume, the better. In my first experiments, I used ten-liter bottles for mash. Now I have 18-liter bottles in my arsenal, as well as milk cans.
Next, you need to have a pressure cooker and a thermometer. We drill a hole in the lid of the pressure cooker where we need to insert a thermometer. A piece of silicone tube can serve as a seal. You can cover the top with dough. A flask of this kind is also needed.

You also need to have a reflux condenser. We'll talk about its purpose a little later.

Ariometers (alcohol meters) serve well as a coil, which also performs the function of a refrigerator.


So, let's start assembling. Place the pressure cooker on a sprayer (gas stove). And then - according to the sequence shown in the pictures. When installing silicone tubes, you can use dough as a sealant. Cold water is supplied to the refrigerator from below!

After the assembly is complete, it’s time to pour the mash. Along with it, you need to add 2 tablespoons of activated carbon BAU-A and just a little potassium permanganate.

One pressure cooker can produce moonshine within half an hour. Condensation starts at 88 degrees on the thermometer and lasts until 97 degrees. We mercilessly remove the first 20-30 grams to avoid spoilage of the entire product. Don't be greedy on them!
During cooking, various nasty things accumulate in the flask.

But after the dephlegmator and condensation of the moonshine in the refrigerator, you can evaluate the purity of the color of the finished product!

Ready-made moonshine can be drunk, but it is better to clean it. To do this, take two egg whites and pour them into a 1 liter jar of moonshine. Then strain through cheesecloth. Now you need to make a filter from white bread, oats, BAU-A activated carbon, cotton wool, bread, gauze. It is recommended to filter the almost finished product three times through it.

The resulting moonshine can be diluted with spring or regular drinking store water. The optimal alcohol content in the drink is 50 degrees.
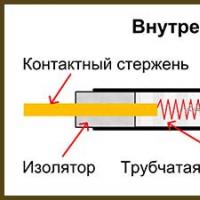
Design The moonshine still consists of:
Now in more detail about each component.
1. Distillation capacity or - cubic.
As containers For a moonshine still, the easiest way is to use a pressure cooker; it initially has good tightness and easy accessibility.
Pressure cookers are equipped with special fittings to relieve excess pressure.
You can unscrew the valve from the fitting, thereby obtaining an outlet for releasing steam.
The fitting is connected to the refrigerator using a hose or metal tube.
What an old Soviet pressure cooker looks like, suitable for converting it into a moonshine still:
Any other container made of stainless steel, copper or aluminum will do, as long as it is sealed.
For example, a beer keg, a travel thermos, an aluminum milk flask, etc.
2. Refrigerator. He's a snake.
For small volumes it is easiest to use laboratory ball or once-through refrigerator, because it is the easiest to obtain, it is sold in any store with laboratory equipment and is not expensive. You can also buy a ready-made glass distillation apparatus in stores with laboratory equipment, but in domestic conditions its use will not be practical enough, because glass is a very fragile material.
In addition, glass is chemically inert, i.e. does not form any harmful compounds or odors upon contact with hot alcohol steam during the distillation of mash.
The photo shows a laboratory refrigerator installed on a homemade moonshine still from a pressure cooker:

In addition to the glass refrigerator, an equally affordable and proven design is the coil. It can be made, for example, from a copper tube. A tube for air conditioners is well suited and, moreover, it can be bought at any construction market or store, it costs less than a laboratory refrigerator and the design of the moonshine still turns out to be more reliable and practical, but you will have to work more with your hands.
The most basic design is coil inserted into any container that can be easily processed, for example a plastic drinking water bottle with a volume of 5-10 liters. The entry and exit points of the tube into/from the container are sealed. Coolant supply from below.
A more complex design is a metal tube, for example copper, inserted inside any hose of larger diameter.
The hose is sealed on the sides to prevent coolant from spilling out.
The image below shows the simplest one implementation of such a coil, arrows show the main nodes:

You can make it more beautiful and more reliable with the help of plumbing accessories:
3. Connecting hoses.
To connect the distillation tank and the refrigerator, you can make an adapter from a copper or stainless tube, or use silicone hose.
If you choose a hose, then use only silicone hoses.
Silicone the material itself is inert and does not react with hot alcohol-containing steam and does not impart any taste or smell to it, unlike rubber hoses, after which moonshine makes it terribly smelly.
Silicone hoses can be purchased at a laboratory supply store.
You can tell silicone from rubber by burning.
Silicone burns without soot and leaves behind white ash, while rubber, on the contrary, smokes and leaves black soot.

In more complex designs of moonshine stills, various additional components can be used to improve the quality of the resulting product (steamers, drop eliminators, etc.), or for convenient control and monitoring of the distillation process (thermometers, barometers, diopters). Which apparatus is best to assemble depends on what you want to get from it, for example, to obtain raw alcohol it is best to use large stainless steel containers, to obtain fruit and berry distillates it is good to use a copper container and coil, and the distillation of grain wort can only be done with steam or in a water or other bath, so that the wort does not burn, you cannot do without a steam generator.
During Prohibition, a moonshine still was the only thing that saved people before holding any events: birthdays, weddings, and so on.
In Soviet times, moonshine was considered a criminal offense. After all, this alcohol, unlike vodka, is environmentally friendly. The brew for it is infused with yeast, sugar, wheat or beets. And to add flavor, you can use various additives: prunes, herbs, mint, oak chips, birch buds and other components. Therefore, at home, craftsmen made a moonshine still from scrap materials.
One of the most popular and simplest options is milk can construction. Moreover, an aluminum can cannot be used, since this material reacts with all chemical elements. And the first purification moonshine contains a large number of harmful impurities: fusel oils, acetone and others. That is, with intensive use, after some time the aluminum can will turn into a colander.
How to make a moonshine still?
- First you need the can itself. If you can find one made of stainless steel, that will be just great. Volume – at least 30 liters
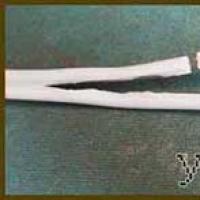
- Next, you will need a coil. The coil is needed to improve heat exchange between two media. It is practically the main part of the structure. Even in Soviet times, when the police were looking for “moonshiners,” it was he who was confiscated. For the coil, it is better to take a copper tube with a diameter of approximately 12 mm. In order to bend it at home, you can use the wooden handle of a mop or shovel. If there is nothing suitable, then simply take a piece of pipe, fill it tightly with sand or soda, compact it and wind several turns around the pipe. Carefully remove the coils and cut the pipe. Moreover, it is necessary to leave even pieces of pipe at the top and bottom
- Then the twisted part of the coil must be placed inside the pipe (for example, you can cut it from a sewer pipe of suitable diameter), stepping back three centimeters from the twisted part on each side

- After this, to the same pipe (which will play the role of a refrigerator), we attach adapters from the outside to drive and drain cold and heated water, respectively. It is advisable to imagine in advance where the water at home will be connected and make an adapter in this direction. You can use a test for sealing. When dry, it will tightly close the slightest holes and prevent precious liquid from seeping out.
- The next step is to close the top and bottom holes of the sewer pipe section with plugs. They can be cut from tin, copper or other material. In the center of them, make holes in advance for the ends of the coil. Seal all joints tightly using the same dough.
- If instead of a plastic pipe you use a metal one (refrigerator), then the end caps can be welded to it, and a mixture of epoxy resin and silver can be poured on top. Epoxy, by itself, is quite fragile, so it must be mixed with another component to obtain “forever” protection.
- You can connect the refrigerator to a steamer. This is optional, but desirable to improve the quality of moonshine. Since when entering it, fusel oils cool down and, having lost their boiling point, remain in the steamer in the form of sediment
Making a steamer
- To assemble it at home, you will need a glass jar with a tightly screwed lid.
- You need to cut two holes in it: one of which will include the end of the pipe from the can, and the other will go into the refrigerator
- To do this, draw circles on the cover according to the diameter of the adapters (fittings), carefully cut them out, install the adapters and screw the nuts tightly

- For reliability, the joints can be treated with varnish or the same raw dough
- The last step is to close the lid of the jar and also seal the joint.
- Then, we tightly seal the lid on the can and cut a tube into it to connect it to the steamer, which, in turn, needs to be connected to the refrigerator
The refrigerator should not be installed horizontally or vertically. The optimal tilt angle is no more than 40 degrees.
Putting all the details together
Next step. It is necessary to connect two hoses to the improvised refrigerator to drive and drain water. You can connect the cold water pipe directly to the tap, or you can cut into the system by installing a tee on the pipe. The heated water drainage hose at home can simply be lowered into the sink.
Before using the device for the first time, you should check the entire system and boil clean water for several hours. In order to make a moonshine still of this design at home, neither a diagram nor drawings will be needed.

You can make an electric moonshine still at home. In this case, you will already need drawings and a diagram and a preliminary calculation of the energy consumption and power of the heaters that are installed in the distillation tank.
In addition to full-fledged designs, there are options for mini-devices. For example, from an ordinary cola or cocktail can and an ordinary three-liter can. In addition, there are gift options for mini-designs of this type. Having given such a mini-device as a gift, you can then proudly say that you have given a mini-plant for the production of alcohol as a gift.
Moonshine still from improvised means
And the simplest apparatus for making moonshine at home is an ordinary saucepan with water at the bottom.
- A stand for the container is installed at the bottom, and such a structure is closed with a basin of suitable diameter. The edges are sealed with dough or clay for tightness.
- The pan with the mash is placed on the fire, the mash gradually evaporates, cools from the basin-lid and drips into the container
- The main thing here is to correctly calculate the volume of the product. From approximately 4 liters of mash, a liter of finished product is obtained

Therefore, if you are not satisfied with the quality of purchased alcohol, then you can take decisive action and surprise your friends with home-made moonshine.
Today, almost anyone can create a moonshine still with their own hands. A lot of information in various manuals helps us assemble the distillation system correctly. We have the opportunity to purchase some components of the design in specialized stores, everything else can be made at home. How to make a moonshine still from available materials and what is needed for this?
1 Moonshine device - buy or make it yourself?
Most of those who have tried really high-quality homemade moonshine, be it cognac, whiskey or, begin to wonder how to make something similar themselves. The first questions about how to make a moonshine still with your own hands are usually asked by the owners of the devices. Having received answers to their questions, people begin to prepare to assemble distillation systems using improvised materials. This is approximately how the large army of fans of quality homemade drinks is replenished.
It would seem that there is nothing complicated: I prepared the material, looked through the pages on the Internet, found a detailed algorithm for manufacturing the structure and began work. But in practice, everything is not so simple, especially if you clearly analyze your preferences and needs. This is why beginners who want to produce homemade alcohol prefer to buy ready-made moonshine stills. It is worth saying that this requires at least a basic understanding of what this or that device model is, whether it is overpriced in the store, and how to use it.
We will consider a more economical, but also more labor-intensive option - creating a distillation device yourself. Here we get the opportunity not only to save our money, but also to assemble a structure that will fully meet our requirements. Here, as they say, everyone is their own mechanic, technologist, and designer.
What does the simplest homemade distillation system consist of? Which moonshine still design is right for you? Below we will provide answers to these and other questions.
2 A distillation tank is an essential component of a moonshine still
Before starting work, you need to create a drawing of a moonshine still. In the future, we will add to it the dimensions of this or that part, as well as mark the places to create the necessary holes. This way we won’t make big mistakes, and if we make a mistake, we’ll be able to fix the problem in time.
The first element that should be in every homemade unit is a distillation vessel. The most common options for making a distillation container at home are any suitable electrical appliance, for example, a multicooker. This device has all the necessary qualities for a distillation vessel.
Along with this, a homemade moonshine still from a multicooker will not allow you to distill a lot of alcohol, since the volume of the household appliance leaves much to be desired. Another available option is any copper vessel. For example, this could be a saucepan with a volume of 5–10 liters. It will hold a sufficient amount of mash, which means that you won’t have to add another portion of raw materials every time. In addition, unlike a multicooker, you don’t have to pay for a saucepan, since every home or country house probably has one. Despite the advantages, copper containers have significant disadvantages.
The first of them is the need to saw holes in the lid and bottom of the pan, and this entails additional time and effort. In addition, it is not always possible to find a lid for a vessel that would seal it tightly. This is a big drawback, since a pan that cannot be tightly closed cannot be used in moonshine. Another important nuance is that you should not use an old pan made of copper or other metal to make a homemade distillation system. They become rusty very quickly, which should already be a warning sign for you.

Since copper vessels have many disadvantages, it would be right to opt for a multicooker. Alternatively, you can use a regular milk can. It is very important that the seals on their lids are made of silicone. If they are rubber, then your moonshine will taste with “notes” of rubber. All kinds of flasks are very good for creating a distillation cube. When choosing such vessels, you should be guided by the following principles:
- volume not less than 5 liters;
- material – stainless food steel;
- there are holes and fittings for them;
- internal and external surface without damage;
- the vessel should be light enough (this way the distillation unit will be portable and can be taken with you outdoors).
Possessing all these qualities, the flask can become an excellent distillation container. After you select the optimal vessel, you can begin making another important element - a homemade refrigerator in which alcohol vapor will be cooled and turned into liquid.
3 Selection of the optimal cooling element for moonshine vapors
The simplest moonshine unit must be equipped with a refrigerator. This design can be either flow-through or non-flow-through. The first type of cooler is considered more compact and is much easier to store due to its small dimensions. This type of refrigerator consists of a coil called a coil, which is placed in a completely sealed container. Cold water passes through the container, which cools the moonshine vapor. Because of this, they condense, turning into purified alcohol. A flow-through refrigerator can operate from a direct flow of water. Under normal conditions, it is easier to make such a design, since for this you only need to find a large container into which the coil is inserted. The only negative is the large linear dimensions, which is why racks are needed to use such a cooler. Flow devices are much more productive than non-flow devices.
A static refrigerator consists of a large canister with a volume of at least 35 liters. A coil tube cuts into the container. To brew moonshine, the vessel is filled with cold water, which must be scooped out as it heats up. After this, you need to immediately add cold water. This is not very convenient, but such a cooling system has its advantages. Firstly, it is very simple to assemble such a structure under any conditions. Secondly, such a refrigerator will be the only option in the absence of running water. And thirdly, the coolant in this design can even be snow or ice.

You can make a combined version of the refrigerator. To do this, you need to take an ordinary bucket, into which you then need to cut a spiral, and under the top of the container, install a fitting under the tap to drain warm water. The channel for supplying cold water is attached to the bottom of the bucket. This refrigerator design is quite compact, since it uses running water. However, it can also work in the absence of running water. True, under such conditions the alcohol will have to be distilled a little more slowly, and water will have to be scooped out and added more often.
If you have a water supply connected, you will have to adjust the flow of flowing fluid. This is necessary so that your refrigerator does not “choke” during operation, and you get cold or slightly warm moonshine of high cleaning quality.
4 Don’t forget about the steamer
When planning the manufacture of a moonshine unit, do not forget about the steamer. It is best to immediately include it in the drawing. Many moonshiners consider this part optional, but if you strive to produce high-quality alcohol, then it is better to equip your distillation system with it. The steam steamer should be located between the distillation tank and the cooling system of the unit.
The principle of operation of the steam vaporizer is quite simple: in the process of evaporation of ethyl alcohols, vapors capture boiling fractions, which contain fusel oils. It is the latter that give moonshine an unpleasant odor and cause severe poisoning. When fusel oils are few or completely absent, moonshine has a pleasant aroma and mild taste.

Condensing inside the steamer, moonshine vapor turns into liquid. After this, the alcohol is heated again and again turns into steam, thereby undergoing secondary purification. In relation to alcohols, this is more gentle, but completely removes the remaining heavy fractions. Considering the principle of operation of a steamer, it is simply necessary in any, even the simplest distillation system.
You can choose any container to make the part. Under normal conditions, this is a glass vessel with a screw cap. It is better to take the volume of the jar more than two, but less than five liters. After distillation, more than 3 liters of waste can accumulate in the steamer, so with such an element capacity we will be able to distill more moonshine. It is necessary to cut fittings into the screw cap to which we will connect the tubes. Through them, moonshine steam will flow in and out of the steam tank.
During the distillation process, many moonshiners place various flavorings in the steamer. These can be dried fruits, aromatic spices. So, if you are planning distillation, then you can put 2-3 parts of the peel of this citrus inside the steamer.
After making the steamer, you can begin to connect all the elements of the moonshine system. To do this, connect 2 tubes to the fittings in the lid of the distillation cube. After this, we connect the vessel with the steamer, after which we connect the latter to the refrigerator. It is best to use silicone tubes for connections, as they do not emit odor. At the end, we need to attach a thermometer to the distillation cube, by which we will monitor the boiling point of our alcohol.
As you can see, there is nothing complicated in creating a distillation system. The work is very easy to do yourself. The main thing is to make a drawing in advance, according to which you can navigate in all your further actions.
And a little about secrets...
Russian scientists from the Department of Biotechnology have created a drug that can help treat alcoholism in just 1 month.
The main difference of the drug is ITS 100% NATURAL, which means it is effective and safe for life:
- eliminates psychological cravings
- eliminates breakdowns and depression
- protects liver cells from damage
- eliminates heavy drinking in 24 HOURS
- COMPLETE RIDGE from alcoholism, regardless of stage
- very affordable price.. only 990 rubles
A course of treatment in just 30 DAYS provides a comprehensive SOLUTION TO THE PROBLEM WITH ALCOHOL.
The unique ALCOBARRIER complex is by far the most effective in the fight against alcohol addiction.
Follow the link and find out all the benefits of the alcohol barrier
After the bad moonshine of the 90s, many people were turned away from this drink for a long time, but recently traditions have begun to be restored. People began to understand that bad moonshine is made only from bad raw materials, and from good, high-quality raw materials, excellent alcohol is obtained, superior in quality to the same vodka.
However, it is very difficult to prepare high-quality moonshine without a special apparatus, and it is not always possible to buy it. Let’s put it this way: it costs a lot and it’s difficult to find a normal one.
Therefore, many lovers of homemade alcohol are inclined to think that they need to make a moonshine still with their own hands. What is needed for this?
Firstly, understand the essence of moonshine brewing technology, and secondly, understand which fragments must be present in the apparatus.
The principle of moonshine technology
Despite the variety of all available methods for producing moonshine, the essence of the process comes down to the fact that the raw material is heated in a sealed container, and its vapors containing alcohol are cooled as they pass through the pipe. In the form of condensation, they flow into another container. The resulting distillate is the moonshine we need.
This process is clearly shown in the figure:
Thus, we can clearly see that the moonshine still must have a container into which the raw material (mash) is poured - a distillation cube or evaporator, a pipe through which vapor will pass, a cooler and a container for collecting the distillate.
Despite its simplicity, the combination of these elements gave rise to many designs of moonshine stills. Craftsmen have long figured out how to make a moonshine still using scrap materials.
Moonshine still designs
Any design has its pros and cons, as well as parts that, like a designer, are put together into a specific model of the device. By the way, the quality of moonshine depends more on the accuracy of its preparation than on the complexity of the apparatus itself.
Model 1. Isothermal distillation apparatus
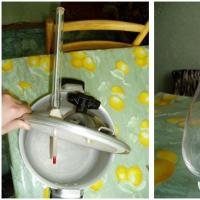
In the picture below you can see two almost identical moonshine stills. These are the simplest schemes that do not require any special skills to create them.

You will need: a gas or electric stove serving as a heat source (5), a large saucepan or stainless steel pot (evaporator) (3), mash (4), a dish (deep bowl) for collecting moonshine and a stand for it (2), a basin , the size corresponding to the width of the pan (entering it to the middle) (1).
The essence of working with such a device is simple: you pour the mash into the evaporator, install a stand for the moonshine collection container and place an empty container on it. Next, you install a basin that should partially fit into the evaporator, but not touch the moonshine bowl. Ice water is poured into the basin, and the entire structure is installed on a heat source (stove). To ensure tight contact, the place where the basin enters the pan can be tied with a towel soaked in cold water or a layer of fresh dough. When heated, the mash vapor comes into contact with a cold basin, and, as a result of condensation, falls in drops into a container for collecting moonshine.
This method has many disadvantages:
- there is a possibility of mash getting into the moonshine collection container
- you cannot determine the strength of the moonshine that is formed until you disassemble the device
However, this device can be improved with the help of a funnel and outlet tube (2), which replace the container for collecting moonshine in the design: 
Such a device allows you to collect moonshine outside the evaporator, which reduces the number of disadvantages of such a device and improves the quality of the alcohol itself.
The funnel, like the container for collecting moonshine in the earlier model, must be placed on a stand. This stand can be a tripod or a wire basket.
Model 2. Moonshine from a pressure cooker
Do you remember Soviet pressure cookers? Nowadays they rarely cook in them, but any moonshiner who owns this treasure knows that making a full-fledged moonshine still from it is not too difficult.
How to make a moonshine still from a pressure cooker is shown in the figure:

You will need: gas stove and pressure cooker.
The technology for assembling the device is that the two valves on the cover (1) are replaced with rubber plugs, into one of which a thermometer (2) is inserted, and into the other a fairly long tube (3).
A tap (4) and a device for cooling the vapor with ice water (5) are installed on the tube. The water inlet and outlet are shown in the figure using arrows.
Sometimes a coil is inserted into the vapor cooling device (5) (as a fragment of a tube (3)). How to make it is described in detail below, and now we will tell you how to make a tube - a cooler (as in the photo).
We insert the coil or tube (3) into a piece of plastic or metal pipe:

We prepare fittings for water supply and drainage:

They will need to be glued to the cooler; for this you will need to heat them up and press them against the pipe.


Irregularities may form inside the pipe where the drill inserts. They need to be cleaned with a knife or sandpaper.
The result is a design like this:

To close the pipe on the sides, you need to cut out lids from tin from beer cans or seaming lids. You need to make slots in them for the coil tubes and glue them inside with superglue.

To completely seal the seams, you can use a hot glue gun, first forming a border around the seam using simple baking soda. You will end up with a fairly reliable design.
Next you will have to seal the coil tightly. This is done using epoxy glue, which is used to fill the entry and exit points of the coil. Sometimes, to save glue and make the structure look noble, epoxy is mixed with silver.
Attention! The second edge of the coil is sealed only after the first has completely dried. Only diligence and patience will allow you to create a high-quality cooler.
A glass tip (7) is placed on the outlet end of the tube (3) or coil, through which the moonshine enters the moonshine collection container (6). It must be installed in such a way that the distillate falls into the container, but the tip itself does not lie in it.
The collection container (6) can be a glass jar with a screw cap, in which a hole is made for inserting the tip. This container (6) must be placed in a saucepan with cold water (8).
The essence of working with the device: after the mash is poured into the pressure cooker, it is put on fire, and the cooler (5) is connected to running water. After boiling, the mash should bubble over low heat. Alcohol vapor, rising through the tube, will be cooled by the pressure of running water in the cooler and flow into an additionally cooled receiver.
Design advantages:
- minimum modifications
- Due to double cooling, a higher degree of alcohol is maintained
- there is no chance of mash getting into the moonshine collection container
Design disadvantages:
- when making a large amount of moonshine, you will have to disassemble and reassemble the structure many times
- you cannot separate the “heads” and “tails” of moonshine, which reduces its quality and requires additional purification of the product
Model 3. Alembic with coil
This is the most common model. Using it you can get 0.6-0.8 liters of moonshine per hour.

You will need: a gas stove, a large container for mash (1) with a tight-fitting lid (2), a thermometer that determines the temperature of the mash (3), a tube for removing alcohol vapors (4), a valve (tap) (5), a coil (6 ), a capacious container with inlet and drain (locations indicated by arrows) of cold water (7). In addition, you will need a container to collect the resulting alcohol.
The essence of working with the device: fill the mash container 2/3 with it and wait for it to boil (78°C). It should boil gradually and evenly. This is achieved using low to medium heat. The best option would be to lower the heating temperature after the mash reaches 75°C. Excessively violent boiling can throw mash particles into the outlet pipe and ruin the entire moonshine process.
Passing through the coil, the steam cools and enters the moonshine receiver as a ready-made distillate.
A similar moonshine still can be made from a flask in which milk is usually transported. Let's consider this option in more detail.
During the creation of the apparatus, a 40-liter flask will serve as a distillation cube. To begin, remove the lid from it and disconnect the bar that presses the lid to the flask and the lever with the clamp on the flask itself.
In addition to the dough, the fit of the lid to the flask can be ensured by “fum” tape. It will also work if, for example, you start using not a flask, but a large saucepan:
For cooling, you will need to choose a 30-liter tank made of stainless steel, galvanized iron, hard thick plastic or aluminum. A coil will be located inside it.
How to make a coil.
At home, the coil is made from a copper tube. Its diameter should be 10-12 mm, and its length should be about 3 meters.
To create a coil, a tube is wound around a pipe to form a spiral. The diameter of the spiral matters only in the sense that it should easily fit into the tank for
cooling.
The number of turns can be arbitrary - sometimes it is enough to make only 2 or 3 turns.

The coil must be bent carefully so as not to break it. To do this, a copper tube is tightly filled with sand before bending, with its ends flattened.
The finished coil is inserted into the tank vertically, and its lower end must have an exit from the tank. In this case, the tightness of the outlet can be ensured in different ways, for example, using a brass bushing with a thread along the outer diameter, a nut and a paronite gasket.
From above, the coil is attached to the tank with a clamp.
In addition, the tank must have 2 drilled holes with pieces of tube soldered into them for supplying and draining water (hoses are put on the tubes for this purpose).
It is very good when the water supply to the tank is regulated by a tap.
Model 4. Moonshine still with steamer
The design of this model almost completely duplicates the previous one, with one exception - between the container for mash and the cooler, a steam tank is installed in it (a sealed container that separates fusel oils from alcohol vapors).
In the picture this device looks like this:

The essence of the operation of a steam steamer is that when steam enters it, the pressure inside a container larger than the pipe drops, the temperature decreases, and fusel oils with a small part of the distillate precipitate. Typically, out of 10 liters of mash, this sediment is about 200 ml.
The action of the steamer is well reflected in the figure:

Creating a still with or without a steamer depends on personal preference, but you should know that when assembling a moonshine still with your own hands, it will not be difficult for you to build a steamer.
It is made from a regular 1-3 liter jar with a screw cap. Two holes are made in the lid into which fittings are inserted. They are secured with nuts and additionally treated (outside) with hot melt adhesive.
After the structure is ready, it is connected by hoses to a mash container and a cooler. At the same time, try (if possible) to ensure that the incoming tube of the steam tank is slightly lower than the outgoing tube (by 1-1.5 cm).
There is another design for a home steamer. Everything about it is also simple: one wide hole is made in the lid of the jar into which the coupling is inserted. It needs to be secured with a nut, and the tubes from the coil and mash containers must be placed inside. Before being placed in the coupling, they are cleaned and tied with threads.
Inside the lid, you need to stuff cotton wool into the gaps and fill it with epoxy glue on top. When it dries, the cotton wool is removed.
When assembling a moonshine still with your own hands, you can install a steamer on almost every model (except for the first, simplest one).
There is a similar model of a moonshine still, but still differs from the previous version.
Model 5. Device with two containers
In order to make this moonshine still with your own hands, you will need to study in detail the structure of previous models.
The disadvantage of this option is its complexity and lower alcohol yield, but the big advantage is the high quality of the resulting moonshine.

You will need:
- gas stove with two parallel burners
- large mash container (1) with a tight-fitting lid
- two thermometers (2) - to determine the temperature of the mash and water,
- tube to protect the device from pressure surges (3)
- valve (4)
- tube for removing alcohol vapors (5)
- water container (6)
- tube – cooler with coil (7)
- container for collecting the resulting alcohol, installed in a vessel with cold water (8)
The essence of working with the device:
- We heat the water in the container (6) to 80-82°C and use a thermometer to constantly maintain it.
- Heat the mash to 78°C. At this temperature it boils and the release of alcoholic vapors begins.
- The vapors leaving the heating container (1) enter a container with water (6), where some of the water and fusel oils settle, while the alcohol vapors continue their journey through the cooler into the distillate collection container.
Model 6. A device created from a multicooker
This model is dictated by modernity, but not everyone likes it. Its main disadvantage is that moonshine in it can only be prepared from sugar mash, i.e. absolutely pure liquid.
The design of the device is simple, it contains only 3 elements: the multicooker itself, a glass distillation tube from the laboratory, 3 medical tubes (but better than silicone ones) of 1 meter each. In addition, you will need an outlet and a tap with running water.
The assembled device looks like this: 
You need to use the device like this: after installing and securing the hoses (based on the photo), you need to set the “multi-cook” or “cooking” mode on the multicooker. The initial heating temperature should be 120°C, but when steam begins to form it will need to be reduced to 100°C.
The moonshine obtained as a result of this experiment is quite transparent, but many complain about its low strength.
P.S. The models of moonshine stills presented in the article are given as examples of their possible options.
When making a home brewing apparatus, we recommend that you use only stainless steel, glass and silicone as materials for its elements.
If you use other materials, we do not guarantee you the complete absence of harmful compounds in the moonshine produced using these machines.
The chemical composition of the distillate obtained at home can be checked in any chemical laboratory.