Do-it-yourself stone mosaic. Do-it-yourself stone mosaic Do-it-yourself stone mosaic
Mosaic is perhaps the most effective finishing method. Many small colored fragments, shimmering in the sun and forming various patterns, attract the eye from afar and can decorate absolutely any surface. For external cladding, the most popular mosaic is made of natural stone, which is distinguished not only by its durability, but also by a wide variety of colors and textures.


Mosaics are small pieces of processed stone that are square, rectangular or irregular in shape. The most popular are square elements (chips) ranging in size from 1x1 cm to 5x5 cm, and in the form of bricks, sizes 1x3, 2x4, 2x6 cm. The standard thickness of the mosaic is 10 and 15 mm, although each manufacturer has both the thickness and size of the chips can vary significantly differ.


Finishing the facade of a country house - cladding with natural stone
To make mosaics, both hard and soft stones are used: all types of marble and granite, basalt, quartzite, travertine, limestone, sandstone, dolomite and others. As a rule, hardwood mosaics are used for exterior decoration, and softwood mosaics are used for interior decoration. The surface of stone chips can be smooth or rough, depending on the processing method. The mosaic acquires its smoothness and glossy shine during the polishing process, but to obtain a rough texture, the stones are treated with a tumbling or sandblasting machine.

As you know, laying mosaics requires a lot of time and patience, especially if you need to lay out a complex pattern. Therefore, for ease of installation, manufacturers produce stone chips on a mesh matrix. The sizes of the meshes vary, as do the patterns on them, but the laying principle is the same. The seams, as in regular tiles, are treated with grout pastes.


 Mosaic model "Colosseum"
  Barcelona mosaic model
There is another type of stone mosaic - mosaic plaster. It consists of natural stone chips of various types mixed with an acrylic binder.

Depending on the grain size, stone chips are divided into several groups:
- fine-grained – granule diameter less than 0.5 mm;
- fine-grained - from 0.5 to 1 mm;
- medium-grained – from 1 to 2.5 mm;
- coarse-grained - from 2.5 to 3.5 mm.
All granules undergo pre-treatment, as a result of which they acquire a spherical shape. This is necessary so that during the application process sharp edges do not scratch the surface. Stone chips have many colors and shades, so the coating options are also very diverse.

Pros and cons of stone mosaics
Why is stone mosaic so prized? After all, there are a lot of other materials that are more affordable, bright and attractive in appearance, and easy to process. To answer this question, you need to take a closer look at its advantages, the list of which is not so small.
Environmental friendliness. Since stone is a natural material, it does not contain chemically aggressive substances that are hazardous to health. For this reason, it is excellent not only for exterior decoration, but also for residential premises.

Durability. Natural stone is not afraid of temperature changes, prolonged freezing, moisture, or exposure to ultraviolet radiation. Mosaic has the same properties - even in unfavorable conditions, it retains its magnificent appearance for years, does not collapse or fade.
Strength. Stone mosaic is many times stronger than ceramic and glass, so it withstands mechanical stress better and does not become scratched or cracked. Of course, a strong blow can split the stone, but no homeowner will deliberately hit the cladding. The surface of this mosaic is resistant to abrasion and can be washed and cleaned many times.
Attractiveness. Each stone has its own natural shade and unique pattern, which are preserved in every small fragment. The correct selection and combination of such fragments allows you to create real mosaic masterpieces. But even a coating of identical stones is very decorative, thanks to the interesting texture and play of light on the stones.

Simplicity of finishing. Despite the fact that laying mosaics is a rather lengthy task, the process itself cannot be called complicated. Working from a template, anyone can lay out a pattern or a small panel, and even more so with a mosaic on a grid.

Disadvantages of stone mosaics:
- high price;
- heavy coating weight.
Advice. Even mosaic plaster, containing only stone chips, places a high load on the supporting base, and for stone chips it is even higher. For this reason, such a mosaic is suitable only for strong, reliable foundations that are not prone to crumbling and shrinking.
Varieties of mosaics
There are three main stone mosaic techniques - Florentine, Roman and Russian. Florentine is used to create artistic images, and is rightfully considered the most difficult to perform. Flat stones of various colors and shapes are used here.

For Roman mosaics, pebbles of light shades and polished, uniform stones of small sizes are used. They are used to lay out geometric patterns, floral patterns on the walls, and make patterned stone paths.

The technique of Russian mosaic appeared later, and it originated in the Urals, famous for its huge deposits of valuable rocks. This technique is distinguished by the fact that stones with a textured surface, unpolished, are used for laying. This mosaic is widely used for finishing interiors and exteriors, as well as in landscape design.

As for the material itself, there are many more varieties of mosaics. Manufacturers offer chips made of marble, granite, onyx, jasper, basalt, limestone and many other stones. Each type has its own characteristics and distinctive features, which determine the choice of material for finishing.
Popular types of mosaics
| Type of stone | Main characteristics |
|---|---|
| Refers to exclusive types of finishing. Stones tend to partially transmit light, making them appear translucent at a certain angle. The palette of shades is very wide - from snow-white to burgundy and almost black, but the most popular stones are sand, beige and golden colors. The shape of the chips is most often square, rectangular and triangular, with a matte and polished surface. Suitable for both interior and exterior decoration |
| An expensive type of finish, distinguished by the widest variety of colors and shapes. There are mosaics that are plain and with a pronounced pattern, textured and polished. Manufacturers produce many options for mosaics on a grid, with chips of regular and natural shape, which allows you to create a unique design of decorative cladding. Marble chips are used in the production of mosaic plaster |
| One of the best types for exterior decoration. Valued for its high strength, resistance to abrasion and aggressive chemicals. The color palette includes various shades of red, gray, green, as well as white and black. The pattern of the stone can be monochromatic or with multi-colored splashes. Granite chips are used to produce mosaic plaster. The material is suitable for both outdoor and indoor use |
| Relatively inexpensive type of finishing. The color of the stone varies from light yellow to red, with brown shades occurring. The rarest and most expensive is white travertine. There are stones with a pronounced pattern on the cut, which further increases the decorative effect of the mosaic. Travertine can be easily sanded and polished, but mosaics with a rough surface in the antique style are more in demand. The material is suitable for indoor and outdoor use |
| An inexpensive and practical type of finishing, although the heaviest. The material is very durable and resistant to various types of influences. The color scheme is gray-black, sometimes there are stones with a greenish tint. Basalt mosaic is widely used in finishing facades and plinths, paths, and floor surfaces. Basalt chips are often included in mosaic plaster. The limited palette is compensated by the shape of the mosaic chips: they are round, square, triangular, in the form of honeycombs and oval granules, with a rough and polished surface |
| A very popular and inexpensive type of finishing made from river and sea pebbles. The stones are color-matched, calibrated and finished with a final polish to impart a soft shine. The color palette is very wide and includes various shades of gray, red, brown and yellow. Most stones have a pronounced pattern. Pebbles are great for cladding exterior walls, foundations, paths, and interior decoration |


DIY stone mosaic installation
Mosaic installation is done in different ways, depending on the type of material. But the requirements for surface quality are the same: the base must be strong, reliable, as smooth and even as possible. The mosaic elements are small, which means that even small flaws will be clearly visible on the finished coating.
Preparing the base
The area intended for mosaic finishing should be cleaned of dirt and dust and carefully inspected for defects. Paint and old plaster must be removed to a solid base, because the load from the mosaic is very significant, and the old coating will not be able to hold it. All cracks, even small ones, must be opened and re-sealed with mortar.


The next step is leveling. The walls are primed, a cement-sand mortar or a purchased plaster mixture is mixed, and it is applied in an even layer over the surface. If unevenness exceeds 10-15 mm, it is recommended to reinforce the plaster layer with mesh. During work, be sure to control the plane of the base with a level. After the plaster has set, it is necessary to grout it with a polyurethane or metal trowel, which will achieve a perfectly smooth surface. You can begin finishing only after the solution has dried.

![]()


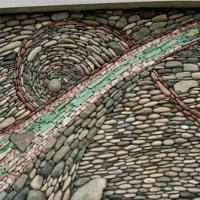
Laying stone mosaics on a grid


Mosaic on mesh, material - marble
In addition to the mosaic itself, you will need:


Step 1. The prepared base must be primed. If the surface absorbs the soil strongly, after the first layer has dried, apply another one.

Step 2. Measure the mosaic sections and make markings on the base to avoid trimming in visible places. You can immediately attach the section to the wall and mark its boundaries with a marker.
Step 3. Mix the glue: pour dry powder into water at room temperature in the proportions indicated on the package. Using a drill with an attachment, mix the composition at low speed for a couple of minutes, then leave for 5 minutes to mature and mix again.
Step 4. Apply glue to the wall with a smooth spatula and spread it so that the layer is about 4 mm thick and uniform over the entire area.

Step 5. Using a notched trowel, grooves are formed in the mortar and a mesh with stone chips is applied. Level the mosaic with your hands, press it to the surface, and then smooth it with a grater with an elastic pad. When facing curved bases, smoothing is done with a thick roller.


Step 6. Lay the next mesh so that the width of the seam between the sections is equal to the width of the seams between the mosaic chips. If the seams differ in width, this immediately catches the eye, and such a mosaic looks sloppy. Having leveled and smoothed the mesh, you need to carefully wipe off the excess glue along the seam with a damp sponge.

Step 7 Having secured the first row, proceed to the second. While the glue has not hardened, the mesh may slide down slightly under the weight of the stones, causing the width of the horizontal seams to decrease. Plastic crosses for tiles, which need to be inserted between the sections immediately after fastening, will help to avoid this.

Step 8. Having completed the cladding, allow the solution to dry completely and begin grouting. The grout mixture is scooped up with a spatula and, holding it at an angle to the surface, the composition is applied in a thin layer. The mixture must be rubbed vigorously over the mosaic to ensure that each seam is tightly packed. The grout should completely cover the finish in a thin layer.

Step 9 Approximately 15-20 minutes after applying the grout, take clean water, a thick foam sponge and wash the mosaic. The water needs to be changed as often as possible so that after drying there are no streaks left on the stones.
When the seams are dry, all that remains is to wipe the mosaic with a dry cloth. At this point the finishing process is considered complete. Further care involves periodically cleaning the cladding from dust and dirt. To do this, just rinse it with clean water.
Laying a mosaic pattern on the wall
This method is slightly different from the one described above; this installation requires more time and skill. In this case, the mosaic must be purchased in bulk (it is sold by weight), selecting several types of stone that are combined with each other. First you need to think carefully about the pattern, draw a sketch, lay the stones on a flat surface without glue and see how the mosaic will look.
If the pebbles are small and the base is monolithic concrete or brickwork, you can do without reinforcing mesh. For large mosaics, especially those made of pebbles, granite and basalt, a mesh is required. The galvanized metal mesh is attached to the wall using disc-shaped dowels, and a thick layer of adhesive solution is applied on top. Next, the creative process begins: the stones are selected by color and size and, one at a time, pressed into the solution at least a third of the thickness. You should work as carefully as possible so that all elements are buried equally, at the same distance from each other, and the pattern is clearly visible.

After laying all the stones, you need to wait at least a day so that the glue has time to dry, and then start grouting as described above.


Finishing with mosaic plaster
Mosaic plaster goes on sale ready for application, and before starting work you just need to mix it so that the crumbs that settle to the bottom are evenly distributed throughout the mass. The base should be pre-coated with a primer containing quartz filler, which will ensure reliable adhesion of the plaster to the surface.


Next, take a little plaster mixture onto a spatula and apply it from bottom to top, pressing the tool firmly against the wall. This plaster cannot be smeared and leveled for a long time, since the crumbs begin to crumble from such actions. Therefore, they apply the composition in one motion, try to smooth everything out with a second, and move on. Having processed about a meter of area, take a foam grater and rub the plaster with light circular movements. In this way the entire area is finished.

After about two weeks, when the coating has gained strength, the surface is treated with a water repellent or transparent stone varnish. This treatment will create additional protection from moisture and enhance the shine of the stone chips.
Video - Mosaic made of natural stone
Video - Laying pebble mosaics
Video - Applying mosaic plaster
The tradition of using natural stone in construction has been preserved in our time. Granite, limestone, tuff and other rocks are successfully used not only in the construction of structures for various purposes, but also in finishing. One of the ways to decorate a constructed building and increase the strength of its structure is stone mosaic.
These are not only standard facing marble or granite slabs, but also colorful original works made from small fragments of different colors and textures. Each designer mosaic made of natural stone is, first of all, a work of art, and it will decorate the building for a long time and tell about the time in which its creator worked.
Material for making mosaics
Everyone can try themselves in this creativity. Having even a small country house or plot, you can create not only beautiful mosaic panels or intricately lay out stone paths from multi-colored pebbles, but also use ready-made modules from stone squares for this purpose. Any stone mosaic can greatly enhance a swimming pool, kitchen flooring or exterior walls. Each job requires certain knowledge and skill, therefore, if you decide to decorate your own house or area with stone mosaics, you should get acquainted with the basics of the craft and try your abilities in making a small
An ordinary walk along the river bank can bring a fairly large supply of various small stones for a future mosaic. Having sorted them by size and color, then thoroughly washed them and cleared them of dirt, you can begin to create a preliminary sketch. Already having the selected material and roughly imagining what a mosaic of stones will look like, you can create a real miracle with your own hands.
Technology of work
There are two technologies for making mosaic coverings. The most accessible and less labor-intensive method is the direct method of pressing individual elements into a viscous base. The reverse method involves laying out a mosaic pattern on a smooth surface and filling the finished painting with a special binding compound. After the solution has set, the product is turned over and cleaned from the front side.

Pebbles rolled in water are an excellent material for making such stone paintings. Pebbles selected by color, shape and size are placed in accordance with the sketch in a wooden or metal frame. A small notch around the perimeter of the entire frame will help the binder hold the mosaic within certain boundaries.
The height of the sides of the frame should be slightly greater than the thickness of the collected stones. Before laying out the mosaic pattern, plywood or cardboard wrapped in paper is placed on the bottom of the frame. A sketch of a future creation can be drawn on it.
Artistic approach
A hand-made mosaic made of natural stone can look different, in accordance with the artist’s imagination, but most often large elements are located in the center of the product in the foreground. Small details look best in the background or in the resulting spaces between large stones. Tweezers may be needed to place the smallest stones.
There is no need to achieve complete similarity with the preliminary sketch. The most important thing is to maintain color proportions and choose pebbles with an original texture. A piece like a stone mosaic will look beautiful and elegant in any case.

Connecting elements
All elements are first placed in a frame without a binder. Having finished drawing the mosaic, you should fix each pebble in its place with any glue. After this, all free spaces on the mosaic and the space between the frame and the stones are filled with epoxy resin. The layer of epoxy resin should be no thicker than 2-3 mm.
After hardening, the mosaic is removed from the frame, turned over and placed on a soft surface. The remnants of the paper backing are cleaned off from the reverse side, and a complete filling is performed. Then a suitable piece of fiberglass is laid out on top of the resin that has not yet had time to harden. A layer of epoxy resin is also applied on top of the fabric material. After hardening, the stone mosaic is turned over face up and covered with a thin layer of colorless varnish.
Other materials and methods
Stone can be made in the same way. Adding bottle or other broken glass to the mosaic design will make it brighter and more elegant.

A more complex art is considered to be a mosaic set of thin polished stone plates. Such work requires cutting stone plates and placing them in a frame that adjusts the size. The technology for making a painting from polished plates is similar to that described above. The only difference is that mosaics made from such stone elements require additional grinding and polishing after production.
In the same way, mosaic elements are laid on a cement base. Mosaics fixed with cement mortar can remain in contact with moisture for a long time.
Anyone can make a beautiful pebble mosaic with their own hands, even those without mastery of the skill; you just need to be patient and bring your ideas to life. Before you start work, you should stock up on the necessary materials.
It is worth immediately noting that there are three types of pebbles - sea, river and lake. Sea pebbles are more durable, which is why they prefer them. Look at the photo for several design options for garden paths.
Pebble patterns will be a beautiful decoration for any interior - they can be laid out on the wall, on borders and on fences.

We create a pebble mosaic with our own hands from natural pebbles
Pebble and stone mosaics are the strongest and most durable. Bound with cement mortar it has an advantage over other materials. It is also much cheaper in cost.
To work you will need:- Natural pebbles.
- River sand.
- Steel mesh with cells 10 x 10 cm.
- Sackcloth.
- Nails.
- Boards.
- Cement.
- Hammer.
- Hacksaw.
- Brush.
- Brush.
- Bucket for glue.
- Before you start work, you should stock up on good craft material - natural pebbles. Stones collected from the banks of reservoirs, mountain slopes and fields should be washed thoroughly in warm water with detergents. Remove any dirt from the cracks with a brush. Sort them by color.
- Dry and sift the river sand.
- Dissolve wood glue in a bucket.
- Sketch the pattern. Then make a formwork 8 - 10 cm high from the boards, and nail a plywood bottom to it.
- Pour sand into the formwork - 3 - 4 cm high.
- Place the stones on top of the sand according to the sketch. They should lie tightly, with their flat edges up.
- Apply glue to the burlap, leaving the edges intact, and place it with the adhesive side on the mosaic. Smooth the burlap on top with your hand.
- After the glue has dried well, turn the burlap over with the stones facing up. If any pebbles fall off, re-glue them back into place. Sweep off any excess with a brush.
- Pour the sand into a bucket, and place the burlap with stones in the formwork.
- Prepare 1 X 2 cement mortar, mix it well and place half of the mortar into the formwork.
- Place steel mesh on top of the cement for reinforcement.
- Place the remaining second part of the cement on the mesh.
- 2 – 3 days, regularly moisten the solution with plenty of water to make it stronger.
- After the mosaic has dried thoroughly, turn it over and moisten it with water, remove the burlap.
- Cover the mosaic with clear varnish.
 We make a stone floor in the bathroom from natural pebbles
Since sea pebbles are the most durable, this is an ideal option for a bathroom; the natural material can withstand high humidity. This floor will look unusual and original.
To work you will need:- Sea pebbles.
- Tile adhesive.
- Rubber spatula with teeth.
- Brush.
- Foam sponge.
Rinse the pebbles well and remove dirt. Then select stones of the same shape and size and plan their placement by color.
The floor should be leveled and primed, after which pebbles can be laid on the floor.
Laying stones.Apply glue to a small area of the floor, 1.5 cm thick, with a notched trowel and begin laying out the pattern according to the intended pattern. The pebbles should lie close to each other. Lightly press them down, sinking them 1/3 into the glue. Once the installation is complete, leave the mosaic for several days until the glue has completely dried. When the glue has dried well, grout using a rubber spatula. After grouting, immediately wipe the entire surface with a wet sponge, leveling the seams and removing excess grout. After two days, the floor can be washed with water, dried and covered with waterproof varnish. After 10 - 12 hours you can walk on the floor.
Such a floor will not only be an original decoration of the bathroom interior, but also a durable and strong product.

If you have accumulated a certain amount of broken tiles at home, you can lay out the floor from them in a similar way.

Video on the topic of the article
Stone mosaic is an original way to decorate any interior. Patterns laid on a canvas made of natural stones allow you to create a unique antique atmosphere in the room. The process of making a mosaic is quite simple, and anyone can make their own special picture on their own.
Stone pictures are an easy way to artistically decorate any surface in the house. Solid natural material has many advantages. You can create your own exclusive drawing at no extra cost.
Stones of any color, shape and size are used for design solutions. The variety of materials allows you to realize a wide variety of ornaments.
An important advantage of using stones for mosaics is their strength. The colorful structure is securely fixed to the cement base. This structure and the special properties of the material make the paintings strong and durable.
Techniques for making stone mosaics
To create a beautiful canvas, you need to select and prepare the basic material. You can use a variety of stones - river, sea, mountain. Hardwoods from the garden or collected in the field are also suitable. It is recommended to use small pebbles - from 1 to 4 centimeters.
Before work, the stone should be prepared:
- remove all dirt using powder and warm water;
- wipe and dry;
- Arrange the finished natural material according to color, shape and size.
After this, you can proceed to creating the selected pattern. To do this, a sketch of the future painting is drawn on cardboard paper. For the further process you will need:
- dried river sand;
- wooden formwork 8 centimeters high and the bottom made of a sheet of plywood;
- adhesive solution;
- paint brush;
- solution of sand and cement in a ratio of 2:1;
- steel mesh with cells 10*10 centimeters;
- canvas is the basis for the painting.
Having made the blanks, you can begin to design the mosaic. Creating a canvas with your own hands is quite simple:
- the formwork lies on a flat surface;
- sand is poured into the middle of it in an even layer of 3-4 centimeters;
- According to the intended drawing, stones of different colors are laid out with flat edges up;
- the prepared canvas is treated with a thick layer of glue so that the edges remain dry;
- the lubricated canvas is carefully applied with the adhesive side to the mosaic;
- the surface is evenly smoothed.
After the glue has completely dried, the base should be carefully lifted and turned over with the stones facing up. If some parts are poorly secured or have fallen off completely, you need to glue them in place.
Sand and dust are removed from the mosaic. The formwork is also completely cleaned and the canvas is laid with stones at the bottom. The top half of the frame is filled with cement mortar. A reinforced mesh is installed on it, and then everything is covered with a second layer of building mixture.
It takes at least three days for the solution to completely harden. During this period, it should be moistened with water daily. After this, the canvas with stones is slightly moistened, and the formwork is completely removed.
The resulting mosaic of stones can be coated with transparent varnish. This painting can decorate any wall in the room. And your own design of the stone canvas will allow you to add a special unique look to the interior.
If you want to create a very unusual interior in your home, and at the same time want to avoid additional significant costs for its creation, the optimal solution for you will be a stone mosaic made by yourself.
This is what the stone mosaic options look like; with your own hands you can fully experience the “beauty” of the surface of the material. Touch it and tactilely determine what type of surface you like, and choose it for implementation
Mosaic made of stones, as an interior detail, has been known to us since ancient times. Its main advantage is the ability to create almost any design from such available material as stones. At the same time, the costs of its creation will be minimal. The existing variety of types of stones (white and black are most often used, the background version is made of gray stone) provides enormous scope for flight of imagination. In addition, this type of interior is much more durable than all others.
Manufacturing technique
| The process of making a stone mosaic is quite interesting and funny. You can do this work with your own hands and even involve children in the “game”... Take the widest spatula in front of this size |
Now, let’s look at the technique of making mosaics point by point:
|
Traditional natural stone tiles are practically no different from laying glass or tile mosaics. Above was a description of the production of decorative mosaics for the interior with a base. This will be quite a labor-intensive job, since epoxy grout is used, which is difficult to wash out and requires a certain skill. You should not use simple cement grout, since after water gets in, the seam will not hold each element of this mosaic firmly enough. Grouting stone mosaics is an important stage of work. For example, if the mosaic is laid on the floor and grouted with cement, then the chipping process will begin very quickly and the tesserae will simply fly off, first one at a time, and then in batches. We don’t need to re-purchase material and make repairs!
 We recommend that you do not deviate from the technology; laying natural stone mosaics on the wall and floor should be carried out according to the instructions; in the photo, the master “tapping” the material so that it is immersed in the glue and firmly fixed
 Why choose mosaic
Mosaic finishing is probably the most effective finishing option. A large number of small fragments, with the help of which various patterns are created, attract both near and far and thus decorate the surface of any home. At the same time, stone mosaics can also be used for exterior cladding of a house, resulting in a large number of options for colors, shapes and textures.
Stone mosaics are small pieces of processed stone that have different shapes: square, rectangle, polyhedron, oval, circle. The simplest option is oval stones, popularly called pebbles. A professional version of stone mosaics are square tesserae (chips) ranging in size from 1 to 5 cm, up to 20 mm thick, or in the form of bricks, ranging in size from 1x3 cm to 2x6.
You can use any type of stone for stone mosaics:
- Marble
- Granite
- Basalt
- Quartzite
- Travertine
- Limestone
- Sandstone
- Dolomite, etc.
At the same time, mosaics made from hard rocks are used for exterior decoration, and mosaics from soft rocks are used for interior and decorative decoration.
You can choose the surface to suit your taste; there are absolutely smooth, rough, rough and pre-polished options. The process by which a stone is made smooth and shiny is called polishing. For a rough rough surface, technology is used, either tumbling or sandblasting (both options are performed with a special apparatus). It’s more pleasant to lay polished stone mosaics with your own hands.
How long does it take to produce
In order to make a mosaic panel according to a specific pattern, say 1x1, a specialist will need less than one day. A student can spend up to 1 month on such work, because this is a very painstaking work that requires time, attention, and patience to arrange the stones in a certain pattern. The drawing is first assembled into certain parts; craftsmen call the assembly canvas a matrix, and only then the assembled part can be glued. Very rarely, assembly is done simultaneously with gluing. The process is not that simple. Both the initial assembly and the process of laying and grouting are complex. Therefore, try to plan the order of the mosaic panel in advance, and if you are planning to make it yourself, then stock up on time and patience, the work ahead will be long.
For newbies! Novice mosaicists imagine the process to be quite simple and think that the mosaic can be selected and laid immediately on the spot, without preliminary laying out, but this process of laying a stone mosaic with your own hands is indeed possible without preliminary work, but only for very professional artists. You need to start creating a stone mosaic with preliminary layout and templates!
Other finishing options
If there is no time for finishing, then you can use a subtype of stone mosaic - mosaic stone plaster. It consists of stone chips of different types, which are bonded using acrylic.
The grain of stone chips is divided into groups of granules of different diameters:
- 0.5 mm (fine grain);
- 0.5 – 1 mm (fine-grained);
- 1 – 2.5 mm (medium grain);
- 2.5 – 3.5 mm (coarse-grained).
These granules, with the help of special processing, have spherical shapes, which give the surface smoothness and eliminate the likelihood of injury from sharp corners of the stone.
Stone plaster can be of different colors, which allows you to create different effects on the surface that is finished with this material.
Application of stone plaster
Hard rock can be used for exterior decoration and therefore hard rock plaster (most often the composition of such crumbs is marble and granite) can be used for the facade of a building. Such material, using acrylic binder glue, becomes another reinforcing layer, which will improve the resistance of the building walls from natural grinding (in the form of rain, snow, wind and sun).
|
It is necessary to highlight all the advantages of such plaster:
|
Pros and cons of stone mosaic
Is stone mosaic valuable? There are other materials that are cheaper and look no worse, and sometimes brighter and more attractive. In order to deal with this issue, you need to understand what the advantages of this material are.
The material belongs to the BIO category, i.e. environmentally friendly. Stone is a natural material that does not contain aggressive or hazardous substances to human health. That's a plus.
The stone has great strength, which understandably affects the durability of its use. It withstands temperature changes, freezing, has virtually no water absorption and is not subject to destruction from ultraviolet radiation. Stone mosaic retains all these properties. This is also a plus.
Natural beauty and attractiveness allows designers to rely on this material when creating decorative objects. Mosaic only enhances the beauty of the realized object, especially due to the mosaic pattern, small details and a large number of colors. We also put a plus.
Installation without problems is typical for all types of mosaics. The technique of laying stone mosaics requires skill, but it is still simple, especially if the mosaic is already glued to mesh or paper. The main thing is to use two-component glue so that the material sticks forever. Previously they described how to trowel a stone mosaic, although the process requires patience, but they are available for laying a stone mosaic with your own hands. And again a plus.
Please note that any stone decoration of load-bearing structures carries a load on them. For stone mosaic plaster it is high, for stone mosaic it is even higher. Therefore, carry out installation only on a strong base, which has been treated in advance to prevent shedding and subsidence.
What types of mosaics can you choose?
There are not so many stone mosaic techniques:
- Florentine
- Roman
- Russian
The first technique is used for artistic products and images, it is very difficult to implement. To complete it, you need many stones with different colors and shapes.
The second technique is used to create geometrically correct designs and patterns, using homogeneous light polished stones, mostly small in size.
The third technique is the simplest; stone with a textured, unpolished surface is used to create mosaics. This technique is used mainly for finishing interiors, exteriors and in landscape design, and not for creating art objects.
Attention! There are a large number of manufacturers on the market that offer a variety of stone types. However, this product does not require certification. Nevertheless, you need to obtain a specification for the material you are purchasing in order to be sure that it is a stone and not its analogue.
What is offered and what is chosen
The choice of mosaics is quite large, so we will touch on the most popular ones for artwork and decoration.
Onyx stone mosaic
High-end mosaic, a very expensive option, since onyx is a semi-precious stone. Due to the fact that the stones skip counting, products made from them appear translucent at certain angles. You can choose colors from a fairly large palette.
Available in: white, snow white, ivory, beige, burgundy, gold, honey, black, etc. For mosaics, stones of regular shape, matte or polished, are used. Suitable for interiors and exteriors.
Marble stone mosaic
Used for luxury finishing of interiors and exteriors. Its use allows you to create interiors worthy of glossy magazines and museums. This material is mass produced and is most often glued onto a mesh. A large amount of chemicals are also produced for it for treatment during operation. Crumbs from this stone are used in so-called mosaic plaster.
Granite mosaic
One of the most durable options offered on the market today. The highest score for abrasion and resistance to aggressive environments. Can be used on both walls and floors, both inside and outside the home.
Travertine stone mosaic
Compared to the above, it is considered a democratic option. It can be in different colors, one of the most popular is the Noce color. This mosaic is the easiest to process and cut. Mainly used to create interiors in antique style. It can be used both inside and outside the house, but special impregnation is recommended so that the stone does not collapse under the influence of moisture.
Basalt mosaic
One of the heaviest stones to consider when finishing. Refers to a material that can withstand any weather conditions. That is why basalt mosaics are found on the facades and plinths of buildings, and are used for paths and flooring. Crumbs from this stone are also mixed into mosaic plaster. The color palette is quite narrow, so manufacturers often experiment with the shape of tesserae: round, square, triangular, round, oval. It is most often produced in two surfaces: rough and polished.
Pebble mosaic
You can buy river and sea pebbles for finishing. These stones are usually calibrated in size and color, polished and sold as such. Finished products are quite rare, and there is not much interest in such mosaic options. This mosaic is suitable for cladding the walls of a house, foundation, plinth, and for certain types of artistic work.