DIY antennas. Kharchenko antenna: calculation and manufacture Drawing with dimensions of a directional antenna 3g 4g
Now in amateur radio practice, antennas for amplifying 3G, 4G, Wi-Fi signals of the “Biquadrat” type are very common.
Such an antenna has a directional effect, which may not always be an advantage, but even a disadvantage. An example is this: you need to strengthen the signal of your router so that you can catch it in any part of your house. If you use a directional antenna, the signal will most likely be well accessible only within the field of action of this antenna. Surely there will be only one room where it will be directed. It is good to use such an antenna only for long-distance communications, provided that you know where to point it.
To strengthen your WI-FI signal in all directions, an antenna is suitable, which I will show you. Its directivity characteristics are close to those of a whip antenna, with the exception of greater sensitivity.
In structure, it is actually the same biquadrate, only twice directed in opposite directions. Plus, this antenna is many times simpler than a classic biquad antenna, since it has neither a stand nor a reflector.

How to calculate an antenna?
Just please don't be scared, fifth grade math. We only need to calculate one arm since the antenna is square. But first we need to find out at what frequency we will make the antenna. Personally, in the example I will do it under WI-FI. It is known that the Wi-Fi frequency is approximately 2.4 GHz or 2400 MHz (there is also an even more modern Wi-Fi - 5500 MHz). If you do it under 3G - 2100 MHz, and 4G (YOTA) - 2600 MHz.We take the speed of propagation of radio waves (300,000 km/s) and divide by the desired frequency (2400 MHz) in kilohertz.
300.000/2.400.000 = 0.125 m
This is how we got the wavelength. Now divide by four and get the length of the arm of the square.
0.125/4 will approximately turn out to be 0.0315 m. Let's convert it to millimeters for convenience and get 31.5 mm.
Making a simple DIY Wi-Fi antenna
Brem thick wire 2-3 mm thick. And a template cut from a piece of aluminum. You can, of course, do without it, but it’s easier with it.

We bend two loops from one wire and two from the other. The gap should be between the squares.


Then, I temporarily fix the squares crosswise with masking tape to make soldering easier. And I solder the middle on top so that the structure becomes rigid.


Now you need to take a thick piece of cable with a connector (you can take it from the same whip antenna).


Insert the antenna inside and solder it. The middle wire goes to the top, and the lower arms of the squares go to the common wire.


The antenna is ready. To finish, you can fill the solder joint with hot glue and paint it.
Antenna tests
Let's compare the signal strength with the whip antenna that originally came with the router.
Whip antenna:

Now in comparison. The first one is pin and then our omnidirectional biquad.

It can be seen that our antenna receives and amplifies the signal 30% better. Here is the result of the work.
A good signal level is the key to high Internet speed, and therefore the key to stable operation. 30 percent is a very high figure, considering the fact that nothing had to be changed radically.
Make your own simple antenna for 3G, 4G or Wi-Fi and no longer suffer with an unstable and weak signal.
Provides enormous opportunities for communications, business, entertainment, communication and much more. Thanks to the advent of cellular communications, and then 3G technologies, mobile Internet has become a well-known and popular phenomenon, attracting people with its speed and convenience.
Large populated areas and megalopolises have long been covered with frequency waves that have a binary code. People nowadays increasingly need access to a source of information, and therefore they are increasingly using wireless network access.
Active external antenna
Although every factory or company engaged in similar technologies has a wide range of products, in the modern domestic market it is quite difficult to buy an antenna to improve the 3G signal. There are practically no such antennas in retail sales, and if you can find them, the price will be high, since they are a one-piece product and have no competition.
Most people have no idea what such a mechanism might look like or how to connect it to a modem.
Types of antennas
The external antenna for a 3G modem comes in two types: directional and omnidirectional.
The first type of device has powerful amplification indicators and an acceptable cost. The signal strength here depends on the number of components present on the waveguide. The common type of Yagi antenna has fifteen elements. This device can amplify the signal frequency up to 21 dBi. Its only drawback is its narrow beam, i.e., to receive a signal it will be necessary to accurately catch the frequency source, called the base station. That's why experts gave it the name - a directional antenna for a 3G modem.
Another kind
There is a model of directional action in the form of a panel. Its design feature is that it looks like a square or rectangular surface, inside of which there is a waveguide attached to a foil PCB. It happens that such a directional antenna for a 3G modem is made from two metal panels, one of which serves as a reflector, and the other as a radiation source.
With large dimensions, such a device can provide a high percentage of gain, about 25 dBi, but its cost will be slightly higher than that of a direct model. The radiation here is not so narrow, but nevertheless you also need to know where the base station is located and point the antenna in that direction.

External 3G antenna for USB modem, omnidirectional
This device is a vertical waveguide. They can be seen in taxis, on the radio, Wi-Fi system and so on. They are also often called circular. As a rule, due to their simple design, they have a lower price. Their power depends on the length of the antenna. Most of these devices can pick up a frequency of 15-17 dBi and no more, since a more powerful source requires a greater length, comparable to a pole, which, when swayed by the wind, loses the signal beam. If the code radiation station is nearby and there is still a 3G beam, albeit intermittently, then such an active external antenna is suitable for home use. But if the source is located far away, and the frequency coverage is worse than ever, then you will have to use a directional antenna.
Mechanism for connecting external antennas to the modem
The connection issue is not as simple as it seems at first glance. After all, a 3G modem with a connector for an external antenna cannot be connected without losing signal quality. Manufacturers of stationary modems create their devices mainly with a CRC9 connector. For example, the Huawei E352 modem, which is often used by Megafon operators. It has just such an input for an external antenna.
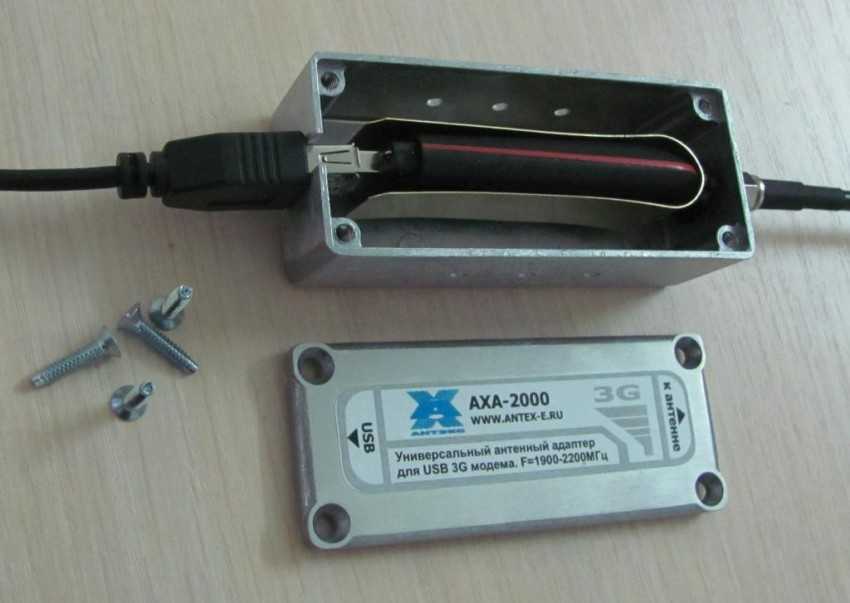
However, most external communication sources have FME, SMA, N-Type and other connectors that do not fit into the antenna plug. So, after all, how to connect an external antenna to a 3G modem? To solve this issue, you will need a special antenna adapter. It has a CRC9 connector on one end and what is needed for external signal sources on the other.
This adapter is not easy to find, and its price is 500-800 rubles. True, there are antennas on sale with a ready-made CRC9 connector, but they have one significant drawback - the maximum cord length is only one meter. Therefore, such devices are used only in the room, and not outside, to obtain a stable signal.
But there are other, popular ways to connect a 3G modem with a connector for an external antenna, and thereby improve and strengthen the signal frequency.

Basic signal property
An external antenna for a 3G modem bought in a store, the price of which ranges from 650-800 rubles and above, according to many experts, is not a good option, because it is not cheap, and the connectors are not suitable for all modems, as mentioned above. Also, the adapter itself costs a lot. So the game is not always worth the candle.
Most experts argue that the main point in the efficiency of signal reception is not the percentages shown by the modem program, not the various data in decibels, but the access speed.
Connecting a 3G signal depends on many features - how busy the slots are, how active subscribers are, weather conditions, distance to the base source, and so on.
DIY amplifier
An external antenna for a 3G modem, the price of which, as we see, is quite considerable, is not affordable for everyone, and finding a suitable one is problematic. Therefore, our folk craftsmen are inventing various ways to improve the quality of the captured signal. And what’s most interesting is that they succeed! They share some powerful ways with other people.

Handy items
The simplest option for amplifying the signal is to use ordinary copper wire, which needs to be wound around the end of the modem in four turns. Why do they wrap it around the end? Because there is a built-in internal signal receiver.
This kind of external antenna for a 3G modem really increases the speed and quality of the resulting binary code. However, it also has its disadvantages. In order for everything to work as it should, you must carefully select the number of turns, the thickness of the wire and the length of the free end. All these parameters are different for each modem and location. For example, there are cases when one unnecessary turn can only worsen the quality of the received signal.
Another way to strengthen the 3G modem, suggested by people, is to use a colander or a saucepan. Such experimenters can create entire systems from kitchen utensils, various metal screens and satellite dishes. It is easier to pick up a signal using a pan than through a wire, but it will take much more time.

Other ways to create antennas for modems
Often, when purchasing a modem, you can find a special extension cord with a piece of tape at the end for attaching it to a wall or window. However, the quality of work of such a “gadget” will be equivalent to the effect of a wound copper wire.
“Can” signal amplifiers for 3G and 4G modems are much more popular. This “technology” comes from the Wi-Fi network, where users can stretch the network coverage over a decent area. How to make such an amplifier?
For such work, you will need a simple tin can, for example, a coffee can. At a certain distance from the bottom, it is necessary to drill a hole for a standard antenna socket. The waveguide wire is soldered to it. A TV cable with the necessary connectors and an antenna adapter to the modem are connected to this socket.
If the mobile device does not have the necessary connectors, then craftsmen advise inserting the modem itself into the hole of the can so that it fits tightly there.
Naturally, such devices are inconvenient, since you will have to walk around the entire apartment or house with them in search of the best signal.
Laserdisc - mobile device amplifier
To make an external antenna for a 3G modem from CDs or DVDs, you need the disk itself with a mount for a flash drive, a 3- or 5-meter extension cord with female-male USB sockets, outside the window where the “dish” will hang, make a mount.
Thus, a disk with a modem and an extension cord is mounted on the glass outside or inside, depending on weather conditions, and the other is connected to a laptop or personal computer.
As many users who have tried this technology have noticed, the signal quality really improves compared to what it was before. If you use something larger instead of a small laser disk, then the signal will increase significantly.

How to choose a signal amplifier?
Before selecting an amplifier, you must first determine the standard frequency level of the code source. To do this, do the following:
- Using a mobile phone, you can find out where the signal is strongest by walking with it in and around your home.
- You can also go with a laptop, which, especially in modern models, has a 3G connection indicator.
- We put on the paper a couple of points where the signal is the best.
- We check these points in height.
- We stop at one position.

An external antenna for a 3G modem, which can be purchased or made using the above methods, does not always bring the desired result. Some electronics engineers and specialists recommend assembling a device called a “Kharchenko amplifier.”
Many users speak positively about this device, emphasizing its good results.
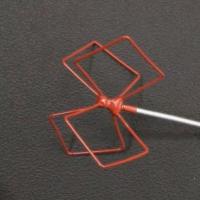
In order to create such an antenna, you should take a thick copper wire and bend it in the form of two rhombuses, connecting to each other at one of its corners. The main thing is that you get exactly rhombuses with angles of 120°, and not some other shapes. This is necessary to reduce internal resistance.
A high-frequency cable with a feeder, which is screwed onto it, is soldered to the amplifier. Separately, a small piece of copper wire is soldered to this very component.
To improve the effect, a metal plate (reflector) made of foil PCB 12 x 13.5 cm is added to the device. The distance between the reflector and the antenna should be about 35-36 mm. To do this, you can use a deodorant cap, which is attached to the antenna using hot-melt adhesive. Then we connect such an amplifier to the modem using an adapter or coils around the device, as we described at the beginning of the article.
Bottom line
What conclusion can be drawn from all of the above? The best type of Internet connection is cable. It is more reliable, stable, faster and provides greater opportunities. But there’s one problem - you can’t take it to the country or on a trip.
On the road or on vacation, mobile Internet is a good option. However, not everyone can afford wide-screen communicators and smartphones to conveniently view any pages of the World Wide Web. Therefore, as an alternative to cable Internet and mobile, communication through special modems was invented.
They are good where there is no cable Internet, but there is a desire to view web resources on a normal screen. This 3G modem, reviews of which most often indicate insufficient power, also has its own disadvantages.
It would seem that you take a modem and go wherever you want - there will be access to the Internet everywhere. It turned out that this is not entirely true. When you are in or near a city, where network coverage is stable and stable, you practically do not notice its problems, which is what users note. But as soon as you move several tens of kilometers from the source base, all its disadvantages immediately appear, the main one being a weak and intermittent communication signal. Therefore, many craftsmen themselves have come up with and advise others to save the situation with a homemade device known as an external 3G antenna for a USB modem, giving preference to it because of its low cost and better quality than purchased antennas.
A convenient device for accessing the Internet is the so-called USB modem, based on 3G mobile communication technology and more modern 4th generation technology.
The difference in 3G and 4G technology mainly lies in the data transfer speed. So the maximum 3G speed is 15-20 Mb/sec, while the 4th generation offers transfer speeds of up to 100 Mb/sec. Technically, there is a difference in transmission frequency and in a number of other general technical parameters. Currently, almost all mobile Internet operators: MTS, Beeline, Megafon and Tele2 present both GSM, 3G and 4G modem technologies. The technical support of 3G and LTE differs, so 4G has its own operating frequency.
The dependence of an Internet connection using 3G technology on many factors leads to the fact that it is often necessary to use signal amplifiers. What can we say about a 4G LTE connection, which is even more demanding on signal quality.
General principles of signal amplification
There are several ways to increase signal strength and create a stable connection:
- Install the USB modem as close to the transmitting station as possible, raise it higher, bring it to the window;
- Buy a signal amplification system produced by industrial methods;
- Create an external receiving antenna yourself, using available materials, tin from food cans or copper wire in a Kharchenko biquadrat.

The signal amplifier operates according to the following scheme:
- The external 3 g antenna for the modem picks up a weak signal from the mobile communication transmitting station;
- The signal is sent to the repeater, if available;
- The amplified signal from the repeater is sent to the modem.
It should be noted that when making an antenna with your own hands, a repeater is usually not used. How to make an antenna? More on this below.
Important! The signal quality is affected by the length of the cable from the computer to the modem. The shorter this wire, the better the reception.
Types of antennas
Various materials are suitable for use as working materials, but copper alloys are preferred. Although in some cases coffee cans worked great. The cable is shown to be used for television, high frequency. A DIY antenna for a 3g modem is easy, but the time and labor costs are proportional to its effectiveness.

Types of execution:
- An amplifier made from an ordinary tin of coffee or canned food, hung on a high-frequency cable outside the window opening. In this case, 3-4 turns of wire are wound onto the modem itself. The disadvantages are the unpresentable appearance and bulkiness; on the other hand, the can antenna for the modem is unpretentious and easy to manufacture;
- Using a tin can as a reflector, in this case a white metal food can is used as the antenna. A hole is made in the side wall of the can exactly along the cross-section of the modem box. After which the modem is simply inserted into the jar. For temporary fixation, you can use regular plasticine or chewing gum. Good fixation is achieved by using cold welding. The modem itself is connected to a laptop or computer using a cable. This DIY 3g antenna option is more effective than the one described above and can give up to 20% increase;
- Use as a satellite dish reflector. Quite an interesting method, but it requires quite a long and tedious setup of the modem’s location relative to the focus of the dish. In addition, it will no longer be possible to use the dish as a television dish, since if a modem is installed, it must be directed towards the station. In this case, it is necessary to isolate the modem from the external environment. The method is complex, but if the transmitting station is visible, where it is enough to direct it, it produces an excellent result;
- Using a 3g directional antenna - this can be either a self-made antenna or a television antenna; the calculation of this antenna circuit is complicated, so it is recommended to use a factory-made 3g antenna. You can disassemble the whip antenna and use parts from it. Directional antennas are quite good, although they have their drawbacks;
- Using a biquad antenna. The Kharchenko antenna has been known since the 60s of the last century. In terms of quality and efficiency, it has performed well during its long service. The Kharchenko antenna for a 3g modem consists of two open rhombuses connected to each other at one angle. Behind the frame there is a reflector, which can be made from a sheet of tin or a copper alloy. The homemade 3g antenna showed excellent results in terms of efficiency and manufacturing costs. Antenna location: the higher, the more stable the signal: there is no better place than the roof of a multi-story building. The direction of the antenna is selected experimentally. You will have to point the antenna manually. Biquadrat Kharchenko receives signals three and four G quite well.

Important! When soldering, take into account the characteristics of the metal, as most modern cables are quite poorly soldered, but there are feeders of excellent design that are easy and simple to solder. Don't forget that using them will make life easier in different cases.
Connecting the antenna to the modem
It is best to use a high-frequency television cable to connect the antenna and connector. It is best to connect the antenna elements and cable by soldering; this achieves the required connection density.
There are several options for connecting the modem to an external antenna:
- You can connect the connector to the antenna by simply winding turns of bare wire around the modem body - not the most successful, but a very fast option;
- Creating a highly effective removable connection, in this case you need a sheet of copper foil, which is carefully wrapped around the connector and marked with a slight overlap. After which the strip of foil is soldered along its length and one end part is sealed. The cable coming from the antenna is soldered to this case on top. On top, at a distance of 5 mm, another strip of foil is soldered, serving as a screen. The efficiency of such a connection between a USB modem and an antenna will be much higher than winding a wire around the modem. This is a fairly good connection system, perhaps the best;
- The most effective option would be to use a standard antenna adapter, but, unfortunately, this method is only suitable for a connector that has the ability to connect an external amplifier.
Important! It should be noted that if you have skills in soldering thin parts, you can disassemble the modem itself and solder the antenna lead directly to the internal antenna. A test of this method shows a significant improvement in signal. But this method is not recommended for use without sufficient skill in working with microcircuits.

Making a Kharchenko antenna for a modem
The 3G modem operates at a frequency of 2100 MHz. Based on the necessary calculations, the general circuit of the 3 g antenna consists of two rhombuses connected by a central solder. The dimensions of the side of the rhombus are 35 mm, the diameter of the copper wire is 2-4 mm, the outer angle of the rhombus is 120 degrees, and the error should be minimal.
The Kharchenko antenna for a 3g modem is quite easy to make with your own hands; the relative difficulty lies only in calculating the parameters and finding the necessary materials. It is this 4g antenna that is shown to all fans of surfing the Internet in hard-to-reach places.
Armed with a ruler, a protractor and metal scissors, we cut the wire. To bend the antenna frame and make it easier to solder, you can make a simple conductor; for this you need a circuit. Using a protractor and a ruler, we mark the wooden board according to the diagram, according to the required dimensions. We drive 4 nails or self-tapping screws into the corners of the diamond, and then wind the straightened wire onto them.
The distance between the lower and upper frame at the junction should be no more than 3 mm. In this place we solder the end of the high-frequency cable, covered with a feeder. The presence of a feeder will allow you to solder the wire to the frame without any problems, since most modern wires are quite difficult to solder using conventional methods.

For greater efficiency, a plate of copper foil or foil PCB is installed at a distance of 3-5 cm from behind. This is a reflector. In order to maintain a constant distance between the frame and the deflector, we install a dielectric gasket or pin of the required thickness at the connection point. We attach the frame and deflector to it. Don't forget about insulating the pin. Thus, the gasket is the connecting link of the antenna, the requirements for it are appropriate.
In some cases, it is possible to add a third and fourth diamond to the antenna to improve a very weak signal.
Since the main part of the device’s operation will take place outdoors under the influence of rain, wind and temperature changes, it should be coated with a layer of nitro varnish before use. This will protect the frame and reflector from moisture.

If necessary, the parameters are calculated for the required frequency. Calculating the antenna is not difficult. Currently, an online calculator is sufficient to calculate the biquadrat parameters for a 4g modem. Then we connect the cable to the modem according to the recipe, and the amplifier is ready.
Video
The author shares his experience of improving the quality of home Internet after incomprehensible actions of the Beeline provider. The Internet in the country house has always been available and was quite fast, but in 2016, interruptions in speed began, and sometimes a complete loss of signal with the cessation of stable communication for several hours. The solution to the problem had a price of 1,400 rubles (2016). An antenna for the USB modem was selected, purchased and installed. I managed to connect and configure everything myself. The result is almost the maximum speed of mobile 3G Internet from the provider and an insignificant influence of weather conditions on the data transfer speed. There is no 4G signal in my area.
3G/4G budget antenna for USB modem and reliable Internet
 3G 4G Wi-Fi antenna
 Before purchasing the antenna, the situation with mobile Internet was studied. This allowed us to make an assumption about the problems occurring. In my area there are four mobile operators Beeline, Megafon, MTS and Tele2. In 2016, all of them provided 3G Internet services. A comparison of coverage maps showed that the place where I am falls into a dead zone. And the cards are carbon copies. Although there are 3 cell masts nearby, literally in direct visibility. A study of the area led to the conclusion that all operators broadcast from one mast, which is behind the hill:(. The hill is hill, but the 3G signal on the second floor of the house was from Beeline and was completely absent from Megafon. Tele2 was not studied, MTS for former merits and mistrust was not was studied in principle. Solving the problem did not require any mental effort. I have had experience working with antennas for the 980 MHz band since 2000 (some of them can still work now). The requirements for choosing antennas are as follows: the antenna must be made of aluminum alloy (less corrosive and lightweight ), highly directional, have maximum gain, easy to install, have a cable of sufficient length and the kit should include an adapter for connecting to the antenna. And naturally, the antenna should not be expensive.
The choice was made in favor of the antenna "Ultra 3G/4G" , which works with 3G and 4G modems. The antenna is made of aluminum alloys protected from atmospheric influences by powder paint.
Antenna "Ultra 3G/4G" description
The Ultra 3G/4G antenna is a directional antenna for 3G (UMTS2100/WCDMA/HSPA/HSPA+), 4G (LTE2600 FDD Band7/Band38) and WiFi (IEEE802.11b/g/n) networks.

 Ultra 3G/4G Antenna
 Ultra 3G/4G Antenna
 Ultra 3G/4G Antenna
 Ultra 3G/4G Antenna


 Mounting kit
 Technical data and characteristics
- Operating frequency range 1800..2700 MHz
- Gain 12…18 dB
- Drop cable length 5 m
- Dimensions assembled 1010x110x70 m
- Antenna weight 0.8 kg
The antenna is supplied unassembled
Assembling, installing and tuning the antenna
According to the instructions supplied with the antenna, we assemble the antenna sheet. See photos and videos. This antenna may contain a small ambush in the form of a manufacturing defect. It is better to identify and eliminate defects at the assembly stage. Watch a video on troubleshooting or repairing the Ultra 3G/4G antenna.
Based on experience in operating antennas, it is a good idea to protect all joints of parts from precipitation using reinforced tape, or it is better to cover these problem areas with automotive sealant.

 Antenna assembly
 Antenna assembly
 Protecting Antenna Connections
 Defective soldering of the central core
 Soldering the central core
 Before installing the antenna regularly at the highest place, it is better to conduct research and establish from which direction the Internet is coming to you. To determine the direction, a number of actions must be taken.
- I used my laptop. I downloaded the signal level monitoring program from the manufacturer’s website MDMA .
- I connected the modem to the laptop and launched the program. I set up a program to determine the signal level on the modem.
- I connected the antenna via an adapter to the modem.
- As indicated above, you may find the signal for distributing communication packets not where, according to your logic, it should be. This is what happened to me too. The antenna was kept in working position in each direction until the signal level was updated on the screen. I scanned the horizon literally 5 degrees at a time. In my case, the signal was only detected from one direction and from the farthest mast. I remembered the landmark on the horizon where the antenna was pointed.


 Signal strength with antenna
 Next, you need to choose a location to install the antenna at the highest possible height. In my case, raising the antenna two meters higher from the initial direction determination measurement led to a noticeable increase in the signal level. There should be no metal obstacles in front of the antenna (metal roofs, fences)
In my case, I installed the antenna on a steel TV antenna bracket. Pay attention to the condition of the steel bracket after 15 years of use. The antenna was attached to the bracket using the mounting kit supplied with the antenna, using a U-shaped clamp (bracket). The antenna was fixed in the direction of the established landmark. Just in case, the accuracy of the direction was checked again - the peak of the signal corresponded to the selected direction.

 Assembling the Mounting Bracket
 Many people in the modern world use the mobile Internet - with the help of it a person can communicate remotely, receive information and even work. But the provider does not always provide users with a stable connection speed due to the characteristics of communication reception, which may be limited by terrain features, a large distance to the transmitter, and other factors.
A homemade antenna for a 3g modem will help you improve the speed and range of signal reception. We offer you several instructions on how to make an antenna for a 3G modem with your own hands.

Kharchenko's method
We recently wrote how to make an antenna for television reception with your own hands. But did you know that you can make a homemade antenna for a 3G modem in a similar way?

We will need:
- Copper wire or wire, you will need a section of about 30 centimeters;
- Coaxial cable with a resistance of 50 or 75 Ohms;
- A piece of foil or DVD as a reflector;
- Tools: knife, soldering iron, pliers, glue, ruler and pencil;
- Plastic bottle cap to separate the antenna from the reflector.


Production of biquadrat Kharchenko
In photographs of homemade antennas for 3G modems you can see its approximate appearance. First, you need to make markings on the copper wire with a pencil: the length of the outer side of each square should be approximately 35-36 mm.

Carefully bend the wire along the markings, helping yourself with pliers. You should get a symmetrical design of two squares touching at the corners. Remove the remaining pieces of wire.

Make a hole in the cover and insert the end of the cable into it. Separate the cable, exposing the inner conductor and shield for soldering.

Next, you should solder the antenna to the cable and connect it to the modem. Soldering proceeds as follows: solder the central core to the middle of the antenna on one side, and the screen on the other. Then move the cover towards the antenna; you can further strengthen and insulate the structure with glue or sealant.

Insert the reflector disk into the wire through the hole, move it towards the antenna and glue it to the cover. Solder the connector to the cable on the other side for connecting to the modem. Connect the antenna to the modem. Enjoy the results of your work!

Double ring antenna
The next method of creating a homemade antenna is more difficult to implement, but gives a greater effect. To complete it you will need:
- Copper wire or wire;
- Reflector - a flat long tin can, a piece of foil, etc.;
- Coaxial cable with a resistance of 75 Ohms;
- A short metal tube into which a cable can be threaded;
- Connector for connecting the antenna to the modem;
- Tools: soldering iron, knife, ruler and pencil.

Detailed manufacturing instructions:
- Look on the Internet for a Bi-Loop antenna diagram for a 3g modem - on it you will see a design similar to the Kharchenko antenna, but in the form of two rings;
- Make markings on the wire with a pencil: for waves with a length of 2050 MHz, the length of each ring should be approximately 146 mm;
- Carefully bend the wire into a double ring. You can also make two rings with gaps approximately 3mm long and solder them end to end, leaving the gaps open;
- Make a reflector. Minimum dimensions: height - 120 mm, width - 170 mm. Any metal panel will do; you can use foil or tin from a tin can if you have available materials;
- Make a hole in the middle of the reflector through which to insert a metal tube - from the side connecting to the antenna, the length of the tube should be approximately 18 mm! Solder the tube to the reflector on the other side;
- Separate the cable with a knife: the screen should be soldered and the conductor should be slightly exposed;
- Pass the cable into the tube and solder the antenna to it: the upper part should be soldered to the conductor, and the lower part to the copper tube;
- Solder the tube and cable braid;
- Additionally, to strengthen the signal, you can use a satellite dish by installing a ready-made antenna on the bracket;
- The other end of the cable should be connected to the modem connector using a soldering iron;
- Connect the antenna to the modem. Ready!

Now you know several ways to make an antenna for a 3G modem with your own hands. The above methods should help you solve problems with low Internet connection speed.

Photo of antennas for 3g modem