Original do-it-yourself metal products. Metal products - we decorate the house and yard with our own hands. Metal products with steel wire
Every owner spends a lot of time thinking about how to decorate their home. Today there is a huge choice of materials - wood or plastic, but in the first place is metal - one of the durable, strong, resistant materials in the world, serving as an example and standard of metaphors.
History of origin
Metal products became most popular in Europe in the 11th century. Everywhere, facades of buildings, fences, and decorative statues began to be decorated with unusual forging, and the profession of a blacksmith became an honorable and famous figure in the early Middle Ages.

What kind of craft can be made from metal?
Having thought carefully, the owner decides to present a piece of the unusual to his home, but the question immediately arises: should he buy it or make it himself? Of course, do it yourself, because doing something with your own hands is much more pleasant and more profitable from a price point of view.

Today, forged ornaments for grilles, doors or fences are in fashion; forged animals, a mysterious owl, or a Russian bear also look great in the garden. Ladies prefer forged bouquets, and a rose created with their own hands will surprise anyone.

What do you need to make metal crafts?
There are not as many tools as it seems, all you need is the following list:
- Photo of a craft you like;
- Paper;
- Welding machine;
- Chisel and hammer;
- Grinder for cutting metal;
- Special rust solvent;
- Pencil and scissors, when using a stencil;
- Several washers or bolts for decorative elements;
- Steel rods, from a few centimeters to a meter.
- The basis of creation is sheet iron.


Step-by-step DIY crafts
An original idea for a metal craft would be an owl. First, for aesthetics you will need a template or stencil. It can be made from a sheet of paper with drawings printed on it.

After cutting out the owl drawing, the stencil should be applied to a sheet of steel and the drawing should be transferred; it should be done in the most realistic way.

The next step is to trim the metal with a grinder and drill holes for mounting and inserting the owl's eyes. After creating the body, you should move on to the details: the legs are made from a rod, and the irregularities are smoothed out with a grinder. At the end, our beauty is treated with a chemical rust remover and painted.

Master class on making roses
And materials. List of basic tools:
- Welder.
- Hammer and pliers.
- Sheet steel
- Bulgarian.
- Special paint for metal.
- Grindstone.
- Steel wire with a diameter of 6 mm.
- Metal scissors.


Attention. Do not forget about safety precautions when working with these tools! Be sure to wear gloves and a welding mask when working.


We take metal cutting scissors and cut out thirty rose petals (thirty petals will make the bud seem more magnificent). You need to move in cutting from small to large, that is, from 15 mm to 80 mm. Your rose should not be prickly. Therefore, a sharpening stone will help smooth out all the unevenness of the petals.


After forming a complete flower, we weld the spikes and clean off the excess with a grinder, clean the seams and cover with a layer of protective paint - the craft is ready.

Metal products with steel wire
The British National Academy of Sciences declared in 1856: “Everything that can be invented has long since been invented,” but time has shown a different outcome. So it is now. Every year new ways of decorating are invented.

For example, in recent years it has been fashionable to make a figure from wire or rod. Combinations and special weaves create an impression of indescribable beauty.

Master class - butterfly made of twig
In terms of its complexity, a steel butterfly is not difficult and will not take much time. Typically, the work technique consists of twisting the wire (the manufacturing process depends on the correct material: the material should not be too thick so that it can bend, but should not be too thin so as not to bend) into several layers.

A body is created using spiral turns, after which wings made from two ovals are attached.


Some interesting facts
Metal is the most ancient mineral of interest to humans. He mined it, forged it, and then a new fence or another forged deer lit up the smile of passers-by.


During the rapid introduction of Hollywood films and the development of artificial intelligence, the topic of androids and the like became relevant. Although the world is far from the rise of the machines, it is always possible to forge a transformer, say, for an exhibition.

Vitaly Yashkovich from Krasnoyarsk became famous throughout the city for his miracle robots. His collection includes such titans of world cinema as: Megatron, Terminator T-200 and T-800, Star Wars androids, as well as droids from cartoons. The owner himself claims that he will not sell his robots to anyone, they say, he created for the soul

You too create, because the world is unidentified and multifaceted. Give him something new and unusual.

Photos of metal crafts


To decorate the interior or exterior of your home, it is not at all necessary to purchase various store-bought trinkets. Metal crafts made by welding or other methods are excellent for this purpose. Moreover, this craft is accessible to everyone, because you just need to follow the instructions, and all the necessary tools can be found at hand.
 There are several different manufacturing technologies, and you can choose any of them based on personal preferences, knowledge and capabilities. Anything that can be made from metal is always closely related to the method of manufacture.
As is known, using metal and with a little effort you can make almost any design attractive and practical. This includes various benches, cornices, furniture and other interior items.
Since iron crafts are manual labor, their cost in stores is quite high, so it will be much easier to master this craft yourself and save your money. The only thing you have to spend money on is materials for production.
The first thing you need to do is choose the direction you like in which you will work. Equipment for bending and forging, stamping, cutting, and embossing is especially often needed. After this, a drawing of the future craft and the necessary materials are prepared.
There is a whole list of different methods using which you can do DIY metal product for sale or for personal use.

 As for the design drawing, it can be made manually on paper or using specialized computer programs, which can be found in a wide range throughout the Internet.
In principle, you can do without a diagram if we are talking about simple products. But for large objects such as gates, gratings and the like, a drawing is extremely necessary.
Simple products
 If you have never done this kind of craft, it is best to start with making simpler iron products. To do this, you do not need to have special skills or experience in this field. Just follow the instructions described, and everything will work out.
Tin box
This craft is not only beautiful room decor, but also a useful thing. Therefore, you can start with it. Prepare all the tools:

First you need to clean the can of paint. For this you will need sandpaper. It is best to carry out the step when the tin has not yet been opened, otherwise there is a high probability of accidental material deformation, and this is extremely undesirable.
Then you need to cut the jar as follows: remove the bottom and cut the top lengthwise. Using sandpaper, sharpen all the rough edges and sharp edges. This will help give the product a neater look and also avoid cuts.
Now you need to apply the pattern. Here there is complete freedom of choice. You can use any accessories and paint the picture you like.
After this, all that remains is to assemble the fake according to the drawing and find a suitable place for it.
Metal owl
If you have experience with a welding machine, then after making the box you can take on a more complex design - a metal owl. To do this you will need the following tools:

 First you need to make a sketch of an owl in pencil on paper, what the future craft will look like. Therefore, make every effort to create a beautiful picture. Then you need to transfer the drawing onto cardboard.
Now you will need a grinder and thin metal. For an owl, you need to have materials for the eyes, body with feathers, wings and tail. This is all cut out from iron parts using a grinder:
- When creating the eyes, try to make holes in them for the bolts to be inserted into.
- Make notches around the perimeter of the body that will create the effect of an owl's plumage. For this you need a chisel.
- A piece of bent metal can serve as a beak.
- When creating paws, use various rods, connecting them by welding.
After making all the parts of the owl separately, combine them with a welding machine. In general, at this stage the product is already ready, all that remains is to apply color and treat the owl with a special varnish. You can add your own elements.
Cold forging
If you have a press, you can do cold forging. With its help you can create more interesting and attractive designs for decoration. This method is simple, but it requires special tools that not every craftsman has:
- Bend for making bends.
- Snail for deformation of iron sheet.
- Flashlight for weaving.
- Wave for making wavy patterns.
- Twister for twisting rods together. This will allow you to create spiral elements.
As in other cases, the first step is to prepare a sketch or diagram. Afterwards, the stage of manufacturing the elements of the general structure separately begins. As with the owl, welding will be required to finally put all the parts together.
 Now all seams are removed, the entire structure is sanded using sandpaper, and at the end a special varnish is applied. The structure is ready.
As you can see, in order to decorate your home or cottage it is not at all necessary to buy expensive decorative elements; a little effort is enough to invent your own crafts. Of course, if you do not have at least minimal skills in making such structures, everything will not be so simple. But starting with simple options, you can gradually achieve serious heights in this craft.
The first artistic forging appeared in ancient times. However, only talented craftsmen could do it. Metal crafts became fashionable in the 11th century and are still gaining popularity. Nowadays, you can make metal crafts yourself with your own hands, which is what we will get acquainted with.
Observe safety precautions while working!
You will need: sheet of paper, cardboard, pencil, scissors, grinder, sheet metal (1.5mm thick), hammer, chisel, chemical rust solvent, welding machine, 6-8 mm rod, 2 bolts and 2 washers.
Master Class

You will need: sheet of metal 2 mm thick, drill with a metal drill, grinder, metal scissors, grinder circle for stripping, electric welding, rods (4.6, 10, 12, 14 mm in diameter), 3 metal bearing balls, wire.
Master Class
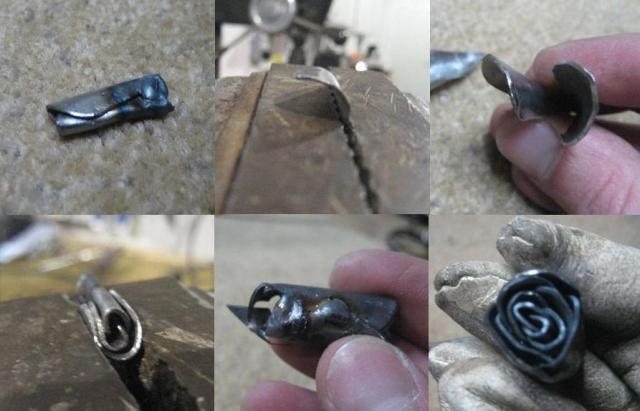
- Take 2 pieces of metal pipe and make a head from the first one. Cut out identical parts along the entire diameter as shown in the image, then weld them.
- Clean the part using a grinder with a wheel.
- Make the torso smaller than the head in the same way.
- Weld the head to the body of the rat.
- Create and transfer sketches of paws and ears onto a metal sheet, then cut them out.
- Roll the paw blanks into a funnel, scald them and clean the seams.
- Electrically weld the paws to the body and the ears to the head, clean the seams.
- Make the paws-hands of a rat from twigs in this way: the upper paws of a 4 mm rod are welded to a 10 mm rod, the lower ones are 6 mm to a 12 mm rod. Insert into funnels and weld.

- Make a tail from a 14mm rod and weld it to the body.
- Make holes for the eyes (make them smaller than the balls from the bearings), recess the balls into the holes and weld. Also weld the ball nose, drill holes for the whiskers and insert wire into them.
- Clean the rat with a grinder and make its fur this way: apply longitudinal welding seams close to each other.

- Clean the craft, giving it shine and varnish.
You will need: sheet metal 0.5 mm thick, metal scissors, yews, whetstone, 6 mm steel wire, hammer, pliers, grinder, welding machine, metal paint.
Master Class
- Cut out 30 petals and 2 rose leaves from metal in this way: start with a 15mm petal, end with 80mm.

- Smooth the edges of the petal with a sharpening stone.

- Cut rose thorns 10-15 mm long from metal.
- Make a blank for the stem from wire. Use a hammer to bend the stem.
- Create a rose bud in this way: hold the 2 smallest petals in a yew and bend them in half. Form 8 petals in an arc relative to the center, weld and clean each part.
- Shape the remaining petals in an arc. Bend the top of the petals with a hammer, weld and clean each part.
- Weld the thorns to the stem and clean them with a grinder.

- Clamp the rose leaf in a vice, then release it so that the vein comes out, bend the edges of the leaves with pliers, weld them to the stem and strip them.

- Weld the bud to the stem, trim and paint.
Many people have a desire to produce any product; beginners and experienced craftsmen create metal products with their own hands for sale. Some people come up with some pretty interesting developments.
What can you focus your attention on? How to start manufacturing products from steel and non-ferrous materials? What is in demand today? What products will be in demand in the near future? What tool should you have on hand? There are many questions. It's quite difficult to answer everything. But many potential entrepreneurs will still be concerned about finding their place in the market.
From idea to market
The peculiarities of the market are such that a very tiny product may be in demand, but large products, into which a lot of thought, work and talent have been invested, will turn out to be unnecessary. There are plenty of paradoxes in free trade.
Hardware is still in greatest demand.
- Nails are bought in kilograms. They are used in construction, the manufacture of other goods, and in the production of packaging.
- Self-tapping screws came to replace nails. The advent of cordless screwdrivers has changed construction technologies and furniture production. It is much simpler and easier to assemble any spatial structure using self-tapping screws than to use disposable fasteners.
- Screws (bolts) and nuts are fasteners that connect individual parts to each other. The demand is enormous. It is difficult to imagine any production that does not use threaded hardware.
- Wire staples are used in conjunction with staplers. Mechanical, electrical and pneumatic staple driving devices are used in all walks of life. A small box of staples is available in any home. The goods do not sit on the shelves.
- With the advent of tools for quickly connecting parts into finished products, blind and threaded rivets help in the production of complex one-piece units. The range of rivets is constantly expanding.
- Electrodes for welding are soft steel wire coated with protective compounds. Even ordinary clay on the surface of wire rods allows parts to be welded together using electric arc welding.
To start producing hardware, it is enough to purchase automatic machines, for example, a nailing machine. All that remains is to thread the wire from the next roll into the machine and adjust it to the desired nail size. All further work proceeds without human intervention.
To operate the nailing machine, you will have to purchase wire and boxes where the finished products will be packaged. In the production of nails, one person performs the duties of director, accountant, foreman and auxiliary worker. Everything is in one hand. All that remains is to distribute the goods to retail outlets and wait for the results from its sale.
The equipment for the production of other hardware is not much more complicated. In a small workshop and even in a garage, entrepreneurs organize completely modern mini-factories that produce in-demand goods.
Those who managed to establish the production of hardware in the early nineties of the last century still continue to produce them. Small factories export staples, nails, screws, screws, bolts and nuts to dozens of countries. Electrodes are purchased in tons in the retail chain.
What can an amateur manufacturer offer?
When it comes to metal products, many potential manufacturers begin to fantasize about the manufacture of large spatial structures. Others see themselves as blacksmiths, forging intricate fences or steel flowers.
In fact, the list of metal products is quite extensive:
- Jewelry production. It is not necessary to use precious metals and alloys to create a sought-after product. Most jewelers work with cupronickel, bronze, brass and copper. They decorate their works with pebbles collected from streams and rivers. Jewelry and decorations sell out quite well before major holidays.

- Cold steel is an interesting line of work. The demand is constant. However, the manufacturer is always under close surveillance by law enforcement agencies. It is advisable to start making weapons to reconstruct historical events. There is no need for sharp sharpening, just similarity with the prototypes is enough.

- The production of armor will be in demand in the coming decades. Many clubs are being formed where those who want to get involved in history are looking for manufacturers who can produce ammunition for medieval knights according to the given designs and height of the customer. The price of the products is quite high. While maintaining high quality, the demand is quite high.

- The production of metal structures for protected soil is a rather promising area of activity. Greenhouses and greenhouses, made wisely, are always needed in summer cottages. Even raising livestock in chicken coops on a metal frame is more interesting than traditional methods. Rabbit hutches made from a profile pipe, lined with panels, allow you to raise furry animals quite profitably.

- Stairs for the home are most often made on the basis of a metal frame. The designs address different ideas for manufacturing staircases and railings. Having mastered the technology of calculation and welding, the master will receive a profession in demand for several decades. Individual construction is only gaining momentum. Entrance lobbies and interfloor staircases will be ordered constantly.

- Metal furniture is in demand outdoors. Various types of benches, benches and tables are used in parks, gardens, dachas and personal plots. These items, after being painted with protective paints, can be left outdoors. They are not afraid of precipitation, temperature changes and other natural disasters. The demand for such products is always stable, especially in spring and summer.

- Metal gazebos are a rather interesting line of production. Prefabricated and welded structures do not require the use of complex technological equipment. Any craftsman who has mastered the features of using an angle grinder and a welding machine is able to independently weld structural elements. After painting, ready-made fragments are obtained; all that remains is to deliver them to the site and assemble them. The sheet material serves as a roof.

- A steel swing can take its place near the house. It is based on a metal frame, as well as a swing installed in bearings. The device is simple and can be mastered by a skilled person.

- Accessories for carpentry and plumbing tools are in demand. Many craftsmen require simple devices, which make it easier to manufacture: hives and components; facades for cabinet furniture; parts for various crafts - and many other things that home manufacturers use on a daily basis.
- Rural residents and summer residents will buy gardening tools and tools if the products contain new ideas that reduce labor costs. Conventional rippers or uprooters will be purchased by those who have to work on the land.
- Agricultural devices for walk-behind tractors and mini-tractors, which use more efficient methods of soil cultivation, will definitely be appreciated and paid for by buyers.
To master the manufacture of a particular product, you can read the relevant books, watch videos and get acquainted with step-by-step instructions on the basic operations and the tools used.
How to start and grow a business?
You can hear the opinion that to create your own business empire you need significant initial capital. Without it, it is impossible to organize a profitable business. But history proves otherwise. With relatively small investments, gigantic fortunes and enormous production are created:
- Henry Ford began building production with one successful engine on a self-running wheelchair. It cost only $50 to not only design and build the first engine from water pipes, as well as carts with steering and brakes. Already during his lifetime (1924), the company produced more than a million cars a year.
- Dale Carnegie remained a teacher all his life, but managed to earn more than a billion dollars. He correctly decided on what he had to offer: he taught others how to make money. He earned money himself; his heirs could not count the inheritance for another twenty years.
- Michael Rubin started his business at the age of ten, selling seeds. No initial capital. Then he organized the first snow removal company: he hired friends to work and agreed with the neighbors that within an hour there would not be a single snowdrift left near the houses. An enterprising boy at the age of 12 headed a small cleaning company. At the age of 14 he had his own store. Today his fortune is estimated at more than $2 billion.
- Sergey Brin came to the USA at the age of five and now heads GOOGLE. Anyone who wants to will always find the necessary information about him.
The main thing is not the presence of initial capital, it is important to desire and try to achieve the fulfillment of your desires. You need to put all your time into this and try to find ways for further development even in losses.
There are certain rules that should not be ignored. If you decide to deal with metal and products made from it, you need to decide on the place where the production process will be organized. You will need tools, fixtures and raw materials.
At the initial stage, non-mass production is organized, they start with the first experimental models, on which demand is tested, the limit price of the proposed sample and the wishes of potential customers are determined.
It's time to consider some areas of activity.
Jewelry production
It is not necessary to use precious metals in your work. Copper, bronze, brass and cupronickel look quite attractive. These metals can be cast into special molds to create original products.
Stable demand among buyers for products made by weaving. Various chains, brooches, necklaces and bracelets are jewelry in which openwork wire weaves create unique designs. Having mastered the complex technology of creating spatial structures, the master will acquire a circle of people willing to buy his products. In the future, a transition to the use of silver and gold as raw materials is possible.
Jewelry manufacturing technology using casting method
To familiarize yourself with the features, you need to look at the proposed photos and explanations for them.
For foundry production on the table you will need:
- A flask is a device into which blanks are cast. It creates a mold for future casting.
- Container for preparing molding sand. Here different types of gypsum are mixed and mixed with water.
- Device for centrifugal casting. Most often, this is a special chain suspension that is untwisted to force the foundry mixture to fill the mold with a certain force.
- Tool for grinding cast metals.
- Gas burners - they are used to heat the flasks, molding mixtures and melt the metal.
- Devices for making models. In the production of rings, cylindrical supports of different diameters are used.
For spatial and flat models, boards are used, on which the model mixture is placed and the model is cut out;
- Sets of cutters - they are used to cut out the design of the future product.
- Grinding tools for processing models and castings: files, needle files, sandpaper, drills and other abrasive tools.
To perform casting you need to have:
- Foundry mixture - if there is copper and lead, then mixing them in different proportions, bronze is obtained. By mixing electrical copper and tin, brass is obtained. Old nickel silver products can become raw materials for the manufacture of silverware. Some craftsmen purchase brass fittings, cut them and cast their products;
- Molding sand is a special product that uses fine sand mixed with gypsum. Ordinary building plaster will not work; the shape and size of the grains will not allow you to repeat a complex and small pattern;
- Modeling wax is a plastic structure from which complex surfaces are cut. This material, slightly heated, can be glued in the right places. Beginning craftsmen use paraffin from candles. Simple models can be cut from cheap raw materials, but the quality will be low.
Information: Carl Faberge began making bronze jewelry. At first he cast medals and cigarette cases. Only after mastering the technology did he begin to use silver, gold, platinum and aluminum in his work.
Attention! When preparing foundry mixtures yourself using lead, tin, zinc, antimony and other heavy metals, you should have exhaust devices to remove vapors.
Step-by-step guide to making a brass ring
Attention! Lost wax casting technology. It received this name because after pouring the molding mixture and its hardening, the model wax is melted out. It doesn't stay inside at all.
There is also a method of casting using burnt models. In them, the model is made of polystyrene foam. When molten metal is poured, the model is burned out.
The work begins with preparing the wax mass. It is heated. At a temperature of 62…65 ⁰С the wax melts. Heat a little higher, to about 70 ⁰C, so that it remains in the molten state longer.

Wax is applied to the surface of a template of a certain diameter. A good craftsman usually has a set of templates so that he can make rings for different clients. The minimum size is 12 mm and the maximum is 28 mm.
Subsequently, all work on preparing the model is carried out on the surface of the template. The wax is cut to the shape of the future product. A pattern is formed on the main surface.
If the stone needs to be secured in the future, small tendrils are created on the model. They will hold the stone on the front surface of the ring.

The template allows you to work without the master touching the wax with his hands. Therefore, there are no fingerprints left on the surface. Having a set of cutters, skilled craftsmen cut out a convex or concave design. This is how signet rings are made.

When developing the model, it is agreed upon with the customer. Then the exact product approved in the order will be manufactured. Sometimes a master makes not one, but several models. Subsequently, one or more are selected to be cast from metal. The work is quite complex, so this stage of work is negotiated and paid for separately. Each new model is a new product that the master spends time on.

Attention! You can design a product in 3D modeling programs and make a model using a 3D printer.
After all the elements of the future product have been worked out, the model is removed from the mandrel. A gating system needs to be manufactured. It will be needed for subsequent metal pouring. Ensure that there is sufficient volume for the melted mass. There should be plenty of it.

Ordinary plasticine is used as the basis for making a sprue. Filling is done through at least two holes. One is molded, and the second serves as a vent - air outlet. It is correct to place them at different heights. Thick wire is used to create holes.

The rods are slightly heated before installing the model. Then she sits down easier. They try to make the casting hole lower, and the projection a little higher. Its filling will occur with the reverse movement of the metal at the moment the space is filled.

The flask is put on the gating system. A tight installation will not allow the molding sand to leak.

Inside the flask you can see that the model does not touch the walls of the flask anywhere. There will be no deformation of the product when pouring.

The molding mixture is mixed with water. A solution is obtained that must be poured into the flask.

When pouring, it is advisable to place the investment ring on a vibrating table. Then air bubbles will be removed from the poured mass. The absence of bubbles will make it possible to obtain a durable shape without defects. It remains to wait until the gypsum present in the mold hardens.

The gating system is removed from the flask. Now the wires responsible for pouring the metal are visible.

Remove the wire. There will be access for metal through small holes. But for now there is a model inside. It is surrounded on all sides by the frozen molding mixture. When removing the wire, try to act carefully so as not to damage the workpiece.

After removing all the auxiliary elements, the mold begins to warm up and wax is removed from it. The flask is turned upside down. Place it on a dish where the wax will flow out.

When the wax comes out, a cavity is formed inside for the metal. Filling by centrifugal injection molding is provided. A special device in the form of a box and chain is used. The flask will have to be rotated by hand so that, under the influence of centrifugal force, the metal penetrates more fully into the most distant spaces of the form.

Heating is carried out in a device for centrifugal casting.

Attention! At home, other injection molding methods are also used. Many jewelers use potato halves. When there is molten metal, the flask is covered with a potato and pressed against the flask with force. Below, the high temperature is over 800…900 ⁰С. Moisture evaporates from the surface of the potato. The resulting steam presses on the molten metal with its pressure. It penetrates into the most remote parts of the form.

When all free moisture has evaporated from the mold and a temperature close to the melting point of the metal being poured has been reached (about 850 ⁰C), pieces of brass (nickel silver, copper, bronze or other material) are placed on the sprue part.

The molten metal flows into the mold. Now you need to force it inside. They begin to unwind the device for centrifugal casting. Craftsmen using steam apply potatoes and wait for the steam to push the metal inside.
It doesn't take long to turn (about two minutes). The fluidity of the metal decreases quickly. You need to wait until the product hardens inside the mold. The temperature difference between the device and the surrounding air is high, so after 5...8 minutes the casting will become solid.

You can destroy the plaster and remove it from the flask by waiting for it to cool. This is what they do when casting gold products. If mold particles cool quickly, they can damage the soft metal.
In cold water, within a few seconds the mold will collapse and the product will be released. It's easy to get.

The casting shows the remains of the gating system. Use pliers to cut off the excess. They can be reused. When using expensive metal, use a jigsaw to saw through the sprues.

The immediately cast part looks unattractive. It is treated with sandpaper and polished. Gives a marketable appearance. If necessary, the drawing is refined using pens, giving it an even greater convexity. Skilled craftsmen apply a fine mesh, which will enhance the texture effect.
The size is being finalized. After casting, it is possible to reduce the diameter of the ring. You can simply grind off the excess inside with files or needle files. More often they use mandrels (a tool made of a hard material of a given size, for example, balls from a bearing), which are driven through the holes.
Using polishing wheels, the surface is processed and a high-quality product is obtained.

Products containing copper are treated with sulfur. It helps you see the depth of the drawing. The easiest way is to use sulfur ointment purchased at a pharmacy.

By firing at a temperature of 250...280 ⁰C, the oil evaporates. The sulfur film settles in the depressions. Excess on convex areas is removed by polishing using polishing pastes.

The finished metal product is examined for defects. If they are not there, then you can give them to the customer and receive payment for the completed order.

Video: decorative elements made of metal.
Other types of own production for profit
By studying step-by-step technologies, you can master several different professions in the manufacture of metal goods.
The issues of individual production are quite interesting. For an active person, a direction will always be found, which in the future will become the work of life.
Crafts made from metal such as steel using welding turn out to be quite durable and reliable, and even a person who has had no experience with such technology before can make them. The main thing at the first stage is to fully comply with safety precautions during work, that is, not to get exposed to hot sparks or hot metal, and also not to get an eye burn.
Crafts made from metal blanks using welding will be very useful in a private or country house, as well as in the country. Thanks to these products, you can very quickly and easily develop even a large area, build a fence, make a gate, gazebo, canopy, and so on.
First of all, you need to get a reliable welding machine. In domestic conditions, where it is not necessary to obtain very high quality connections, unlike industrial work, transformer or inverter equipment is used. Each of these devices has its own positive and negative characteristics.
Transformer structures are distinguished by their large dimensions and large mass, which makes it difficult to carry out work if the device needs to be moved over significant distances, for example, when constructing a fence or other large iron products. Another disadvantage of transformer welding is the fairly heavy load on the electrical network, and they cannot be connected to gasoline or diesel generators.
The positive aspects of this equipment include the simplicity of the device, which allows you to assemble it yourself in a short time. It does not provide for the presence of any serious electrical circuits, so, by and large, there is nothing to break there.
Inverter-type welding machines have a more complex design, so it is not possible to assemble them yourself. They work using a completely different technology, which allows you to work not only with steel, but also with various types of non-ferrous metals. The manufacturing technology involves the use of a smaller transformer, which makes it more compact and lighter. Largely due to this, the equipment is much easier to transport than transformer devices. Electric current consumption is much less, the load on the network even from the most powerful device is minimal. It is allowed to connect the structure to generators.
Basics of welding work
If you have to weld for the first time, then you should not immediately start producing a complex structure. First, you should try your hand at unnecessary metal parts. At the first stage, you should learn how to light an arc and hold it at the required distance from the metal so that it produces a constant voltage. In the future, you need to understand how a welded joint is formed by surfacing molten sections of workpieces on top of each other.
You should definitely play with the current strength to figure out how to regulate it correctly, since this indicator will vary greatly depending on the thickness of the workpieces. The current strength is selected so that through-melted holes do not appear in the metal. The diameter of the electrode also plays an important role. To obtain high-quality metal products with your own hands at home, it is enough to use electrodes whose diameter will be within 2-3 m. Electrodes should be taken new and completely dry; even slightly damp products will not allow you to obtain a high-quality arc and will ultimately create a poor-quality arc the seam.
The production process of simple products
As mentioned above, it is best to start with the manufacture of the simplest, even elementary, structures. For example, it could be an ordinary metal box that will perform not only decorative, but also certain practical functions. You can make it from an ordinary tin can. To make your work as convenient as possible, you need to keep a number of certain tools on hand:
- inverter or transformer type welding machine;
- scissors;
- sanding paper;
- ruler and pencil for making markings;
- a fireproof and non-melting surface that will act as a working base;
- paper for drawing the future product.
Initially, old paint should be removed from the surface of the workpiece - this can be done using coarse sanding paper. The fact is that it is strictly forbidden to weld painted surfaces together. When exposed to high temperatures, paint will burn out, turning into toxic fumes that are very harmful to human health, and it will also heat up the metal too much, which can lead to burns.

Old paintwork should be removed very carefully, since tin is a very soft metal that can be easily damaged, for example, dented. Now the jar needs to be cut with metal scissors or an ordinary hacksaw. First, the bottom is removed, then the upper part is cut lengthwise. It is highly likely that there will be burrs or other irregularities along the edges, which should be removed immediately by cleaning them off with a file. When the workpiece is made, it is bent so as to form a box. Be sure to check all corners with a square. All bends will need to be carefully welded, as tin will form burns very quickly. Thanks to welding, the structure acquires the necessary strength, and special stiffeners are also formed. It is better to make the lid on small hinges. They can be fixed to the surface using small rivets, or you can try to weld them to the product. To close the box, make a small hook of the cap type.
Safety precautions when carrying out welding work
Welding work should be carried out taking into account safety precautions, since this is a rather dangerous type of activity, both the welding itself and a number of preparatory works, which include cutting, milling, securing workpieces, and so on. The following points pose a danger:
- electric shock;
- damage to the organs of vision by ultraviolet radiation, which comes quite intensely from the lit arc;
- possible contact with scale, sparks and other foreign objects in the eyes;
- penetration of toxic fumes into the lungs;
- if there are open areas of the body, they can receive burns from molten metal or sparks;
- When using balloon welding, you should protect yourself from a possible explosion of the balloon.
It is best to protect your eyes from radiation using a special mask or safety glasses. There are relatively cheap masks on sale with darkened glass, through which the arc is very clearly visible, but at the same time this glass will absorb ultraviolet radiation well, thereby preventing damage to the organs of vision.
It is much more convenient to use a chameleon type mask, since it will turn dark immediately after the arc is lit. This can be achieved due to the presence of special automation and sensors that instantly respond to the occurrence of a strong source of ultraviolet radiation. Many craftsmen use welding glasses at home, as they perfectly protect the eyes from radiation, but significantly less restrict movement, and also allow you to make the viewing angle much larger, which is important when carrying out welding work. With the right approach to welding, you will be able to obtain a high-quality connection without any harm to your own health.