File dagger. How to make a knife from a file - delicate work! Required tools and materials
The market for knives is quite extensive, but the desire to make a knife from a file with your own hands quite often appears among home craftsmen. The reasons are that there is a convenient workpiece with high hardness and strength.
Having an old file on hand, you can try to make a steel helper out of it for work, hunting, fishing and for home use.
Advantages and disadvantages
Before you begin, it is advisable to consider the positive and negative characteristics of the product. The obvious advantages should be recognized:
- high hardness of the metal used;
- the workpiece can have a very different shape, so the finished knife can be given any suitable look;
- if the thickness of the blade at the butt is more than 6 mm, the finished knife is not recognized as a bladed weapon;
- The blade holds its edge for a long time.
Unfortunately, there are also disadvantages:
- A rather labor-intensive process, it is necessary to perform a number of heat treatment operations, as well as metal removal. It will take quite a lot of time to make the handle.
- The metal is quite fragile; if the load is applied unsuccessfully or if there is an impact, chipping occurs and breakage is possible.
As can be seen from the presented analysis, a knife made from a file has its pros and cons.
Where to begin?
A homemade knife can be made according to different designs and purposes for:
- home use for cooking;
Knife for home use. It is distinguished by its small size and comfortable handle.
- applications in wood processing and production of wood and plastic blanks;

Knife for utility purposes. It has a small blade and a comfortable handle. Such products are used in DIY workshops.
- hunting and fishing, cutting game and poultry, cleaning fish before salting and other work outside the home;

There is a convenient sheath. With the help of such a product, while away from home, you can perform preparatory work, refresh the carcass and gut the fish before salting.
- sports use, for example, throwing at a target with and without turnover;

Throwing knives. Diamond-shaped files were used for them. Part of the handle is welded from other blanks. The handle is wrapped with steam cord (special twine).
- protection from attack (use on the verge of legislation);

Knife for protection. It is distinguished by the presence of a bolster with an emphasis. It is difficult to perform any work with such a tool.
- gift or souvenir with appropriate design.

Options for gift knives in wooden sheaths.
You should decide on the shape of the future product, dimensions and additional options.
Brief characteristics of the feedstock
When choosing a target, the shape of the file must also be taken into account. They are released:
- Flat, which allows you to process the surface of flat and convex parts.
- Triangular - using a similar tool, they sharpen or process grooves, recesses and cut teeth.
- Diamond-shaped ones are most often used by toolmakers. Such files are used for removing metal in difficult places.
- Skilled craftsmen use rounds to process holes and concave surfaces.
- Needle files are used to fine-tune miniature products.
When selecting a workpiece from which you want to make a knife, you need to pay attention to the size of the tooth. There are tools with large teeth, they use U8 or U9 carbon steel.
For files with small teeth and small cuts, steel U10 or U11 is used. Here the number indicates the presence of carbon, expressed in tenths of a percent. Such materials after heat treatment are characterized by high hardness, HRC 58...64.
If you have a tool manufactured in China, then you may not use carbon tool steels, but bearing steels or complex alloys alloyed with manganese and chromium. They are distinguished by an average hardness value, HRC 40...55.
Attention! There may be files in which only the outer surface is chrome-plated. It can reach up to HRC 54…58. When performing work, the applied layer may wear off, and below there will be metal that may belong to the class of structural steel.
What does a knife consist of?
It is customary to distinguish the components of a knife:
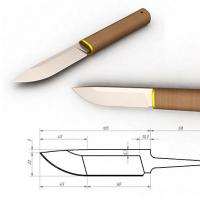
- The blade, this part is subject to special requirements for strength, wear resistance and sharpness.

The blade of the future product.
- The handle is needed for comfortable holding of the product. The design can be very different. They produce typesetting, wooden plastic and other types of handles.

Collapsible handle. The blade, bolster, handle base, and nut are visible.

Removable handle for the original knife.

Typesetting pen.
- Bolster is an auxiliary element with which the handle is connected to the blade. He can be persistent and unrelenting. The stop prevents the fingers from moving when delivering a direct thrust.

Bolster is unstoppable.

Bolster is persistent.
- The sheath is included with portable products. In some designs, they are made with special devices for cutting wire; more often, only one function is assumed - the convenience of wearing on the belt or on the hip. Sheath options are available for carrying the knife on the chest or in shoes.

Leather scabbard.

Deep sheath without fixing strap.
Tools to get the job done
To get started, you need to have certain tools and devices on hand.
- New files will be used to give the desired profile to the future product. You will be working with steel, so it is convenient to use a tool with coarse and fine notches.
- Whetstones for sharpening blades. A lot of work will have to be done removing some of the metal on the descents. Large grain bars are used here. Fine grinding is performed with fine grain stones.
- The sharpening machine will help, if necessary, to sharpen the edges and give the overall shape.
- A grinder is not necessary, but if you have one, it is much easier to give the knife a special shine.
- An angle grinder (angle grinder) with cutting and sharpening wheels will help you perform work related to metal removal.
- A forge or muffle furnace is used for annealing, hardening and tempering. Heat treatment helps to give the material the necessary properties.
- Drilling equipment: A machine or electric drill is useful for drilling holes in the right places.
- Sandpaper, GOI paste, polishing wheels are used to bring the blades to a mirror shine.
- Measuring tools, pencils, and scribers are needed to draw the shape and mark the workpieces in the process of preparing the workpiece.
- Masking tape is used by craftsmen to hold the product by the blade while working on the handle. For a while, you can seal individual fragments with it, protecting them from damage.
- Epoxy glue, mineral and vegetable oils are used to glue the cheeks of the handle and give it a richer look.
- Welding equipment and thread cutting tools will help you make original handles.
- Leather and thread, punching devices are useful for sheaths.
- Brass or steel (stainless steel) rivets will help give a special style to the future product.
Getting started (firing)
Making a knife from a file begins with preparatory work. To make it easier to process hardened steel, its hardness is reduced. In practice, the workpiece is fired.
Based on the study of the properties of steel, it was established that there is a temperature at which the properties of the metal change dramatically. This process was called austenitic transformation. It occurs at temperatures above 728 ⁰C. The structure of the iron-carbon alloy changes. The steel stops responding to the magnet.
Attention! Many people believe that they have reached the required temperature and can proceed to cooling. In fact, the workpiece needs to be heated for 15...25 minutes. The process must take place throughout the entire thickness of the metal.
In order for the resulting large grain to be preserved, it is necessary to slowly cool the workpieces. Therefore, turn off the power and the oven slowly cools down.

Firing in a muffle furnace. Typically, such devices are equipped with thermometers that help determine the heating temperature inside.
If there is no furnace, then you can make a simple forge in which firing is carried out.
- The stove is made of brick and must be equipped with a blower (you can use a regular vacuum cleaner to supply air).
- Light the coals and place the workpiece in them.
- By supplying air, they create intense combustion.
- When the workpiece is heated to a bright red glow, the condition is checked. They bring a magnet on a long wire and check its reaction to the metal.
- If the magnet does not react, then maintain intense combustion for another 15 minutes.
- Allow the coal to burn to the end, the entire oven should cool to a state where the workpiece can be removed with your hands (with gloves).

Firing in a conventional oven.
Attention! It is possible to create a product without heat treatment. However, when doing work, it is easy to burn through the metal and tempering will occur.
Step by step guide
You can make a knife from a file at home if you follow the algorithm presented below.
First, it is advisable to take a sheet of paper and try to draw options for the future knife.
If the workpiece is long enough, the handle will be machined from the main part of the file. If a short file is used, then a triangular shank is used for the handle. Sometimes a threaded rod is welded to it. Then it is possible to make a composite handle from colored plexiglass.

The drawn outline of the future product is glued to the workpiece using PVA glue. The species is assessed. At this stage, you can make adjustments, change the shape and the ratio between the length of the blade and the handle.

Using a marker, it is easy to draw lines along the pasted contour along which the excess metal will be cut off.

After firing, the remaining metal residues that remained after using the tool burned off the surface. The contours left by the marker on the surface are visible quite clearly.

The workpiece is fixed in a vice. Now the excess metal can be cut off with a cutting disc mounted on an angle grinder. If the metal is annealed, then it is even better to use a jigsaw. Then less metal will have to be turned into sawdust. You can cut along the contour.

Having cut off the main part of the metal, you can compare the correspondence of the workpiece in metal and the drawing on paper.

The grinder is especially convenient for work. The presence of a cylindrical part allows you to carefully process the depressions.

The blade is processed on the flat part of the grinder. Using this tool, the desired shape of the product is achieved.

So that the lines left by the scriber can be seen during operation, the end of the blade is blackened. When forming descents, you will have to focus on the planes reaching “zero”.

The contour of the slopes is drawn on the future knife. Most knives use a single-sided sharpening. Therefore, descents are planned only on the main cutting part. Options are possible when a product with two slopes is being worked on. Then the marking will differ from the picture presented.

To better see the difference between the treated surface and the base one, it’s easy to blacken the metal using vinegar essence. It should be borne in mind that the blackening process is quite fast, so it will take no more than 15 minutes to obtain noticeable differences from the original color.

The slopes are turned on a special machine. Its design will be shown below. It can be seen that the desired surface on the knife blade has been obtained. If necessary, it is easy to sharpen the knife.

The slopes are processed on both sides. Their shape corresponds to the accepted drawing.

Aluminum tubes were purchased to attach the overhead cheeks. They will serve as decorative rivets.

Beech board has an interesting texture. After processing, the hard wood will serve as a high-quality handle.

To obtain the required hardness, hardening is performed. To do this, the workpiece was heated to a temperature of 850 ⁰C. We kept it at this high temperature for 15 minutes. Then they quickly took it out and hardened it in mineral oil. To remove residual stresses, low tempering was carried out at a temperature of 200 ⁰C. The workpiece was kept for 10 minutes in a heated oven, and then allowed to cool in air.

To install the rivets, we had to drill holes with a diameter of 6 mm for them.

Many people like a blued blade. The bluing operation is being carried out. Acetic acid with a strength of 9% is used.

The outline of future false cheeks is drawn on wooden blanks.

Cutting is done on a band saw. If the master does not have such a machine in his arsenal, then you can use a jigsaw.

There are cheeks. They still have to be drilled and then processed. Only then will a product be obtained that will satisfy the user.

By inserting the rivets, you can grind both cheeks together. In this case, they are processed simultaneously. This results in a very good surface treatment.

Rough assembly completed. Now the non-working part of the blade and handle is grinded. It is necessary to level the surface of all parts.

Rounded shapes are given. It will be a pleasure to pick up such a pen.

The customer wanted to see a cool knife with cut serrations, so markings were made for future serrations.

When working on the handle, you need to protect your hands from injury. The blade is wrapped with paper and electrical tape.

It’s better to try it on several times than to redo it later. Another rough assembly of the product.

A working solution was prepared by mixing epoxy resin and hardener. Surfaces are greased. It remains to wait for polymerization. To press the cheeks more tightly to the metal, clamps are used.
Attention! Before gluing, the metal surface in the gluing area is degreased.

After polymerization, the vice is removed. You need to cut off the excess from the rivets. At the same time, the surface of the handle is polished. Excess epoxy glue is removed.

Impregnation with oil-based varnish better reveals the grain of the wood. She looks much more attractive. Tinting enhances the internal pattern.

A typical beech tree. The texture looks quite attractive.

When working with varnishes, be sure to wear latex gloves. Then the master’s hands will remain undamaged. Safety comes first.

The sheath is made of leatherette. Wide stitches provide additional decoration. There is a strap for belt fastening. The knife can be worn on a trouser belt.

Finally, the product acquired a marketable appearance. This knife can be given as a gift or used in household chores.

How to make descents
Often, novice craftsmen who are just mastering the intricacies of craftsmanship do not know how best to make descents. If forging is involved in the manufacture of the blade, then it helps to form the vanishing surface from the width of the butt to the cutting edge.
But for such processing you need to have a forge in which the part will be heated. You will need an anvil and a hammer. Few workshops have such extensive equipment.
For stitching, use devices that can be attached to a circle.

A device for uniformly grinding knife edges.
There is an emphasis. It is needed for smooth movement relative to the grinding wheel. A vice is installed on the extension handle. The blade is clamped in them.
When working, you need to slowly move the blade over the stone. Uniform grinding at a constant angle will occur.
The final processing of slopes is carried out using abrasive stones.

Machine for final finishing of slopes.
There are special vices. The blade is attached to them. A series of holes are drilled in the vertical post of the vise to ensure that the specified angle of descent is obtained. An abrasive block is attached to the holder. All that remains is to move the block along the surface from left to right and vice versa. By pressing the tool against the product, they actively remove excess metal.
Finishing is done using GOI paste. The block is removed and a flat fabric-covered support is installed in the cage. All that remains is to achieve a mirror-like shine of the blade with consistent movements.
Video: a simple complex knife made from a file.
Conclusion
It is not difficult to make a knife with a hard and durable blade from a file.
A blade made by yourself is not only a guarantee of good quality, but also a certain “prestige” among friends. Making a knife from a file at home may seem like a daunting task. But with some skill and careful study of this material, almost anyone can cope with this. You need to take the process seriously and everything will work out.
A knife made from a file.
File knife pros and cons
Any blade, even purchased in a store, will have excellent qualities, primarily due to the grade of steel. There are a lot of knives that look great, but the blade will quickly become dull, not give in to normal sharpening, or, in general, will break. The positive aspects of making a knife from a file include:
- high-quality steel, especially if you use samples from the Soviet Union. If you find an old, rusty file, rejoice, you have a wonderful workpiece in your hands;
- its shape suggests making the product without forging, but it will take a lot of time and materials to form the slopes. And even with high-quality hardening, the blade will have fragile qualities;
- With high-quality forging, the output will be a magnificent product. With all the unique qualities, in no way inferior to a blade from a store for at least $200.
The only downside is that if the file is made of alloy steel, it is simply impossible to sharpen it without heat treatment. But since we will describe the manufacturing process using annealing, this is not so important for us.
Required tools and materials
For a novice master, the main thing is to have all the tools, so that at a crucial moment he will not be distracted by searching.

Handmade file knife.
The whole set looks like this:
- several hacksaws for metal with different grains;
- forge or muffle furnace;
- file for processing the workpiece;
- cleats and a set of sandpaper;
- material for making the handle;
- grinder or grinder;
- large forging tongs;
- machine oil and water in a bucket in different containers, will be needed for hardening;
- clean workplace.
And it is desirable that everything is at hand, nearby, so as not to run “from corner to corner.” We will consider the manufacture of the handle from various materials. The set of tools and procedure will be described below.
Technology and stages of making a knife from a file with your own hands
Let us separately touch on the topic of “design” of the future blade. If you don’t have enough imagination, don’t hesitate, go to specialized forums and find the best option for yourself. If you have very little or no experience, in general, it is recommended to choose a simpler blade. You should not immediately make a product of incredible shape.
A simple shape and high slopes, this shape will be the easiest to work with. Draw a sketch on paper and compare it with the width of the file. And first of all, use a grinder with an abrasive wheel to remove all the teeth from the file, this will make it easier in future work.
Firing the workpiece and the step-by-step manufacturing process
Having a real forge or muffle furnace will make the annealing process easy. You can make both yourself, but that's another topic. The easiest option is to make a homemade “camping” version of the forge. A hole is dug in the ground, filled with coal, a fire is lit and the most important point is that you need to supply air under the coals.

The process of making a knife from a file with your own hands.
This can be done even with a simple foot pump; it is clear that you need to use a metal tube so that the hose does not burn out. If you have a small car compressor on hand, even better. This way you can reach pretty decent temperatures.
- Let's say our forge is ready, and in full readiness. We place a file on the coals, carefully monitor it and supply air, the temperature should be constantly high. There are several ways to measure the readiness of a workpiece: with a special laser thermometer, by the color of hot metal, or the simplest - with a magnet. The file will have the required heating of about 700-800 °C, its color will be cherry-red, and it will stop being magnetic. Having reached this heating point, we stop the air supply and leave everything as is for a day. In this way, we will relieve stress from the metal, and it will become more pliable for processing.
- At this stage, we apply our paper template to the workpiece, outline it and begin cutting. It is better to do this with a hacksaw, but it is labor-intensive and time-consuming, but if you perform the process with a grinder, there is a possibility of the metal overheating. And thus, it is easy to lose the strength of the blade. Think over the shank in advance, taking into account the material of the handle. For a beginner, it will be easier to do it in the form of a simple, thin blade extension.
- If any irregularities remain, it is easier to remove them with an emery machine, but again, be very careful about overheating and prevent it. Moisten the workpiece with water more often.
- Making a bevel is a very important moment of the whole work. For non-professionals, it is recommended to circle them on both sides, exactly symmetrically. If you do this work incorrectly, there is a risk of ruining the entire workpiece or it will take a very long time to straighten it.
The blade is almost ready, all that remains is finishing. But in order for it to be fully ready for work, and to get rid of the softness of the metal, another important operation is needed.
How to harden a knife
This process involves a change in the structure of the crystal lattice in the metal. The most common method for hardening a steel blade is to use two liquids - motor oil and water.
We return to our forge again and heat the workpiece to the same temperatures as before. We take the product with long tongs and dip it in oil for two seconds and in water for two. Then, again, we put it on the coals, heat it up and lower it in the same order in the liquid, just hold it there for 3 seconds. To be safe, you can do it a third time, increasing the time by another 1 second.
Three repeated dippings with increasing time will give you a guarantee of a normally hardened blade. A glass bottle is often used for testing; when cutting into it, marks should remain. If so, everything was done correctly.
Making the handle
It’s not for nothing that the shank was mentioned above. And for a person unfamiliar with knife making, it will be easier to make a handle for a long, thin extension of the blade. Different materials are used for it, including combining them with each other. In any case, cover the blade with masking tape in several layers, this will protect you from cuts.

Homemade knife made from a file with a wooden handle.
Let's look at the most popular of them:
- tree, if the shank is elongated, then the simplest option is to select a block of the required length and drill a hole in it that is suitable in diameter. Having sharpened it in the form of a pen, in a rough version. “Place” the blade on the workpiece using epoxy resin.
If the shank is flat, then it is better to make a stacked handle from two halves, fastening them along the length with rivets. Alternatively, in both cases, in the area where the blade and handle meet (stop), you can insert a metal insert. Having adjusted everything well in size, it will look great;
- textolite, this material is usually made in the form of stacked plates and fastened with rivets. The principle is the same as for wooden handles; when finished, you need to finish the handle with a file and sandpaper. Its advantage can be considered that it does not absorb moisture, fat, odors and does not slip in the hand. It will never swell or dry out. The only thing is that its appearance is not “rich”, but it is durable and strong;
- leather or canvas, in ancient times, such a handle was understood as any material covered with leather, or braided with thread, again made from it. This was done to preserve the material of the handle and it does not slip in the hand. Today it is meant to be a typesetting version on a long shank, many small pieces of leather are put on.
When typed, they are glued together, and a holding pommel made of any material is mounted on the head of the handle. The pieces are then cut to shape and processed on a grinding machine. The tarpaulin must be thoroughly moistened in epoxy resin, and a handle must also be made using a typesetting method;
- dial handle, the name speaks for itself, you can type by arranging various materials, the result will be very interesting. In this case, it all depends on your imagination; take into account the properties of each part of the set and the handle will have different properties.
The characteristics of each option are different, and you need to consider for what purpose the knife itself is created. And in the end, it’s a matter of taste. Everyone likes different material.
Finishing and sharpening
In the final part of all manipulations, when the knife is already assembled, it is best to etch the blade. The process will create a film that will provide protection. The knife is made from a file and requires careful care, otherwise it will rust.
Rough work on the product does not imply razor sharpening. The final spiciness is done at the very final stage. When the handle is brought to perfect condition using sandpaper or on a machine, and covered with protective elements, it is different for each material.
For wood, for example, impregnation with boiling wax or varnishing. When the blade has been etched correctly, and only then do the final sharpening of the cutting edge, we select the angle based on the purpose of the knife.
Most people cannot understand why nowadays you need to turn a knife out of a file with your own hands, because you can buy a ready-made one. A good, high-quality knife will be very expensive, but a rusty, old file can always be found. How to make a knife from a file? Anyone who is at least a little familiar with plumbing can turn it at home.
You just need to follow the manufacturing technology. How to turn it, and what tools and materials may be needed for this? What will be the order of operations, all this will be discussed in this article. A knife can become not only a necessary tool, but also a pleasant gift for every man.
Preparation of materials

Heat treatment of the workpiece

Knife making, hardening and tempering
Once the file steel has been tempered, it can be shaped into the desired shape. The workpiece should be clamped in a vice and, using a grinder, cut off everything unnecessary, then sharpen the knife with a coarse-grained wheel on a sharpening machine. If the overhead plates will serve as a handle, then to attach them to the knife it is worth drilling holes for the rivets. After this, you can begin hardening. Heat the steel to a bright red color, and the heating of the blade should be uniform, with the exception of the beginning of the blade. At this point the workpiece should glow white hot. What degree of heating the handle will be does not matter much.
 A magnet is a good indicator of heating. Only after the magnet stops reacting to the heated metal can you begin to cool it. To do this, take the hot workpiece with pincers and place it in a container with water. If the metal is hardened correctly, then the blade will leave scratches on the glass.
But it should be noted that a large internal stress is created in the metal, and during future sharpening it may begin to crumble. To avoid this unpleasant moment, the knife blade is released. This helps relieve internal tension; just put the workpiece in the oven and hold it in it for 2 hours at 200 degrees. Remove the workpiece after the oven has cooled completely.
Processing the blade and handle attachment
After all thermal work has been completed, grinding of the blade and installation of the handle begins. To keep the knife blade smooth, we successively treat it with a wire brush, sandpaper, and finally with a felt wheel. To prevent the blade from rusting, it should be etched. To do this, place the blade in ferric chloride, as a result of which it will be covered with a protective film of gray color and will have a matte tint. If there is no ferric chloride, it can be replaced with vinegar or raw potatoes, which are grated. This film protects the blade well and reliably from rust and scratches.
 If you use a deer antler for the handle, you should simply place it on the shank of the workpiece through a longitudinal hole. Epoxy resin is first poured into such a hole. The typesetting handle is assembled and clamped onto the thread for tightness. Leather belts are wound tightly, pre-lubricated with special leather glue. Bone or wood overlays are secured with rivets and reinforced with epoxy resin.
Lastly, the knife should be sharpened well. Sharpening should be done manually; the sharpening machine can overheat the blade, which will greatly deteriorate the quality. For such purposes, it is best to use an abrasive stone. If you make a knife correctly, it can cut wood, leather, and thin metal well. It is also possible to make a dagger from a file with your own hands.
DIY file knife video.
Making a knife with your own hands is not so easy. Many people don’t understand why do this if you can buy a finished product. But the ability to make a knife can come in handy in completely unexpected ways. In addition, this is a very interesting and unusual process, once you understand it, you can create a high-quality instrument. Next, about the intricacies of creating a knife from a file.
Making a knife from a file is a rather difficult, but interesting process. In order for the result to be high-quality and effective, you will need a considerable amount of skill and strength. Carbon steel is considered the best option for a file knife, so it is advisable to choose it for the job.
In addition, you will need the following materials and tools:
- ferric chloride;
- epoxy;
- rivets;
- sandpaper;
- wood/leather (to create a knife handle);
- grindstone.
The first step in creating a knife from a file is the process of firing the workpiece. This process is very easy to carry out. It is necessary to place the metal workpiece in the oven for 5 hours (if there is none, you can use a regular gas stove).
 It is necessary to immediately prepare the tools
 After a long stay in the oven, the file should be well calcined. Then you should let it cool just as well.
Attention! Only that part of the file that will later become the knife blade is subjected to the firing process.
In cases where a gas stove is used for firing, it is necessary to achieve suitable temperature conditions. For this purpose, a special heat reflector is created. It is necessary to make a small lift of several nuts above the file and place a metal plate on them. The part of the file that will be fired should be sprinkled with salt. When it is completely melted, the firing process can be considered complete.
When the firing process is nearing completion, make sure that the metal is heating evenly. When this happens, you should gradually reduce the temperature over 2 hours. If you turn off the gas immediately, the steel will simply crumble.
Formation of the finished product
The pre-fired workpiece must be properly shaped. To do this, it is placed in a vice and all its excess parts are cut off. You can do it differently by cutting off all the excess on a sharpening machine. Holes are also prepared for the future knife handle.
After this, you can proceed to the next stage - hardening the semi-finished product. The workpiece is heated evenly, while the part where the handle will be attached should be avoided. For such a procedure you will need a burner. It is important to catch the moment when the metal is sufficiently hardened. A magnet is used for this purpose: when it stops reacting to metal, the knife must be immediately dipped into water.
Sometimes there are cases when steel is destroyed after hardening. This occurs due to high internal pressure. Therefore, after hardening, it is imperative to temper. This is the process of so-called voltage reduction. The semi-finished knife should be placed in an oven heated to 200 degrees for approximately 1.5 hours. After this, the oven turns off. The product is taken out only after the oven has completely cooled down.
Finishing and sharpening
Finishing the product at home is carried out using one of the following tools: felt, metal brush, grinder. Finishing the blade must be done very carefully. At the end of the work, the blade should be absolutely smooth and neat.
The next stage is preparing the handle. It can be made from leather (the trim must be at least 0.5 m long) or a piece of wood. Making a wooden handle is somewhat more difficult, so it is advisable to familiarize yourself with detailed drawings of such elements and photo instructions for making a handle for a knife from a file before starting work.
To ensure that the knife blade has a pleasant matte gray tint, it is etched. To do this, you will need ferric chloride or (if it is not available) potato/lemon juice, vinegar. During the etching process, a protective film is formed on the surface, which prevents corrosion.
Advice. Metal etching can be carried out only after the blade has been thoroughly cleaned of any stains, since, otherwise, any contamination (including fingerprints) will certainly appear on the knife blade during the etching process.
Sharpening is the last, but no less important stage in creating a knife. First, the final preparation of the knife handle is carried out (if it is wood, it is sanded and waxed). Then you should definitely sharpen it using a regular sharpening stone (it is not advisable to use a power machine, since it can cause the metal to overheat).
A handmade file knife will become a reliable helper in the house if it is made correctly, according to accurate drawings and with inspiration. Good luck!
How to make a knife from a file: video
Since the steel used to make files is high quality, many people think about how to make a knife from a file. You can do this yourself if you have an idea of some methods of processing and hardening metal blanks.

The file knife is very strong, does not dull for a long time and is easy to use.
Preparing tools and materials for hardening a knife blade from a file
The process of hardening a knife blade is simple. By using a file made from homogeneous carbon steel to make a knife, you can get a high-quality blade.

To harden the blade of the blade being manufactured, you will need to prepare:
- handle for the future blade;
- rivets made of brass;
- ferric chloride;
- epoxy resin;
- magnet;
- grinder;
- a piece of sandpaper;
- vice;
- tool sharpening device.
Making a knife from a file begins in the same way as creating any other product: with preparing a drawing and sketch of the future blade.
On the sketch you need to draw in detail the shape of the blade and handle of the blade. In addition, the sketch should show the method of attaching the handle to the knife blade. The sketch should show in detail the tool that is planned to be made from a file in reality. As a primary workpiece, you can use a flat file, either new or used. All files are made of steel, which has high strength and cutting characteristics. It is best to use an old file to make a knife blade.
Return to contents
Firing the workpiece

The handle for the blade should be durable and comfortable; it is better to use a material such as oak.
Before making a knife, the file should be fired. For this purpose, experts advise keeping the workpiece in a hot stove for 4-5 hours; after this period, the workpiece should gradually cool down along with the stove. The essence of the firing process is to calcinate the metal of the file at a temperature of 650-700º C, followed by gradual cooling. Only that part of the workpiece that will be used as the blade of the future blade should be subjected to the firing process.
If you plan to use a gas stove for firing, you should remember that it produces a relatively low temperature. To increase the temperature, a heat shield should be constructed. When creating a heat shield, a hill of large metal objects is created above the file, on top of which a metal plate is placed. This structure allows the heat generated from the combustion of natural gas not to dissipate into the atmosphere, but to concentrate around the workpiece, thereby heating it more strongly.
To determine the correct heating, it is recommended to sprinkle kitchen salt on the workpiece. When the required temperature is reached, the salt begins to melt, which is an indicator that the workpiece is heated correctly. During the heating process, the workpiece should acquire an even hot color, which should be maintained for 3-4 hours.
After firing, the temperature of the workpiece is reduced gradually and in stages. At the first stage, heating should be reduced by 1/4; after 30 minutes, the heating intensity is further reduced by another 1/4. Thus, a gradual decrease in temperature is carried out until complete cooling. This rule cannot be ignored, as otherwise the metal of the blade may begin to crumble.
Return to contents
Blade formation, hardening and tempering

The formation of the blade is carried out by grinding or cutting off excess metal.
After firing, you need to clamp the workpiece in a vice and remove its excess parts by cutting it off. The formation of the blade can be done by grinding off excess metal on an electric sharpener with a coarse-grained abrasive disc. By using an abrasive disc, the blank of the future knife can be given any shape in accordance with a previously developed sketch. Several holes for rivets should be drilled in the knife handle to attach the linings.
At the next stage, the knife blank is hardened. When carrying out the hardening procedure, its degree should not be judged by the glow from heating the workpiece. The correctness of the hardening procedure can be determined using a magnet. If the metal of the workpiece does not react when the magnet approaches, it means that the hardening has reached the required temperature.
The workpiece must be heated evenly during the hardening process, avoiding overheating and temperature changes during heating.
Only the area where the linings are attached to the handle is not hardened. The handle is heated and hardened only in a 3 cm area adjacent to the blade of the blade. For hardening, it is best to use a burner that produces a higher temperature.
Before hardening, you should prepare a container with water in which to cool the workpiece. After obtaining a uniform color and disappearance of the reaction to the approach of a magnet, the product should be heated for several more minutes. After heating is completed, the workpiece is lowered to cool in a prepared container with water. If the entire process of hardening the knife with metal is carried out correctly, it will be possible to scratch the glass. Such a test is the best proof of the correctness of the procedures.
Due to the fact that high internal pressure arises in the metal during the hardening process, cracking of the blade blade may occur during sharpening. In order to avoid this effect, the blade metal should be tempered. Tempering of metal is a process by which internal stress in the metal is relieved while simultaneously slightly reducing the hardness of the knife material.
The metal tempering process is quite simple. For this purpose, the knife blank is placed in the oven and heated for one and a half hours at a temperature of 200º C. After heating, the workpiece is gradually cooled simultaneously with the oven.