How to make a plow with your own hands drawings. Do-it-yourself plow: the best designs and tips on how to create an effective device (70 photos). Types of plows, their advantages and disadvantages
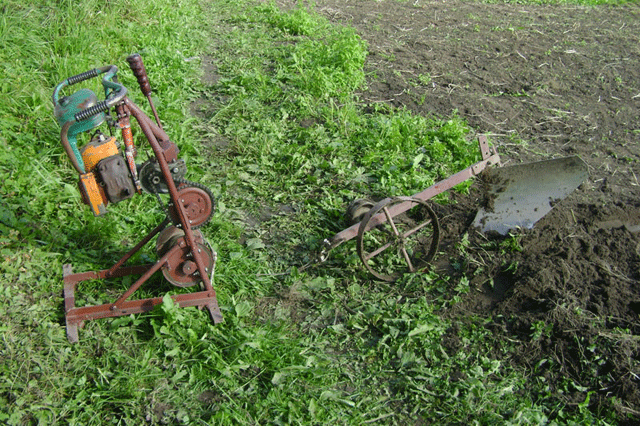
After I had a self-made agricultural motor winch, which is used for plowing the garden, the question became: buy a plow or make it on your own? Walking through the shops and bazaar of Smolensk, there is a strange feeling that the plows for the walk-behind tractor produced by the industry are a sad sight.
And these creations of industry are suitable only for “picking” and not for plowing the land, and even with the turnover of the reservoir, and about the depth and width of plowing, we can conclude that not one of the proposed ones is suitable for planting potatoes with a distance between rows of 60 cm. in the plow trade. Either our manufacturers save money, or the power of the most popular walk-behind tractors is not enough to work with a normal plow with a working width of 30 cm. Do not plow one furrow three times when planting potatoes. And the price wants to leave the best - under 2 thousand. rubles (for a couple of pieces of iron from the scrap metal collection point).
The next step to find something useful is to search the Internet. To my surprise, 3-4 original descriptions with drawings float in the vastness of the Russian-language network (this fact surprises me very much). The next step is to look at what others are using. It was not possible to buy a suitable plow, it was decided to make a plow with their own hands. Based on the fact that the plow was supposed to be used for planting potatoes with a winch for plowing, the following requirements are imposed on it:
1. Plowing width - up to 30 cm.
2. Depth of plowing -10-20cm.
3. The plow must hold the furrow by itself, without burrowing or popping out of the furrow. The geometry of the plow must provide movement with the given parameters without the help of a plowman.
4. Possibility of adjusting the depth and width of plowing.
5. Minimum weight and sufficient strength.
My uncle has been using his homemade motor winch for plowing for more than 10 years and has tried several options, for the last few years he has settled on an option optimized for a homemade motor winch for the garden, namely for planting potatoes with a distance between rows of 60 cm. There is also a homemade hiller for a motor winch and a do-it-yourself potato digger, all this can be viewed on the corresponding pages of the site.
Plow drawing
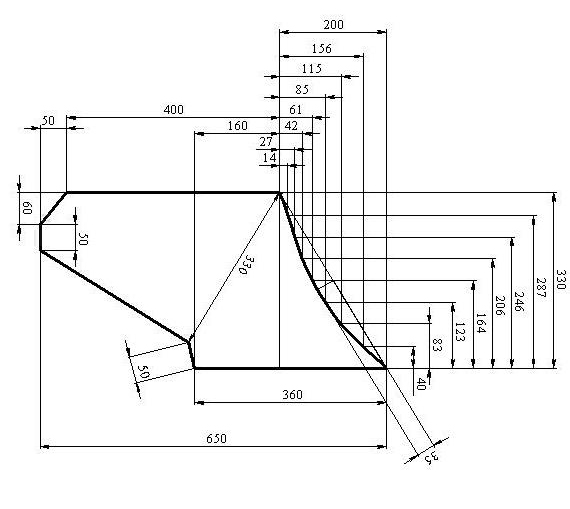
Field board drawing.
The moldboard is bent according to this template, until the two profiles coincide, and then it is welded at an angle.

Using a drawing of a home-made plow, it is necessary to draw a plow pattern template on thick paper, and then transfer the picture to metal and cut out the blank with a grinder. Personally, I used stainless steel material 1.8 mm thick. Many often use a sheet of 2-3 mm. The cutting part of the plow is reinforced with a strip of thicker metal. Someone suggests using a disk from a circular for these purposes, someone a spring from a "Moskvich". From personal experience, If country cottage area for a family of 4 people to plow in the spring and autumn, processing six acres, it is not worth chasing super-strength. It is more profitable to make a plow that is light, but strong enough for its tasks. It is better to repair or replace something after 10 years, and then, if necessary, than to carry the weighted construction of a home-made plow for all 10 years. Extra weight is useless.
This is what the plowing width adjustment system looks like. By rearranging the large wheel, the plowing width can be changed to a significant extent. When I plant potatoes, I set a grip of 30 cm, in two passes I get a distance of 60 cm between the rows. Under the autumn plowing of the garden or when plowing virgin soil, I make the grip less. The small wheel is made so wide that the plow does not press into the ground.


After looking at the pictures below, you can imagine the basic principles of the homemade plow, or rather the guide system, which allows the plow to move strictly in a straight line at the established plowing depth and width without the participation of a plowman. The plowing width is adjusted by moving the large wheel, which, when the point of application of the traction force is shifted, as shown in the figure, is pressed against the furrow, which allows the plow to follow the direction of the previous furrow. The plow turns slightly, which increases the plowing width. In fact, the width of the nose in the direction perpendicular to the axis of the plow movement is less than 300 mm, however, the indicated width is available for plowing.

The plow wheel goes along the bottom of the plowed furrow and this situation is observed from the previous furrow to the next one. As a result of the application of the traction force, a force is applied to deepen the plow until the plow is on the axis of the wheel, as shown in the figure, as a result, all forces are balanced, and the system works very stably. Coarse adjustment of the plowing depth is carried out by selecting the appropriate difference in wheel diameters, and smooth adjustment is carried out by adjusting the plow tilt. At this stage, there was no need to use handles to control the plow, except for some special plowing conditions.

Plows not only loose earth as in the video, but also virgin soil

Plow for agricultural winch - video
The plow is used complete with such a winch for plowing
On sale you can find industrial moto and electric winches for the plow.
Motoblock is one of the most necessary and useful units in the household. It is used for a variety of jobs on the site. This technique greatly simplifies many business procedures. More functional and multitasking are walk-behind tractors, complemented by various designs. For example, it can be a technique with a plow. The latter can be bought at the store, or built with your own hands. It must be done following certain rules.

Dimensions
Dimensions different types plows may vary. You can consider the parameters of parts using the example of a rotary instance. It is taken into account that the rotary view of such a device is assembled from the following bases:
- lateral vertical detail of the skid;
- horizontal plane from the bottom of the skid;
- front dump.
The most productive plow is considered to be, in which the cutting edge from the bottom of the fixed plowshare is 20 mm below the bottom of the skid, located horizontally. Another well-built part of the plow is the matching of the cutting edge on the side of the fixed share with the cutting edge on the side of the moldboard. The plowshare and blade should not protrude more than 10 mm beyond the boundaries vertical plane side stripe.


There is another important nuance - fastening the frontal plane of the plow share without visible slots and gaps, and in the same plane. If we consider these details in more detail, then they should be well polished and, like a mirror, reflect any surface. There should be no protruding fasteners under any circumstances. As soon as the plow returns from land work, it is desirable to clean it from settled soil and foreign particles. Elements that have been polished must be poured with oil or smeared with grease. Next, the mechanisms need to be rubbed with a rag. Thus, it will be possible to protect the structure from aggressive external influences, which can lead to the formation of corrosion on the surface of the plow.


As for the 4th correctly built structure, it includes the flat frontal surface of the plowshare, which makes an angle of 20 degrees with the flat part of the plow structure. It will be equal to the angle located at the back of the exposed share. The cutting sidewalls-edges of the plowshare and blade will also have corners of 20 degrees with bases on the side of the furrow. Moreover, the edge located on the side of the blade may be slightly rounded.


Blueprints
If it is decided to build a blade or a plow for motor vehicles, then one cannot do without drawing up detailed and correct drawings. The reliability and durability of a homemade part largely depends on its well-designed scheme. Based on the rich experience of professionals who regularly produce good plows for walk-behind tractors, it is recommended to make the share in such a way that it can be easily and quickly removed. With this function, the sharpening of this part will be greatly simplified, and it will be possible to safely resort to it before plowing the land on the site.

For the manufacture of the cutting component of the plow, 9XC alloy steel is best suited. The material is mainly used for discs intended for simple hand saws. You can use steel marked 45, which was brought to the optimum level of hardness during the hardening process. If there is only simple steel in stock, for example, carbon steel, which cannot be heat treated, then by removing the cutting edge part (using an anvil) and then grinding it down, it will be possible to safely use the steel to work with the soil.

When drawing up a drawing of a future plow on your own, it is recommended to rely on accurate diagrams. A do-it-yourself design will be assembled from the following components:
- metal pipe, which performs the function of the bearing part;
- wheels needed to move the structure on the ground;
- working cutting part with or without blades (you can fix the cutting elements of old devices);
- attachment mechanism to the walk-behind tractor itself.

When drawing up a drawing of a future plow, it is important to indicate in it the parameters of the future design. Not a single element is left unattended. In this case, when using the circuit, a high-quality and reliable device will be obtained.
How to do?
Modern models motoblocks can be equipped with a reliable do-it-yourself plow. Varieties of this element: double-turn, reverse, double-case, rotary or Zykov's product. There are quite a few design options. There are even options in which the body is made of a gas cylinder. It is not difficult to make a high-quality plow for motorcycles on your own, if you follow certain rules.


Rotary
Construction manufacturing can be divided into several main steps.
- Prepare a good blade in the shape of a cylinder. This must be done exclusively in accordance with the drawing. The part is made of alloyed metal. It is important to follow the drawn up drawing when self-manufacturing designs.
- Expose the ploughshare. The wedges are inserted into the iron sheet (3 mm) at an angle of 45 degrees.
- Connect the plowshare with the shield on the side. Be sure to ensure that the plowshare blade is located just below the shield itself (1 cm, no more).
- Attach the blade to the plowshare.
- To a metal tube, which acts as a base, is welded using welding machine working half with a plowshare. On the opposite side - fasteners for motorcycles.
- When the plow is ready, an axle with wheels can be welded in its lower half.


Turning
The rotary view of the plow is rightfully recognized as one of the most functional and practical. This design is a great helper for plowing the land on the site, because it can cover a fairly large area. The plow is also good because you don’t have to waste time with it after each approach. It will only be necessary to turn the plow and move in the opposite direction. The productivity of technology will increase significantly. The main actions are performed in the same way as in the case of the rotary mechanism, but in this case the cutting elements must be below the skid (at least 2 cm).


Disk
It is possible to assemble with your own hands and a disc plow for equipment. A similar model is assembled from parts:
- disks;
- fist;
- bracket;
- scraper;
- leading beam;
- pens;
- screeds.

Disks for the device can be taken from an old "seeder", if it is in the arsenal. Install these elements at an angle to increase productivity. The okuchnik is hung on the equipment through the coupling bracket. The T-shaped leash from the plow is screwed to it with the help of bolts and a stopper. At an impressive speed, the hiller may begin to slip, so you will have to work exclusively at low speeds or with twin wheels.


How to remake a finished plow?
A ready-made plow can always be redone if necessary. For example, a simple horse version can be easily changed to a walk-behind tractor. Almost all horse plows are distinguished by their impressive weight due to the presence of a heavy blade. If a similar element is installed on a walk-behind tractor without prior alteration, the earth simply will not be discarded. To convert a horse plow into a walk-behind plow, work is carried out in a certain sequence.
- Build a dump. Prepared for him detailed drawing. Based on the diagram, a blade is cut out of a steel billet. It is advisable to prepare a cardboard template for this.
- Give the steel the desired shape.
- They remove the horse blade and fix in its place a hand-made part.
- Remove the handles that were on a vertically oriented axis.
- Instead, metal fasteners are fixed. Through them, the plow is attached to motor vehicles.

If during the “tests” in the field it suddenly turns out that the device does not throw the ground very well, then you can carefully bend the plowshare so that it can crash into the soil more strongly.
Installation and adjustment
After completing the construction of the plow, it should be fixed on the walk-behind tractor. But before that, preparatory activities are carried out:
- moving the walk-behind tractor to the place where they plan to operate it;
- dismantling the wheel travel - it must be replaced with special lugs (if they are not installed, then the plow will not work for planting the same potatoes - the equipment will slip and can "dig" in the ground).

After this stage, proceed to the installation of the plow.
- The plow is attached to the hitch of agricultural machinery using nuts. Thanks to this, it will be possible to independently set its performance characteristics.
- Prepare 2 fastening pins. With their help, the hitches and the plow itself are attached to the earring.

Having completed the preparation, proceed to adjust the installed plow. It is from this stage that it will depend on how efficient both the plow and the walk-behind tractor will turn out to be. For correct installation design should pay attention to:
- width;
- plowing depth;
- incline.

The setup is done step by step.
- At the extreme sections, the width is set. To this end, the edge must never move below or above the toe.
- The most stable equipment is placed on special stands, so that it becomes possible to set the depth required for plowing. We must not forget that this parameter may vary based on the time of year.
- It is necessary to carefully adjust the attachment of the plow to the equipment itself.
- Bolting is carried out in such a way that the rear half of the plow is located on a single line with the soil.
- Now agricultural equipment can be removed from the stand.

If you decide to build a good plow for a walk-behind tractor with your own hands, then worth listening to useful advice from experienced craftsmen.
- If you plan to build a double-hull plow, then you should remember that it must have two shares. The specified device can be used for plowing the soil various types. This is the best copy for working with stagnant soil.
- In the manufacture of a rotary plow, it is very important to ensure that the edges of the blade and the plowshare match. These elements are connected as tightly and firmly as possible. There should be no gaps and noticeable cracks.
- After using the plow, it must be cleaned of any dirt and adhering particles. Only subject to this rule we can talk about the durability of the structure and its wear resistance. And then you don’t have to constantly sharpen the cutting plate.
- Installing the plow on the agricultural machinery itself will be many times more convenient if you put the walk-behind tractor on stands. It can be not only special supports, but also simple bricks or stones / boards.
- Particular attention is paid to the already built plow. If it has only one bolted connection and only one hole, then it will not be possible to adjust it.
A homemade plow is not only economically profitable, but also not difficult in terms of production. You will always be sure of the reliability of such equipment, but let's figure out how to build it.
The plow is used in agriculture for plowing the land.
If you have ever read newspapers and magazines intended for a rural resident, you probably noticed an abundance of advertisements for the sale of mini tractors and walk-behind tractors. Not surprising, because the land has to be cultivated. But attachments for such equipment on sale are not always of high quality. The most popular unit is the plow. And when buying it, the future plowman gets a lot of problems: one cannot always expect high-quality plowing from such a device, although an industrial plow costs quite impressively. A homemade plow can be an excellent alternative to a low-quality product.
Plow design
Before proceeding with the manufacture of the plow, let's deal with it design features. Its main parts: plowshare, blade and field board.

Types of plow dumps: 1 - cylindrical; 2 and 3 - cultural; 4 - half screw; 5 - screw.
The share is the main cutting part of the plow. It is located under the dump. The angle of inclination of the cutting edge of the plowshare should be about 40 degrees. At a smaller angle, the product will rush up. When working on a walk-behind tractor, you will constantly have to raise the handles, which will lead to rapid fatigue of the worker. A home-made plow for a mini tractor with the mentioned plowshare must be kept in the soil all the time due to hydraulics. The plowshare is made from high-strength steel grades. At home, it can be difficult to find such material, so it is recommended to use an industrial plowshare from old technology. Ideally, a part from a skimmer can fit. In the old days, agricultural machinery was not very powerful, therefore, for heavy soils, equipment was used in front of which plows were installed - small plows for preliminary soil cultivation, due to which the sod was loosened.
The plow blade plays an important role. His work is based on the shape of the sheet. The better the sheet is bent outward, the easier it is for the product to turn over the plowed land. A blade is made of low-carbon steel with a thickness of 3 mm or more (this is a critical thickness that is suitable for a walk-behind tractor). The tractor will require a blade with more sheet area and thicker material.
The field board of the plow is needed to ensure its stability in the soil. If your walk-behind tractor has wheel locks, then with a properly installed field board, you will not have to experience heavy physical exertion. It is enough for the block to “show” the direction and set the recess, and then it will work itself until the end of the plowing strip.
Necessary tools and materials

And now let's move on to the direct manufacture of the plow. We will start with mathematical calculations, taking into account specifications your walk-behind tractor. If your equipment is provided with a good coefficient of adhesion to the soil, then you can take any drawings as a basis. attachments for mini technology. Otherwise, do not rush to make a plow with a wide grip and a large recess. For a conventional walk-behind tractor, the following proportions must be observed: 8 kg of equipment weight per 1 cm of recess and 0.5 cm of plowing width.
To assemble the plow you will need:
- finished plowshare or a piece of solid steel;
- electric drill;
- steel for the manufacture of blade and field board;
- electric welding;
- Bulgarian;
- bolts and nuts;
- metal stand for making the base.
Work order

Method for determining the center of gravity of the plow: 1- plow body; 2 - beds; 3 - plow handles; 4, 5 and 6 - ropes; 7 - hook; 8 - plumb.
On a flat horizontal surface, we install a stand vertically, on the left side in the direction of the intended movement, place a field board, on the right side there is a plowshare. Sometimes you can find advice that all parts must be welded to the rack. If you also decided to do this, then abandon this thought: the plow must be collapsible. Then, in case of damage to any element, it can be easily replaced, which will reduce the downtime.
In order to make the plow easy to disassemble and assemble, weld the base for it, the product will include triangular shapes designed to ensure the rigidity of the entire structure. On this basis we fasten the plowshare and the field board in the directions marked in advance. Above the plowshare it is necessary to fix the blade. It needs to be given a certain roundness, which can be done on a special machine or by forging. Cold forging is not suitable here for two reasons:
- Cold metal is very difficult to deform.
- It will not work to give the product a certain shape: you will make bumps that will prevent the soil from sliding along the blade sheet.
It would be better if the metal is heated, forged and immediately hardened. Blade holes (you need 3 of them) can be made right in the forge, but make no mistake with the accuracy in the markup.
And now we will fix the dump on the body. It is necessary to use for fasteners bolts with a hat that is tightly immersed in the hole. All protrusions will interfere with the operation of the plow, so they must be cut off under the base and sanded in places.
If you are working for personal plot on a tractor, then you need to have twin plows that are mounted on an axle that runs at an angle to the equipment.
Here fasteners are carried out using strong metal clamps (do not use welded fasteners - they will break under load!). The position of the carrier axle must not be stationary. Here it is necessary to provide at least a small angle of rotation so that you can adjust the position of the plows.
If desired, the master can also make a reversible plow, placing a hydraulic drive for turning between the axle and the tractor. But such a design is recognized by the people as irrational: it fails too quickly. It is better to use the factory elements for turning the plows. If they are available, then there is no problem, but there is no need to make such a complex device on your own. It will cost a waste of time and nerves, and the result of the efforts will be short-lived.
9205 10/08/2019 6 min.Agricultural machinery has become a real relief for farmers and has allowed save a lot of time. Fortunately, now a large amount of work is performed by various agricultural units, the presence of which brings significant relief to any farmer. Particularly popular are walk-behind tractors. Due to the fact that seeders, plows, mowers and much more can be easily attached to the walk-behind tractor, it has become a complete replacement for the horse. How to make it with your own hands - later in the article.
Why do you need a plow
One of the hardest jobs in farming: preparing the land for sowing. After all, in order to get the next crop, the soil must first be loosened. This requires a plow, with which it is easy to move the layers of earth upward.
In order to create furrows as quickly as possible, the plow is attached to a walk-behind tractor. Thanks to the use of this technique, the time spent on processing the field is reduced tenfold.
The principle of operation of such a unit is simple: the cutting edge plunges the blades into the ground, which loosen the soil, before going deep into it.
Due to the draft force, a harrow is created. This principle has been known for a long time, people used it thousands of years ago, so the effectiveness is really time-tested.
For more information about the plow for a walk-behind tractor, see the video:
The advantages of a homemade walk-behind tractor
To make the cultivation of the land as fruitful as possible, you can not buy a ready-made unit, but make a plow for a walk-behind tractor with your own hands, for example, for a Neva walk-behind tractor. In this case, you can also use the walk-behind tractor Carver, Tarpan, Beam, Texas, Cayman. How to make a plow for a walk-behind tractor yourself?
Video: NEVA motoblock, plowing
Homemade devices have some undeniable advantages:
- You can calculate the optimal design, slope angles that are suitable for the soil in your field;
- Selection of a design for the power of your walk-behind tractor;
- Winning in price, after all homemade device will cost you less than the purchased unit;
- Confidence in quality, because you are making a plow for yourself;
- A sense of pride that you are capable of such design achievements.
Various plow designs
First you need to decide on the design of the device, because there are several different types.
The cylindrical view of the plow is different excellent versatility, because it is suitable for almost any type of soil and field size. This form allows you to cope well with crushing the soil. In addition, making such a unit yourself will not be a problem.

The only drawback of this design is the shallow penetration into the ground.
half screw
If you do not need to loosen the ground, but only need to raise the soil layers, then the half-screw shape of the working part of the plow will be an excellent option. She penetrates deep into the ground, but at the same time practically does not create a loosening effect. It is usually used for heavy soil.
Lemeshny
There are also share plows, but it is quite difficult to make them with your own hands, so you should not consider them.
How to set up a plow
In addition, you need to properly set up the plow: the working part of the edge should be inclined by about 40 degrees, because it is this slope that allows you to make the work as efficient as possible even on difficult ground.
You can familiarize yourself with the advantages of using a mini combine harvester.
It is no secret for every summer resident that tillage, which includes preparation for sowing and plowing, is the most time-consuming and tedious operation. Of course, if there are technical means (walk-behind tractor, tractor), this procedure can be greatly facilitated, but to plow the land you need a plow. But, any attachment for cultivating the land has a considerable cost. To save money, you can make a homemade plow.
There are two ways to make a plow with your own hands:
- Do all the components yourself. This method is considered very difficult, since many parts of the plow have a non-linear shape, with a certain bend of various radii. And to bend thick sheet metal at home is a laborious operation, sometimes even impossible without the use of special bending equipment.
- The second way is considered accessible to many owners of a walk-behind tractor. You can purchase ready-made cases in the distribution network, and assemble all the auxiliary parts and the frame for attaching fixtures yourself.
Plow application
 The main task of the plow is considered to be turning over the fertile upper layer of plant soil. This operation (plowing) allows you to largely free the fertile soil layer from weeds, the root system of which is already starting to grow, but has not yet fully strengthened.
Seeds of not yet germinated weeds when plowing move deep into the ground which also hinders their germination. During plowing, the soil layer loosens, becomes more pliable and soft, which improves the efficiency of crops and has a positive effect on the germination of cultivated plants.
At the first stages of using the plow as a tool for agriculture, it was dragged by people, then by domestic animals (horses, oxen), and at present this hard work is done by agricultural machinery (tractor, walk-behind tractor).
Types of plows
 Many modern agriculture use different equipment in their work. tillage. According to the aggregation method, this equipment can be conditionally divided:
- trailed plow, which is driven by mechanized means on wheels. Currently, it is not used very often, because basically all modern agricultural machinery is equipped with a mounted type system with an integrated hydraulic cylinder. According to agronomists, after tilling the soil with such equipment, the arable land turns out to be more uniform and smooth. But the disadvantage of this equipment is considered to be a very large angle of rotation, which prevents its use in conjunction with mounted and semi-mounted plows.
- Mounted plow can only be lifted when using a technical hitch. Depends on the power of the tractor used required amount equipment cases. The advantages of this type include the relatively low weight of the entire structure and its mobility (small turning radius). But the inability of one technical tool to work with a multi-furrow plow is considered a disadvantage of such equipment.
- Semi-mounted plow is brought into working position with the help of transport wheels and attachments of the tractor. The main advantage of applying this principle is considered to be a large area of simultaneous plowing, which is achieved by the joint use of multi-furrow plows. Poor maneuverability and a large turning radius can be attributed to the disadvantages of semi-mounted equipment.
There are several designs of plows:
- Share plows- the most common, have been used since ancient times and are very popular now.
- Disc structures- are used mainly for plowing heavy land plots, as well as waterlogged or dry soils.
- Rotary systems- very convenient for the cultivation of virgin lands, more complex in design.
- Combined plows- combine both types of plows (disk, share).
- Chisel structures- such devices do not rotate the soil layer. They are used very rarely, especially in the individual household.
Plow device
 Structurally, the plow includes working parts, a frame, supporting wheels and a towing device. Ploughshare-moldboard mechanism, housing, knives, skimmers, ploughshares are the working bodies of the plow.
There are the following types of plowing device cases:
- Non-moldboard- serve for high-quality loosening of the soil in areas subject to wind erosion, as well as dry areas.
- dump- designed for loosening the soil and plowing with the turnover of the layer.
- Disk- effective in the processing of waterlogged soil, as well as for plowing hard and heavy soils.
- cutout- for moldboard tillage with a small fertile layer.
- Enclosures with subsoiler- are used for plowing chernozems (thin and podzolic) and simultaneous deepening of plowing.
- With body top chisel for working in very hard, stony soils.
- Combined systems - used for plowing heavy soil, with its simultaneous loosening.
The functional purpose of the plowshare is to cut the soil layer and direct it to the dump device. The plowshare wears out quickly due to the high friction of the metal on the composition of the soil, which leads to a violation technological process plowing, an increase in traction resistance and excessive fuel consumption of the tractor. Structural properties can be restored by forging with a hammer, after pre-heating with a rock in the forge.
The blade cuts off the soil layer from the furrow wall, shifts it slightly to the side and lays it down with the top layer. Along the junction line, the blade and the plowshare should fit snugly against each other, with a gap of no more than one millimeter.
The skimmer is designed to cut the sod and drop it to the bottom of the furrow. With an increase in the depth of this structural element, the traction resistance of the plow increases, while the turf layer is embedded much worse.
The operation of cutting the earth in the vertical direction is performed by the plow knife. It also qualitatively improves the turnover of the soil layer, with the simultaneous incorporation of plant residues. In addition, the blade helps keep the plow running smoothly by creating a level wall and furrow bottom.
Plowing technology
 To describe the technology of plowing the soil, you can familiarize yourself with the principle of operation of the plow. Its job is that moving in the soil, the skimmer of the device cuts off the top layer of soil, with growing plants, and lays it on the bottom of the furrow. Further, along with equipment body removes part of the soil from the side of the furrow, loosens it and turns the layer to the set level, depending on the design of the plow. After, the earth is laid on top of the turf layer turned over by the skimmer. To level the furrow wall, a knife is installed in front of the last plow body.
General-purpose plows are equipped with body systems with a working width of 25–40 cm. Special-purpose systems are equipped with bodies with a working width of 45–100 cm.
 When planning to make a plow, you must first decide what type of soil you will have to plow with the unit and the type of crop that you are going to grow.
During operation, the body of the unit experiences enormous loads, its working surface is exposed to the abrasive action of the soil. Therefore, for the manufacture of working parts, you need to apply steel metal 3-5 mm thick.
The design of the plowshare, it is desirable to provide for a removable one, so that it is possible to sharpen it.
Considering all these equipment operation properties, you can start manufacturing a carbon steel blade. You can do it in three main ways:
- If the surface of the blade is cylindrical, then it is better to use sheet bending equipment to manufacture the workpiece of the desired shape. A steel billet, cut by gas welding or metal shears, is fed to sheet bending equipment at an angle of 23–25 degrees and bent. Then fine-tuning is carried out strictly according to the template, which is cut out in advance from thick cardboard.
- Suitable for the manufacture of the unit and metal pipe with a diameter of 55–60 mm and a wall thickness of 4–5 mm. Cut out a template from cardboard, put it on the pipe and mark the dimensions. Processed with a hammer and, if necessary, adjusted with emery.
- This method is the most time consuming and requires special skill. The workpiece is preheated in any way, but preferably in a forging furnace, and then bent over the matrix.
The body of the unit is made of sheet steel with a thickness of at least 3 mm.
Plow assembly
 After the manufacture of all the metal structural elements, for assembly you will need a welding machine and a square sheet of metal 50 cm in size. Then, to the prepared sheet by welding we grab all the elements of the device while respecting all angles and dimensions.
The next step is to try on the blade to the plowshare. If you find a discrepancy between the corners of the parts, then you need to bring them to normal with a hammer. By welding, we lightly grab all the parts to the side shield and weld the base platinum and the spacer bar onto it. We carefully examine the product resulting from all these works and, if we have not noticed any errors, we make the final welding.
Using a chisel or grinder, we disconnect the unit from the metal sheet. Be sure to clean the welds, and grind the surface of the plowshare and blade with fine sandpaper.
Do-it-yourself rotary plow
This type of plow differs significantly from the previous product. Compared with disc or reversible plows, the rotary unit has a more complex and time-consuming design.
The principle of operation of such equipment is very similar to the operation of an ordinary soil cultivator. Several shares of the movable type are fixed on the axis by means of shafts. The operation of plowing the soil is carried out due to the rotation of the axis.
This type of equipment works with low tractive effort, as the rotor discs act on the soil from top to bottom. It is very convenient when mixing fertilizers in the soil. But the use of such a system on rocky soils is difficult due to the possibility of a quick breakdown of rotating parts.
It’s worth thinking about how to make a plow from a skimmer if you can find a few ready-made parts. More often, such a device is made for a walk-behind tractor, and the skimmers are taken from a tractor unit. In this case, the general task of creating equipment will be to strengthen it to the walk-behind tractor.
Any person tries to facilitate his work, therefore, the application technical devices becoming more and more popular among vegetable growers. Buying a soil tillage device is currently easy, but quite expensive. To independently manufacture such equipment that meets your wishes, sometimes only people who have the skills to work with metal can do it.


