Do-it-yourself burlap juicer. Homemade juicer for apples and tomatoes: instructions for making from a washing machine. How the device works
One of the most simple ways harvest processing - juicing. A do-it-yourself apple juicer can become great solution, since most of these devices are either expensive or have low performance and short-lived.
There are several ways to make a centrifugal juicer from washing machine. One of them will require a drum, its mount and casing from.
The design of a homemade juicer from a washing machine: 1 - washing machine tank; 2 - centrifuge; 3 - mesh insert; 4 - fruit bin; 5 - grater; 6 - bushing-axis; 7 - guide pipe; 8 - engine; 9 - car tire.
First, they are cleaned of traces of powder and scale, and then polished to a shine with fine sandpaper. All openings in the drum casing, except for the bottom one, are closed with a thin rubber gasket and stainless steel plates using nuts and bolts.
From a sheet of stainless steel, 2-3 mm thick, a circle with a radius of 110-115 mm is cut out for a grater. For the lining, we make another circle of the same diameter and from the same material, but already 0.5-0.6 mm thick. Lining provides rigidity. It is fastened with three brass posts exactly in the middle of the bottom of the drum. The grater is mounted on the pad with five M5 screws.
Through two circles, many holes are drilled, with a radius of 2.5 mm, centimeter markings are made along the diameter, dividing it into 14-20 sections. Cutting teeth are stuffed on it with a punch.
The loading tube for apples, corresponding to the diameter of the large hole, is attached to the drum from four sides aluminum corners on bolts. You can use a pipe with a corrugated hose or a polyethylene pipe with walls 5-6 mm thick. The MB bolts are inserted from the inside of the casing at the beginning of the process and are clamped with nuts from the outside. The distance between the pipe and the grater determines degree of grinding apples. From above, the corners are fixed with lambs.
From a stainless steel mesh with a cell of 1 × 1 mm, workpieces are made with dimensions of a drum section (with a margin of one centimeter for bending) according to the number of stiffeners. We bend the mesh so that the edges become smooth and safe. With a rivet gun and an awl, we tightly attach the mesh to the drum.

For a pusher, a plywood circle with a diameter of 0.8-0.9 cm is attached to the end of a thick handle from a shovel. A limiter is installed to prevent contact between the pusher and the grater.
The pulley is altered to the required dimensions and a V-belt. The base frame is welded from a corner. A 1.1 kW motor at 3000 rpm is ideal.
A polyethylene or rubber circle is cut out with a diameter like that of a casing and a hole corresponding to the diameter of the pipe for loading apples. Such a cover protects against splashes and closes the moving drum. A hose is pulled to the lower opening of the drum for the outgoing juice, under which a pan is placed.
All elements are firmly clamped, the motor and wires are insulated, the mains voltage is taken into account. The parts of the container are thoroughly washed.
During the test run, the empty drum of a properly assembled homemade apple juicer should not beat and make foreign noise.
Apples are laid in it 2-3 pieces. The pusher pushes them close to the grater. The centrifugal force distributes the cake over the grid. If the device starts to vibrate, then, without adding apples, we wait until the juice stops flowing. If you lay the product systematically and constantly, a bucket of apples will be processed before vibration (in 7-10 minutes).
After turning off the engine with a plastic spatula, remove the cake from the grid. Then wash and dry all parts. The apparatus is stored disassembled.
From an activator type machine
It can also be made from an activator-type washing machine. The activator and the shaft are removed from the bottom of the tank, the shaft is installed desired diameter. Three knives are installed on the shaft thread with nuts at an angle of 60 degrees. The drain hole is closed. A stainless steel mesh with a cell of approximately 1.5 mm is placed on the wall of the centrifuge with an overlap of 40-50 mm. A complete rubber cover, plugged with a cork, is placed at the bottom. Everything is washed with baking soda. The timer relays turn off or jam its toggle switch.
Several apples are lowered into the tank on moving knives. The fruits are crushed for 20-30 minutes. Move into the centrifuge at a time no more than 3 liters the resulting puree so that it does not spill out. After 2-3 minutes, the grid with waste is removed.
The assembled apparatus prepares 10-12 liters of juice with pulp per hour, works with juicy fruits. To remove the sediment, the juice is settled, and then passed through gauze.
If there is no electricity, it is better to do a homemade juicer. Apples for her are cut in half, the core and rotten areas are removed. A long straight trough made of pine or spruce boards is filled with prepared apples, which are then pounded with a rectangular spatula with a sharp blade of the width corresponding to the trough.

In a rectangular tank, pan, barrel or wooden compartment lined with polyethylene, a hole is cut to drain the juice. Inside put gauze with apple pulp, laid out with boards. A piston cover is placed on top, and a press of one of two designs rests on it:
- worm mechanism;
- jack.
The screw is tightened smoothly, watching the juice drain. Upon completion of the process, the screw is unscrewed upwards, the cake is removed from the gauze.
Apples for the described manual juicer can also be chopped with a mixer mounted on a drill, this will speed up the process. And as a tank, you can use a large plastic bottle.
After watching a video on how to make a juicer, do not forget about preparing raw materials for pressing. Apples are washed and rotten places are cut off. Product for juicers from washing machines does not need to be cut and cleaned, but should be remove bones. The resulting dry cake is added to animal feed in winter and used as fertilizer.
Having mastered the independent production of a juicer, you can easily manage a factory model.
A juicer from a washing machine that has served its time is not so new idea. Back in the late 80s, handicraftsmen published in popular technical magazines their drawings of productive juicers, which were made from Soviet machines "Riga", "Oka" or "Vyatka". We decided to continue the good tradition and offer our ideas on the use of a modern washing machine, namely, the manufacture of a juicer from its parts with minimal alterations.
Why make a juicer?
The question is really good, why spend a lot of time reworking a used washing machine to turn it into a juicer, when you can buy a powerful machine in a store for relatively little money? The answer to this question lies in human nature.
Some make such things for fun, so that they stand in their garage or in the country and you can show off your ingenuity and "golden hands" to your friends. And some make such things with their own hands simply because they like the process of working with hardware and electrics. So is born into the world, emery and God knows what else. Whatever your motivation, the goal is worthy, and we will try to help realize it.
For your information! Making a juicer from a front-loading washing machine is no more difficult than from any other.
What materials will be required and how to prepare them?
To make a do-it-yourself front-loading juicer from a machine, we 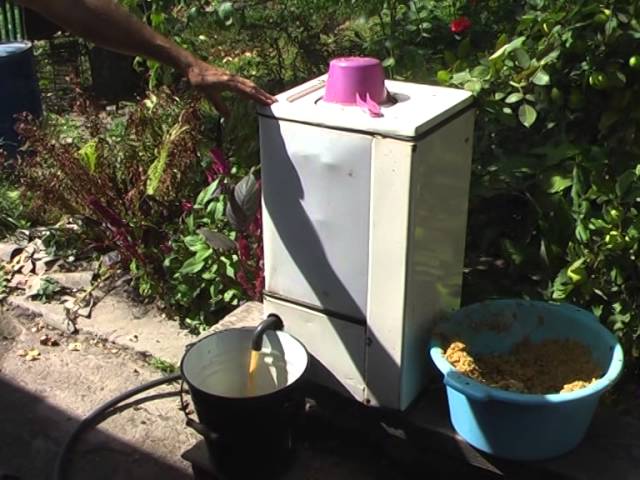 you will need a used washing machine and a few more spare parts on top. Excess from the body of the washing machine, we remove immediately. The pump, pressure switch, filling valve, drain filter, block and control panel are all extra parts, we don’t need them. It will also be possible to remove the bottom and back wall of the washing machine. In addition to all this, we need two additional damping springs to compensate for the horizontal centrifugal force.
We also need to get two thin strips of metal mesh 30 cm long and 6 cm wide, a large number of 3 mm bolts and nuts, a juice container, a new drain pipe and plugs made of tin and rubber. From the tools we need:
- drill;
- Bulgarian;
- welding;
- screwdrivers;
- different wrenches;
- thin awl or drill;
- pliers;
- hammer;
- metal scissors.
Important! This design involves using the parts of the old washing machine to the maximum, so in the end the juicer will cost you very cheaply.
The idea is as follows, we put the washing machine “on its back”, substitute the bars in the corners and fix them so that the juicer does not come off them during operation. We leave the hatch, cuff, drum, engine and drive mechanism in place, we remove the rest. The engine will have to be connected separately, since we also removed the control unit. Next, we need to prepare the details for the future juicer, we do the following.
- Remove the drive belt from the pulley.
- We unscrew the shock absorbers and all other elements that prevent the removal of the tank.
- We remove the cuff of the hatch (for this you need to loosen the clamp).
- We take out the tank along with the drum.
- If the tank is collapsible, we spin it, if it is not collapsible, we cut it along the seam with a grinder.
- The drive mechanism can not be disassembled and the drum not pulled out, our task is to clean the bottom of the tank from debris and dirt, as well as clean the outer walls of the drum from the same dirt. After mechanical cleaning, it is better to additionally treat the bottom and walls of the tank, as well as the drum with vinegar.
- The tank has been cleaned, there should be no debris left in it, no extra parts such as a heating element, thermistor and other sensors. All excess holes must be sealed with tin and rubber patches. We will leave only the drain hole, to which you will need to screw a new drain pipe.
For your information! It is preferable to take old front-loading washing machines for do-it-yourself alteration, in which the tank is made of stainless steel. Cars with plastic tanks are worse, but they can also be used.
- We weld all the holes of the drum by welding, they are not suitable - they are too large. We remove the rib cutters, and leave the mounts for them, they will help to chop vegetables and fruits.
- We make hundreds of small holes with a diameter of 1 mm in the walls of the drum along the entire perimeter.
- We collect the tank back. If it was non-separable, then you will have to drill 15-20 holes across the seam in a circle, coat the seam with sealant, and then tighten the two parts of the tank with bolts.
- We install the tank together with the shock absorbers and the cuff of the hatch in place - the preparation is completed.
Assembling the structure
After high-quality preparation of parts, which was carried out by hand, it costs nothing to assemble the finished device. To begin with, we will finalize the drum of the washing machine so that it turns into a full-fledged juicer.
- We take pre-prepared strips metal mesh and insert them around the drum between the fastenings of the rib breaker and onto the back wall.
- We attract them for strength with screws to the wall of the drum. The grid will play the role of a grater for vegetables.
- In addition, the fastening of the rib breaker will help break the vegetables in the drum, it must be unbent and the edges sharpened. Here is the ready fruit receptacle.
Now we need to improve the design so that the device lasts as long as possible. We fasten additional springs to the tank and the wall of the washing machine in order to dampen the vibration of the tank from the horizontal centrifugal force. This is necessary, since we will operate the juicer with the hatch to the top. Now you need to "give life" to the drive mechanism that rotates the drum, namely, connect the engine to the mains. See the video below for how to do this.
We put our do-it-yourself juicer with the hatch up and conduct a test run. The drum must rotate freely at full speed without knocking or other extraneous sounds. It is also important that the juicer stands securely on wooden supports and does not collapse while working with a full fruit receptacle. We substitute a container for juice under the drain pipe, open the hatch, pour the fruits into the fruit receptacle and start the juicer.
Be careful! In no case do not impose a full fruit receptacle of vegetables or fruits, not only will they not be crushed and will not give juice. If overloaded, there is a risk of damaging the drive mechanism of the juicer, especially the bearings.
 What will happen to the fruits? Rotating at a speed of 800-1000 revolutions per minute, the fruit receptacle, which is also a drum, breaks the fruits into porridge. The porridge is kneaded in the fruit receptacle, and the juice, together with a part of the pulp, is squeezed out through the holes in the side and rear walls of the drum under the action of centrifugal force and settles in the tank. Next, the juice flows down the walls of the tank and goes into the drain and through the pipe enters the container. This is how a do-it-yourself juicer works.
How many vegetables and fruits can be placed in the drum optimally so that they are processed efficiently? The answer is simple - the denser the fruits, the less they need to be poured into the fruit receptacle. For example, hard apples are poured into half a drum, that is, until they fill the fruit receptacle to half. Carrots are very hard, so you need to fill them in a quarter of the fruit receptacle, but berries like currants or cherries can be filled in ¾ of the fruit receptacle - in general, the principle is clear.
In conclusion, we note that, as you can see, making a do-it-yourself juicer from an automatic front-loading machine is not too difficult. The washing machine undergoes minimal alteration, you just have to make some adjustments to the design and you can start processing tens of kilograms of fruits from the garden.
Is it possible to make an apple juicer with your own hands? Of course, more than that, anyone can handle it. The material below will be of interest to summer residents, people who have subsidiary gardening and love apple juice in unlimited quantities throughout the year.


Device Features
If we are talking about making juice from seasonal fruits in an amount of up to 2 liters, then electric auger juicers, presented on the shelves of any large hardware store, will help here. But if it is necessary to squeeze juice from a large number of apples, and household appliances are not suitable, then the head and improvised materials come to the rescue. A large number of apples requires a highly productive and reliable juicer.
One of the main advantages of a homemade device is with little or no investment, if all available materials are available. In the event of a malfunction or breakdown, it is possible to repair the device yourself.


Before you start making a homemade juicer, you need to understand the principle of its operation and know how what elements must be provided and installed in the process of its creation:
- first required part- this is a grinder;
- in fact, a press, which produces juice from the fruit;
- something like a filter, in this case you can use gauze, a sieve, a colander or make it yourself with a drill and stainless steel;
- the last mandatory element is a container in which freshly squeezed apple juice should be collected.


Kinds
Homemade juicers are divided into 4 types: mechanical, pneumatic, hydraulic and electro-hydraulic. The most commonly produced at home are mechanical type juicers. Such models are large in size and are divided into two types: centrifugal machines, where the apple is crushed in a centrifuge, and then a press or screw products come into action, which produce the necessary juice through the complete processing of the fruit.
A big plus of screw machines is that they give the maximum amount of juice, and after the end of work there is no need to clean and rinse them, like centrifugal ones. Please note that the option with a screw apparatus is more costly and time-consuming to create, requiring the use of a machine and certain knowledge.


How to do it yourself?
One of the easiest ways to quickly create a juicer is the old folk method. This requires a wooden or metal container, a sieve and a manual screw press, under which the fruits are poured, and by means of human power juice is squeezed out of them. Any hard material can act as a press (an old grindstone, a wooden circle of hardwood, a metal product), the desired shape is round.
In the manufacture of this model, only the creation of a screw press will take time. To do this, you will need the so-called support frame, metal or wooden, the screw itself, preferably with a tightening handle, and a support board, the diameter of which must correspond to the dimensions of the inside of the container. If there welding machine and a metal sheet, then the above-described screw mechanism, as well as a metal profile for fixing the base board, can be welded, which also does not take much time and effort.
You can use an old but working jack as a press, which is attached to the frame on top of the base board.


Among homemade automatic apple juicers, a popular option is to use elements of an old or broken washing machine any type. What is needed for its manufacture:
- take the drum of the machine, better known as the centrifuge, and an intact casing (tank);
- in the tank itself, it is imperative to close all unnecessary holes and holes in any way, leaving only one through which the finished juice will flow out during the extraction;
- if the filter mesh has been preserved in the tank in a satisfactory condition, then it can be moved and installed on the drain of the product;
- presence or independent production fasteners;
- ball bearings, if the old ones are in order, we use them or purchase new ones.


Please note that all materials that are removed from the washing machine must be thoroughly cleaned, while removing washing powder, elements of rust, oils, scale.
Assembling an automatic juicer has its own nuances:
- installation of a DC motor with a power of at least 11 kW;
- making a frame for attaching the casing, it is best to weld it from metal corners;
- all electrical contacts must be well insulated, if possible, use corrugation;
- before switching on, you need to check the correctness assembled apparatus, the electrical network must provide the required voltage;
- after assembling the device, it is necessary to rinse it well and make the first idle start.
The product is ready for use. Do not forget that after each squeeze, the drum must be washed and cleaned. A product of this type shows great productivity: within half an hour you can process 2-3 buckets of apples and get natural fruit juice.
There is another simple option for creating a juicer to get your favorite apple drink. We take a conventional mixer, attach 2 bolts to its lower part, connect it to an electric drill and grind apples in a container (bucket, deep basin, tank). The resulting mushy liquid is placed in a cloth bag and in a new container, preferably with holes in the bottom for juice to flow out.


Fruit preparation
Before squeezing the juice, apples must be carefully sorted out, since rotten fruits will subsequently negatively affect the taste of the future drink. After selection, the fruits must be thoroughly washed and allowed to drain. It is advisable to cut large apples into pieces, the core can not be removed, but in this case, after receiving the juice, it will be necessary to drive it through a dense filter to remove the seeds, the peel from the apples is also not removed.
Once all the juice is stacked, run it through a filter. However, if it is planned to prepare juice with pulp, and the cores of the fruits have been removed in advance, then the finished drink may not be driven through the filter. To preserve the nutrients in the resulting juice, it is better to pasteurize it, but do not boil it.
How to make a juicer with your own hands, see the following video.
The hot summer and the first days of autumn delight us with the fragrant fragrance of ripe fruits. Piquant taste of grapes and apple charge of vitamins, unique taste of pear and healthy tomato juice- the table at this time of the year is filled with a large number of fruits and vegetables.
To diversify the menu and regularly delight yourself with a refreshing fresh juice, you can make a juicer at home. Such an invention is an alternative to bulky, loud and expensive devices.
In contact with
Classmates
Equipment and sequence of actions
To make a homemade centrifugal juicer, we need an old washing machine (always with a working centrifuge).
The resulting semi-automatic device will perform a number of tasks:
- grind raw materials;
- squeeze and filter juice;
- flush the internal installation yourself.
A mandatory requirement for the selected model of the washing machine is the existing activator at the bottom of the tank. Old samples that have serviceable parts are also suitable for use.
You should know: actively develop the topic of "homemade" in the press began in the early 90s. One of the first to propose the idea of installing and launching the device was engineer Kotenev and inventor Maslov (Model Designer magazine).
To facilitate your work, first of all, you need to draw detailed drawings: draw up a detailed layout of the future juicer. Then you should prepare all the tools.
In the process of work, we will need the following elements:
- centrifuge;
- proper cover;
- brackets for fastenings;
- bearings of various sizes.
Selected elements should be cleaned from regular exposure to powder - rust and scale. To do this, with fine sandpaper, it is necessary to polish all surfaces to a shine.
Note: the design should have only two holes: for laying raw materials and draining juice. Other voids and holes must be sealed with rubber pads.
The next steps are the manufacture of a grater and a gasket. To do this, we need a cutting tool, for example, a grinder. It is better to cut the gasket from stainless steel to increase the durability of the entire device.
To make a grater, you will need to work out technical drawings and perform a number of simple steps:
- Drill small holes.
- Divide the resulting circles into sectors.
- Attach the workpiece to the screws.
- Stuff the cutting teeth.
What should not be forgotten

From any wooden handle, you can make a pusher for tomatoes and other fruits. Do not forget to put a limiter so that the device does not sag and does not fall to the grater.
To make a high-capacity squeezer, you will definitely need a powerful engine. It is important to secure all parts well and insulate electrical parts.
Remember: be sure to flush before starting detergent all details. Components must be made of proven materials and prevent oxidation, corrosion and ingress harmful substances into juice.
Trial run

 Before starting the active use of the juicer in the country or city kitchen, it is necessary to make a trial run. When rotating the drum, pay attention to extraneous noises, knocks and beats. Any extra sound indicates the imperfection of the design.
First run benefits:
- the ability to test in practice all the capabilities of the device;
- prevention of negative moments in the future during operation;
- technical condition control.
For the first productive launch, you need to carefully prepare and sort out the raw materials. Dense and strong parts, for example, the core of apples or pear pits, do not need to be removed, as this is not a hindrance to work.
We substitute a container under the tube, put the fruits in the bunker, press them against the wall with a pusher. It is necessary to squeeze the juice before the vibration sensations begin. If there is a slight vibration - stop casting and let the spinning device work. After completing the session, it is imperative to immediately disassemble the device and rinse all parts.
Other ideas for squeezing fruits and vegetables

The main advantages of this type:
- affordable price;
- reliability;
- long-term operation.
To improve the design, you can use plastic bottles. We take a container and cut off its bottom at a distance of 10-15 cm from the bottom edge. Then we insert a small bottle into the resulting hole, having previously made small holes in it. We unscrew the cork and you can get to work. This option is only suitable for occasional juicing for one person Leave a message and your contacts in the comments - we will contact you and together we will make the publication better!
Today in supermarkets there is a great variety of all kinds of juices and other products, but they are, to put it mildly, soaked through with chemistry and this is very mildly said. With the development of mankind, chemistry comes into our lives more and more often. Chemistry is everywhere now and everywhere, but undoubtedly it is certainly convenient when, for example, juice can be stored for a couple of years and does not deteriorate. It is interesting to whom such storage is beneficial, of course not to the consumer.
The manufacturer hides all the secrets under a beautiful cover, looking for his own benefit, and people's health is their own business. To drink or not to drink, that is the question. Many people will naturally agree that the juice squeezed out of their apples, pears or berries is very beneficial for the body. The hand-squeezed juice does not contain a drop of chemistry, only vitamins and fructose that are useful for life.
In people who have personal plots, cottages, the question always arises of where to put a large number of apples or pears, which often disappear simply without work. Of course, there is a solution, you need to squeeze tasty and healthy juice from country fruits. Can be drunk fresh or canned and stored for storage. But then how wonderful it will be on a cold winter evening to open a jar of delicious and healthy homemade juice.
For the extraction of juice, people have used all kinds of devices since ancient times. In our time, a huge variety of different juicers, different brands and brands. This is all of course good, but all this costs money and sometimes not small ones.
So what about the common man? Of course do it yourself. So our author decided to make a juicer with his own hands, from what he had in the garage. What will our designer need to bring his idea to life.
Materials: stainless steel sheet, channel, 16 mm pipe, threaded rod, nut, 30 mm board.
Tools: welding machine, drill, grinder, hammer, hacksaw, jigsaw.


Pay attention after drilling the holes, the author makes them countersinking, that is, with a drill of a larger diameter, he drills the surface of the hole, but not completely so that the hole turns into a cone.


Through these holes, the juice will come out and flow down to the tray and then through the chute into the vessel. Then he proceeds to the manufacture of the bed, for this he takes a channel and cuts it to the specified dimensions.

When the bed is ready, it starts manufacturing the squeezing chamber, where the process will take place. To do this, the resulting mesh is bent into a cylinder and the seam is welded.


The bed is ready.

Next, the author proceeds to the manufacture of a protective casing, this part serves to ensure that the juice does not splash, but flows evenly onto the receiving tray and further flows down the groove into the container.


The author, as can be seen in the photograph, also bent a cylinder of a larger diameter from a stainless steel sheet than the squeezing chamber and boiled the seam. Then a screw press was made.

I also made a round wooden lining under the screw press, this can be seen in the photo below near the press lies separately.


