From what and how to make a vacuum cleaner with your own hands. Homemade cyclone for a vacuum cleaner from a plastic bottle What can be done with a Typhoon vacuum cleaner
There are different situations in life. If you suddenly need to use a mini-vacuum cleaner, you can save on the purchase and make it yourself.
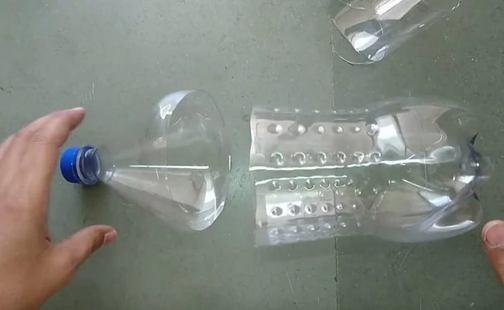
1. Outline the label along the top and bottom lines. Cut out the part of the bottle where the marking label was.

2. Take the old empty can or a tin can, remove the bottom and top, then cut down the middle to make a rectangular sheet.

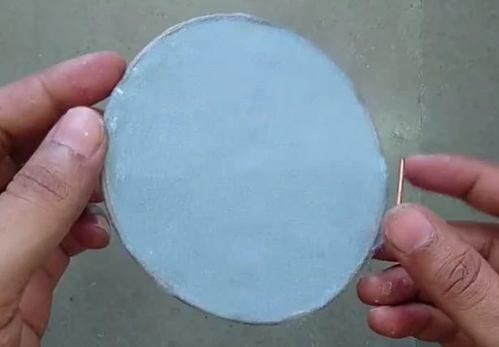
3. Measure and cut a circle from the tin sheet to fit the diameter of the bottle.

4. Leaving in the middle a place for a small motor, draw a tin circle and make cuts to make 8 sectors. Each of them needs to be slightly bent. Make a small hole in the center.

5. Now attach the motor to the resulting makeshift fan.

6. Using a drill and a large drill, make 3 rows of holes at the bottom of the bottle.

7. Glue the cap from another bottle to the motor, after passing the wires from the motor into the hole on the side.

8. Put the fan inside the bottle and glue it to the bottom. Glue the seal to the top of the bottle on the inside.


9. From the wire, make a ring with such a diameter that it fits in the bottle and can be placed tightly on top of the seal. Glue a circle of thin fabric onto the ring.

10. Put the ring in the bottle on the seal and close the structure tightly with the top of the bottle.
When using a conventional vacuum cleaner to collect sawdust, the bag fills up very quickly. For myself, I solved this problem - I assembled a cyclone or a separator for working with power tools. Assembled from available and cheap materials:- an empty bottle of 19 liters;
- a fitting for the sewerage on 40 mm. (with a 90 degree bend);
- coupling and clamp also 40 mm;
- polypropylene pipe and fittings 20 mm;
- an old hose from a vacuum cleaner;
- a plastic bag and an elastic band.
Cyclone assembly
Two 40 mm holes were drilled in the bottom and side of the bottle with a crown. One hole for the hose from the vacuum cleaner, and the other for the hose through which the chips will be sucked. From polypropylene pipe a stand was welded to keep the bottle from tipping over. This was the most time-consuming work in the assembly of my entire structure.There is a clamp on the rack to fix the hose. And on the neck of the bottle is put on
garbage bag and tied with a rubber band. After the end of work (cleaning), the bottle rises, and all the garbage falls into the bag.

Basically the cyclone was assembled to work with mini circular saw and a jigsaw, when using which there is a lot of sawdust, but it has proven itself well when collecting ordinary garbage, since there is no need to change the dust bag now: it is almost empty.
To do this, we only need the most common rubbish that can be found in any apartment: broken appliances, electronics, wires, cut pipes, hoses and other “garbage” that you regretted throwing away. All this is useful to us to make a vacuum cleaner from a bottle with our own hands. Let's consider step by step how to do it.
First of all, you need to get somewhere a small working electric motor. Without it, everything else will remain useless trash.
Equipment often fails due to the breakdown of any one part, and everything else remains serviceable. Therefore, you can, for example, borrow a motor and other parts we need from your old cassette recorder, player, music center or a child's toy.
To make a vacuum cleaner with your own hands, you need to prepare the following details:
- plastic bottle right size.
- Electric motor.
- Switch with wires.
- Power supply or batteries.
- Connector for the power supply.
- Flexible hose or tube.
Tools and consumables:
- Stationery knife.
- Soldering iron.
- Solder.
- Hot glue.
- Scissors.
- Tin can or bottle.
- Marker.
- Ruler.
- Stationery buttons.
- Nylon screed or thick wire.
- Small nylon mesh.
- Scotch, adhesive tape or patch.
Preparation
At the very beginning, you should clearly define the goals that your homemade vacuum cleaner. Some features of its design will depend on this. If we need it, then a battery-powered motor from a children's toy is quite suitable for this. If we are going to make something more serious (for example), then the parts and materials used should be larger and stronger, respectively.
The most careful thing to do is to choose a motor and a power source for it. Their electrical characteristics must match completely, otherwise problems may arise: one of the two will either burn out or simply will not work.
Step-by-step instruction
So, how to make a vacuum cleaner from a bottle? To do this, you need to clearly understand what it looks like and. We take an irregularly shaped plastic bottle and cut off the neck from it in the place where it expands. We should get something like a lid that can be tightly inserted back.
Then we measure the excess part from the cut of the neck and cut it off in such a way that the remaining volume is enough for the dust collector and the placement of the motor.
For the manufacture of a fan, any piece of soft metal of a suitable size is suitable for us. This could be the bottom of a can, a tin lid, or something that can be easily cut with scissors and then bent. Ideally, if we are lucky enough to find a ready-made propeller from some kind of toy.
The diameter of the fan impeller should almost match the inner diameter of the bottle for better suction.
Cut out a circle from a tin and mark it into eight equal parts. Next, along the marking lines, we make cuts with scissors, leaving about 5-10 mm to the center of the circle.

In the center we make a hole for the rotor of the motor, and slightly bend the impeller blades at an angle so that they suck in air during rotation, and not vice versa.
We fasten the fan and the rotor of the electric motor together with hot glue or in another way, trying to avoid distortions in the connection.

In the bottom we make holes for the exit of the air flow, simply by cutting off the protruding edges of the bottom with a clerical knife.

Then you need to attach an electric motor to the inside of the bottom. To do this, we need any plastic cover. The main thing is that its size approximately coincides with the size of the motor.

This is necessary to securely glue the electric motor to the bottom of the bottle using hot glue.

A homemade vacuum cleaner is almost ready, it remains, which will separate the electric motor from the dust collection compartment. To do this, we use a fine mesh, which we stretch on a nylon screed or wire bent into a circle.
If the manufactured filter is tightly inserted into our homemade vacuum cleaner without additional fasteners, then you can leave everything like that. Otherwise, you need to fix it on the holders, which can be used push pins. The latter must be inserted into the bottle around the circumference at the place where the filter is attached and wrapped with adhesive tape on the outside.

For the manufacture of the hose, we use a tube with a diameter slightly smaller than the neck of the bottle. Several layers of medical plaster can be wound around the end of the tube so that the tube fits snugly into the neck and does not slip out of it.

Suction nozzles can be made from anything: from ballpoint pen, tubes from a dropper, syringe, plastic bottle - depending on their purpose. You can even use small replacement nozzles from a real vacuum if they fit.
Now it remains only to solve the issue of powering the electric motor, namely: connect a switch and a power source to it with wires, which can be batteries, a battery or a power adapter.
After that, our homemade vacuum cleaner is ready to use!
Conclusion
As you can see, making a small homemade vacuum cleaner or keyboard cleaner is not difficult at all. Moreover, the device made by us can be easily transferred from place to place not only within the apartment, but also used, for example, in the garage to clean the seats and panels in the car.
With large-scale cleaning of dust or dirt, it will be difficult to cope with garbage with a conventional broom. Of course, it is best to use a vacuum cleaner to use. So our task is to study detailed analysis the process of making a vacuum cleaner with your own hands. It is important to understand that this homemade unit will be slightly different from the purchased technical specifications and multilevel system. The composition of the main elements includes: a filter (with the help of which the air is purified), an engine and a pump.
materials
We will carry out the assembly on the basis of an old household vacuum cleaner, so the following elements will be required from it:
- Various nozzles;
- Motor part;
- Power regulator;
- suction hose;
- Electric power wire.
In addition to the above components, you will need:
- glue;
- polyethylene barrel capacity. from fifty to eighty liters (necessarily a lid);
- bandages;
- scissors with which metal cutting is possible, or a well-sharpened knife;
- drill;
- scotch;
- jigsaw;
- sealant;
- bolts;
- collar;
- plywood;
- air filter;
- screwdriver;
- self-tapping screws;
- stud with washers / nuts;
- a branch pipe two hundred millimeters long and forty millimeters in diameter;
- insulating tape.
Vacuum cleaner assembly
Now let's take a look at the assembly of the device step by step.
 First you need to step back one hundred millimeters from the top edge. Mark and drill a hole with a drill so that the pipe fits there. With sharp scissors or a knife, do the following - edit the hole, you need to tightly place the inner end to the wall at a certain angle (directed down).
Fix the element with glue, after degreasing the work surface. The same fraud should be done from the outside of the unit. Using a jigsaw, cut out two small circles of plywood so that the diameter is slightly smaller than that of the top surface of the barrel.
For blanks for bolts, make two holes and fix the subtleties on both sides of the cover. The remaining holes also need to be drilled. Remove circles and eliminate all possible burrs. Apply sealant over the entire surface without affecting the centers of the workpieces. Cleanly determine fasteners. Make a round hole in the center of the plywood for the stud, and next to it a larger hole.
From the air filter, destroy the mesh of metal material so that it does not clog with sawdust and does not interfere with the performance of the device itself. Install the already improved filter element on the stud.
IMPORTANT! The stud must face up with the nut!
Since the motor part usually has a rounded shape, it is necessary to create the necessary plastic parts (they are taken from the past of an unnecessary vacuum cleaner). As a rule, they are included in the engine. To secure them, you should take a clamp.
 Next, put the power regulator in the box. Place the element indicated earlier and the switch near the engine. Connect all components to each other. Connect the cable to the plug. It is worth making sure that the assembled structure is correct. Take the hose. If it is short, then it must be increased by some product, for example, corrugation.
Fit the brush head to the hose. The next step is to connect the tube to the dust collector. There are two outcomes of events - either it fits perfectly into the hole, or not. In the last of the attached cases, it is necessary to make a so-called adapter. To do this, take a small tube.
REFERENCE. A drain tube will work too. It must be soldered to the bag retainer.
ATTENTION! At first, you will have to check the filling at the dust collector, since the device is not designed for the sensor. And do not bring to the maximum saturation level of the dust in the bag.

With your own hands, you can make a vacuum cleaner not only from the above materials, but also from plastic bottle.

Since every person, one might say, most people have a computer, making such a vacuum cleaner is not difficult. In addition, this method is quite simple and will not cause various difficulties.
It is necessary to cut the bottle into two equal parts. Cut the filter out of the foam rubber and insert it tightly into the neck. Next, you need to take the half in which there is a lid. Insert a hose into it. Then screw the cap onto the bottle. You should take the fan from the PC and smooth its corners.
Insert inside so that the airflow is directed towards the back of the bottle. Wrap the location of the cooler with insulated tape. The last step is to connect to the power supply fan. It is necessary to bring the red wire to the plus side, and the black wire to the minus sign.
Such a small vacuum cleaner is great to serve you for a sufficient amount of time. In addition, it is easy to hold in your hand and work on eliminating the smallest dust particles even from small parts. In addition, a homemade vacuum cleaner from a bottle can serve as a child's toy and teach your child the tricks of cleanliness in a playful way.


