Do-it-yourself funny paper crafts. Children's paper crafts (104 photo ideas). Easy paper crafts for babies
Paper crafts are perhaps the most interesting hobby for children and adults. The manufacturing process is quite exciting, moreover, at the same time, children develop imagination and motor skills. Below we have selected several master classes that, in our opinion, will be of interest to you.
Paper butterfly
Butterfly is a bright summer companion, a symbol of beauty and lightness. Each butterfly is unique and inimitable in its own way. Nature has tried to mark each winged beauty with bright colors and patterns. These beautiful insects are a decoration of flower lawns, and in today's lesson we will try to decorate the room with a butterfly, which we will make with our own hands from paper. Making paper crafts favors the development of attentiveness, accuracy, perseverance and the manifestation of imagination in children. And what a surprise the kid will experience, watching how an ordinary leaf turns into an amazing creature before his eyes!
In order to make a paper butterfly, we need:
- Paper;
- Scissors;
- Paints;
- Fantasy and great mood.
For crafts, an ordinary album sheet will work, but first you need to make it square. To do this, we bend the upper left corner diagonally, cut off the section of paper remaining when folding with scissors. We have a square with one diagonal fold. You need to make another diagonal fold on the other side. To do this, bend the upper right and lower left corners.
At the resulting triangle, bend the lower ends up. Then turn the figure over with its wide side up and bend the top of the triangle so that its tip extends slightly beyond the edges.
We wrap the protruding tip. Fold the future butterfly in half.

The butterfly figurine is ready, but for now it is white and inconspicuous. Therefore, the turn has come for children - to show imagination and decorate the butterfly to their taste, using watercolors or felt-tip pens. Drawing can be the most unimaginable: from flowers, as in our example, to complex geometric patterns, the main thing is that the child enjoys the creative process. If you wish, you can make a few more butterflies, allowing the kid to make crafts without your help.


A boat made of colored paper
Of course, each of us loves when he succeeds. And especially, it is done by hand. And you do it just for yourself, for the soul, without even thinking about specific benefits. Although she will still be. Crafts are a great way to show yourself that the craft is fun and rewarding. Especially when there is no cost and it turns out to make something beautiful from scrap materials. And for children it is a great joy to do it yourself, even if it is not an interesting trinket for an adult, but to do it. And the task of each parent is to support his child, to praise for what he himself was able to create. And also to help, prompt and in no case scold if the conceived does not work. By doing this kind of work, the child tries to learn the world himself, using his imagination. He remembers everything he has ever seen and tries to reflect it in his products. For lovers of the marine theme, we have prepared a lesson on making a simple boat. Feel like a real captain of the most beautiful ship, moreover, made with soul and love. All we need is:
- empty matchboxes;
- colored cardboard and colored paper;
- scissors;
- glue;
- tubule.
Take the matchboxes and fold them so that two are next to each other, and the third is on top of them. To give the boat the desired appearance and the advertising inscriptions of the boxes did not spoil the future product for us, glue the craft with plain paper, as shown in the picture.

After that we will make the stern of our ship. Cut the base out of cardboard, and from two strips build the bow of our ship. Then, we will use the tube to build the sails. Take a rectangular piece of cardboard and attach it to the straw as shown below. Finish the look with small red flags at the end of the tube.

It remains to decorate the craft from the side so that the matchboxes are not visible. If you have small Lego toys, then they can take a place with dignity on our beautiful deck.

Our boat is ready, it's time to hit the road!
Russian oven made of paper
The stove was the main attribute in the house: it heated the house, cooked food in it, and assigned it a special place. Therefore, the stove is always associated with satiety, warmth and comfort. In many Russian fairy tales, we come across a Russian stove. Let's remember Emelya, the fairy tale "Geese-Swans", Baba Yaga. The stove is also found in old proverbs and sayings. And if the child was asked to make a product - a Russian stove, then this is not a problem at all. They build a real brick stove, and we propose to create it from cardboard. With such a child can easily cope. A small Russian paper oven turns out to be very realistic.
To make it work, you need to take:
- a small package left over from toothpaste;
- colored paper (white, orange and black);
- some cotton wool;
- black marker;
- scissors;
- glue.
1. First, let's cut the toothpaste package into two halves, make one more, the other smaller.
2. The larger one will stand vertically, the smaller half will be applied to the larger one horizontally.
3. We fasten the construction of the craft with glue.
4. After it dries a little, glue it over with white paper, imitating whitewash.

5. We prepare a pipe on the stove, for this we cut a strip out of cardboard, bend it to make a small pipe, glue it to the base.
6. Cut a small rectangular sheet of white paper. Prepare the firebox from black paper, the orange strip will frame the firebox.
7. Carefully glue it all onto a white sheet. We are waiting for the glue to dry.
8. Glue to the oven in the appropriate place. Now we have a stove with a firebox!

9. The pipe must be pasted over with orange paper.
10. For naturalness, draw small bricks on the pipe with a black marker and insert a small piece of cotton wool into the pipe, straighten it out, depicting smoke. For strength, so that it does not fall out, it is better to glue the cotton wool on the inside of the pipe.

Here's a Russian oven made of paper! I already want to warm my sides on it and remember my childhood, the village, my grandmother. Plus a paper stove - it is small, light and does not take half a house, but it gives a touch of comfort and warmth.
Chicken from disc and paper
How nice it is to receive gifts made by our close and dear people. Moreover, do them yourself, including imagination and creativity. With our own hands, from improvised means, we can prepare a wide variety of crafts and toys. This is a very exciting experience. And if you make crafts with your family members or friends, then you will definitely get a lot of pleasure from communication and the result of teamwork. Today we will try to make a chicken from a disc and colored cardboard. It will not be voluminous, and therefore it can be hung over the table or even on the Christmas tree in the New Year. Let's start!
For our toy, we will need:
1. Old music or video disc,
- colored cardboard, we will need four colors - blue, white, yellow, red;
- scissors;
- pencil;
- glue;
- a small ball of yellow or beige woolen thread.
2. The first thing to start with is to cut finely the threads, but more. They will replace our chick's feathers.
3. Then, coat the disc well with glue and sprinkle it with thick threads. After the disc is dry, shake it to remove the remaining hair.
4. Cut out oval eyes from cardboard paper - they will be white and blue. Beak and legs - let them be red. And we will make the wings yellow. Oh, and don't forget the scallop. Our chicken is small, but he already has a scallop. You can see each step in the photo.

The job is done, our chicken is ready. You can hang it on a string, as we said earlier. Ask your dad to make a hole in the disk, pull the thread and that's it. The craft turned out to be unusual, joyful. The chick seems to take off, wants to see what is happening there! Or maybe he wants to see - where are his friends?

Similar to this craft, we can make a chicken mom or rooster dad. And if you fantasize, then a bunny, and a pig, and a hedgehog, and a bear cub, and other cartoon characters, for example. Moreover, we did not spend a lot of time and money on this lesson. It remains only to find her a place. Or maybe we will give our chick to someone?
Paper ball
The creative process of creating various crafts, paper designs will captivate both adults and children. After reading the following instructions, anyone can assemble a figure in the form of a beautiful paper colored ball.

Colored paper (two colors that can contrast with each other without breaking the harmonious combination, such as cyan and purple).
Quantity: for each of the eight modules (circles) that make up the final figure of the craft, you need five parts (if you plan to make the ball not large, you can cut 2-3 such parts from one sheet of colored paper of about A4 size).
- 24 parts in blue and 16 parts - purple or equally - twenty parts of each color;
- Pencil;
- Ruler (in order to draw the sides of the cardboard template);
- A piece of cardboard (its size will depend on how large the shape of a wonderful paper ball is needed;
- A beautiful rope (not thick - with its help a ready-made volumetric figure can be attached to almost any place in the interior to decorate it);
- Scissors (preferably with sharp tips, especially if the figure is small, otherwise it will be difficult to cut).
At the first stage of the creative process, you need to draw a sketch on cardboard with a pencil, according to which all the details for the shape of the ball will soon be cut out. It should be noted that the sides of the depicted figure should be straight (for accuracy, use a ruler), and the top and bottom should also be completely the same.
Both parts of the patterned figure are similar to a chef's hat or a cake with cream, but the main thing is that the edges of the upper and lower parts, respectively, should form convenient “ears” for subsequent coupling into a three-dimensional figure. After completing the sketch, the pencil must be set aside, now it is time to carefully cut the template figure out of cardboard along the contour.
You need to take colored paper and draw the required number of figures and cut them out.

Next, you need to interlock the cut-out figures so that they alternate in color, with each subsequent figure rotated about ninety degrees from the previous one so that its narrow side can be inserted into the grooves of the long side of the previous part. Thus, you need to link five such parts in one circle.


If two purple and three blue parts were used to construct the circle, now you need to link two purple parts together (provided that the sequence rule was followed).
All modules are connected so that in each recess there are five "roundings", that is, the joints of the parts.


Card for mom
The most memorable and expensive gift is a handmade gift. An original postcard will be an excellent gift for mom, grandmother or sister, because in addition to a postcard made by yourself, you give a part of your soul, according to the belief of many nations, in every thing created by us, we put a part of our soul. And this is the most valuable thing!
And so let's start, for the craft we need the following materials:

- Glue, preferably paper;
- Colored paper;
- Scissors;
- Marker;
- Unnecessary magazines with pretty pictures.
We make a blank postcard from cardboard, draw a semicircular pattern along the edges of our postcard. You can come up with another ornament, show your imagination.
Carefully cut out our workpiece along the lines.
On our blank, we glue a sheet of colored paper, distribute the glue carefully so that the colored paper adheres well to the cardboard.

It is necessary to make blanks of daisies. We cut out two small circles from white cardboard - these will be the petals of our future chamomile, and from yellow cardboard it is necessary to cut two circles of a smaller diameter for the middle of our flower.
We collect our daisies, glue the yellow center of the daisy to our white petals. Thus, we collect four flowers.
Now for our daisies, we need to make stems. We will make them as follows: on a sheet of cardboard, green, we draw lines at a distance of 2-4 centimeters, we have three daisies, therefore we need to draw three lines.
We cut out our stripes exactly along the contour. The stalks for our daisies are ready.

Next, the fun begins, the assembly and design of the postcard. To our cardboard blank, we glue the daisies and stalks we made earlier, we place the flowers slightly at an angle so that they fit on our postcard.
We cut out beautiful pictures from old magazines for decoration of crafts. On the corners of the postcard we glue the ornament found in the magazine. And we will plant a beautiful butterfly in the right edge.
Now the most crucial moment, we make an inscription with wishes for a loved one. Cut out a blank in the shape of a "cloud" from colored pink paper. We write on it the inscription "Mommy" and glue it on our postcard.
The original postcard is ready, all that remains is to present it.
Origami paper pencil
Origami is a fun technique that can interest all family members. It's amazing how a familiar object suddenly appears from one flat sheet of paper at the next fold, without glue, scissors, or something else.
You will need a little perseverance and accuracy, and you will definitely be able to create a voluminous paper craft, for example, a pencil.
Necessary materials:
- Color double sided square sheet
We used yellow and green colors to clearly show that it is a pencil. And you can also make the first option so as not to get confused in the description, and then, when you learn how to do it, you can use any colors. Or use one-sided colored paper, then the shirt of the pencil and the lead will be colored, and the rod will be in a contrasting white color.
Put the sheet on the table with the yellow side up. We apply the right corners of the sheet to the left ones, and making sure that the line is straight, we make a fold. Without changing the position of the sheet, we unbend it again with the yellow side up.
In the same way, we carefully apply the two upper corners to the lower corners and bend the sheet in half, carefully forming a fold line.

Expand the sheet with the yellow side up again. Now our square is divided into four equal squares by perpendicular fold lines.
Again, take the square by the upper corners and bend our upper small squares in half. Drag the top corners to the center fold on the square. Straighten the full square again with the yellow side up. And again we bend the upper corners so that the green color does not even reach the very top fold strip. We get a yellow square with a thin green stripe on top, as in the picture below.

Let's pay attention to one fold, which runs vertically in the center of the leaf. We take the sheet by the squares on the left and bend it to this center. We repeat these actions with the right corners. Now we have a green rectangle in front of us with two horizontal fold lines.
We take the upper inner corners (which are at the vertical fold) and bend them to the edges. You should see pieces of yellow with green stripes around the edges. As shown in the picture below, we will bend these stripes as far as the paper will allow.

Now bend the upper right and left squares alternately diagonally back. The pencil is ready.

There are many different uses for such pencils: use as a bookmark, as a decorative element in the design of a school office, as a children's toy, etc.
Christmas tree made of paper
The main attribute of the New Year is the tree. Everyone decides for himself to dress up an artificial or live forest beauty. But in addition to the main tree, you can make several small ones with your own hands. With the help of such a craft, we can decorate rooms or present it as a small souvenir that will surely raise the festive mood.
Required inventory:
- colored paper;
- glue;
- wire;
- stand;
- pencil;
- ruler;
- scissors;
- compass;
- beads for decoration.
Twist one end of the wire into a spiral and glue it to a small, stable block.

Using a compass, draw circles on the back of the colored paper. The diameter of the largest should be 20 cm, and the smallest - 6 cm.Reducing the size of the circles in 2 cm increments.Total, you should get 16 circles, plus one circle, the diameter of which will be 5 cm.It will be needed to make the top in the form of a cone ...
Each of the blanks must be divided into segments. And inside, draw a circle, the diameter of which will, on average, be equal to the radius of the workpiece. The centers of the circles must match. Use scissors to cut to the beginning of the inner circle.

Grasp the edges of the segment and roll it up, securing the ends with glue. Hold each section with your fingers until the glue sets. We do the same with each section. In the center of each piece, make a hole for threading onto a metal frame. Assemble the tree, starting from the largest diameter to the smallest.

Cut a segment out of the remaining circle and fold it into a cone, securing the edges with glue. Place the cone at the top of the tree. Now it's time for the most creative part of the process - decorating the Christmas tree. Children really like this procedure, so you can safely involve the children in this activity.
Use bright beads, seed beads, tinsel, rhinestones and other colorful elements as decor. You can fix them with glue, silicone glue is very suitable for this procedure, it sets as quickly as possible and has a transparent texture, which makes it completely invisible.


Christmas garland made of paper
New Year is a bright and long-awaited holiday for all children and for many adults. The smell of pine needles hovering in the room, gifts under the spruce and a decorated house. A large number of people are buying Christmas decorations, because it is faster and easier, but you can get creative and decorate the house with your own hands. For example, make a New Year's garland out of paper. Many people remember garlands and flags from childhood, they are lightweight, comfortable, it is not difficult to make them yourself and are convenient to store after the holidays. A fun, colorful garland will help decorate a simple gloomy wall, a long curtain, and a regular chandelier.
1. What is useful for us for making paper garlands:
- colored paper;
- scissors;
- compass;
- glue;
- rope.
2. Draw neat circles of different sizes on the back of colored paper with a compass. Some circles will be larger, others smaller.
3. Using scissors, cut out the resulting multi-colored circles.
4. Combine several circles of the same shape, but different colors. They need to be laid out on top of each other and bent in the middle. It turns out one big and dense circle.

5. Now let's prepare the circle of the largest shape.
6. Carefully make three small holes in it with scissors. We make sure that the round pieces do not move.
7. We pass the rope through the resulting holes.
8. We have the base of the garland ready.

10. String circles on the rope in descending order from larger to smaller.
11. Let's fluff up the garland so that you can see all the colors of the paper and make it seem more voluminous.
12. We stretch the balls along the rope evenly, at the same distance from each other.

13. You can also decorate the garland with paints - put bright dots in the form of multi-colored scattered confetti. It is better to do this on large circles, since it may not be noticeable on small ones.
14. We ended up with a fun, fluffy and colorful garland. Now you can hang it on the wall at home and admire it all the New Year's holidays!

Volumetric paper snowflake
Outside the window - the wizard-winter, New Year is approaching, the most favorite holiday of children. Everyone, especially children, lives in anticipation of a miracle, and it is in your power to give it to them. It's simple - you need to pay more attention to them, spend time together, and do your pre-holiday chores together. Children will love to do festive New Year's decor with their parents, one of the integral elements of which is snowflakes. Everyone knows how to cut them, but for children who will definitely want to participate, it will be more interesting to make voluminous snowflakes, which are appropriate to decorate a Christmas tree, or to make a mobile out of them by adding different figures (Christmas trees, balls, angels, etc.) or to combine them into a garland. The craft is simple in execution, a child of 4-5 years old can easily make it.
For work you will need: a sheet of double-sided blue paper (any shade can be), a ruler, scissors, glue. Colored paper should be cut in half. Then each half must be folded like an accordion: we put a ruler on the edge of the sheet and make a fold - this is the first strip, the rest are equal along it (you should get an accordion of 7 strips 3 cm wide). We cut the accordions and get 14 strips. From each strip we form a "needle": as shown in the photo.

Cut off the protruding ends of the strips. You will get a cone with a sharp ledge. For the base, cut out a circle of paper with a diameter of 3 cm.

We glue the "needles" to the base with a cone to the center, as shown in the photo. First, on the one hand, then, when the glue dries, on the other, making sure that the "needles" are staggered. You should have a snowflake about fourteen centimeters in diameter.

Give free rein to your imagination: use white paper or paper of two different shades, additionally decorating the snowflake with sparkles, sequins, etc. If you want a bigger snowflake, take two landscape sheets, and double the width of the stripes.
Do New Year's crafts with the children, give them and yourself the joy of communication, and then this New Year will become truly unforgettable for you and for them.
Paper crown
The carnival costume of a little prince or a capricious princess is inconceivable without an elegant shiny crown. A headdress suitable for a young crowned person can be bought in a toy store, but if it is evening outside and the crown is needed for tomorrow's matinee, then there is no choice but to build it yourself.
To make such a homemade attribute of royal power, you will need:
- a roll of thick food foil;
- a sheet of thin and dense white cardboard;
- adhesive thermo gun;
- scissors;
- several packages of glue rhinestones of different colors;
- half a meter of narrow metallized silver braid;
- half a meter of white linen or a hat elastic;
- ruler and pencil.
Making a crown
1. On a piece of cardboard, draw a 25x12 cm rectangle and, using a line parallel to the long edges, divide it into two strips measuring 25x7 and 25x5 cm.
2. Divide the narrow strip into five squares with 5 centimeter sides and write in these squares isosceles triangles with a height and base equal to 5 centimeters. These will be the teeth of the crown.
3. Attach a 1.5 cm wide attachment tab to one of the short side sides of the larger strip.
4. Cut out a cardboard blank of the crown and wrap it in foil.

5. To do this, first, with allowances of 1-1.5 cm, cut out the "metal" lining of the outer part of the royal headdress, attach it to the cardboard and fold the excess foil onto the wrong side of the crown.
6. Then cut out the inner liner (its dimensions should be slightly smaller than the cardboard base).
7. Place the purl foil lining on the glue and snap the crown into the ring.

8. Having stepped back 1 cm from the bottom edge of the crown, glue the edging of silver braid on it and decorate it with crystal rhinestones.
9. Decorate each prong of our craft with a flower made from multi-colored rhinestones and pearl half beads.
10. From the elastic band make (glue, or even better - sew) a ring of such a size that it is quite tight, but not tight, put on the child's head (in the position over the crown and under the chin).
11. Glue the crown to the rubber ring and try the finished piece on the head of "Their Highness".

If you find an error, please select a piece of text and press Ctrl + Enter.
Both boys and girls of any preschool and primary school age love to engage in construction. Bricks and construction sets, plasticine and paper - even the smallest children feel the urge to build the same tower of blocks. Early engagement by parents or caregivers with children directly affects the development of their abilities.
Construction helps the formation of imaginative thinking, improves hand motor skills, expanding horizons. At 3-4 years old, a child is already able to make paper out of paper. He is able to fold paper, learn to cut with scissors, create volumetric structures, do-it-yourself paper crafts. At the same time, accuracy and precision of movements develop.
The easiest way to keep your child busy with a paper craft, while not giving him dangerous scissors or glue, is origami.
Getting started with origami
It is better to start the first origami lesson by creating the lightest paper craft, the child's hand should get used to working with this material. Start by familiarizing yourself with the simplest geometric shape - the square. Try to tell the square about what you can do with it. In a playful way, you can explain that it has sides and angles, and show the child how to find its center. Having taught how to fold triangles, the child can be shown how to make a composition from them, by folding, for example, a herringbone. From a folded rectangle, you can make a door that can be glued to a base prepared with the help of an adult in the form of a painted house.

Gradually, tasks may become more difficult. From squares of different sizes, turned into triangles, the child can be offered to fold a Christmas tree expanding downward. From a triangle and a rectangle folded by a child, you can construct a fungus. Origami-style paper craft templates can be found in specialty books. Below is the

Origami for advanced masters
Origami art is a suitable creative activity not only for children but also for adults. It calms, creates a meditative mood, and allows you to eventually create a beautiful little thing with your own hands.
To twist the tube, you will need a newspaper, a long knitting needle, PVA glue, a stationery or a sharp kitchen knife. A newspaper spread is folded in half lengthwise and carefully cut with a knife. Then fold again and cut until you have four strips for four tubes. After that, take a knitting needle and, applying it to the edge of the newspaper at a slight angle, begin to twist it gently. Having tightened it to the end, a drop of PVA glue is applied to the corner, slightly pressing it, remove the knitting needle and put the resulting tube aside until the glue dries. When weaving, the tubes must be held in order to give them the intended shape. Weaving begins with small products, over time, taking into account and evaluating all the features of the material.
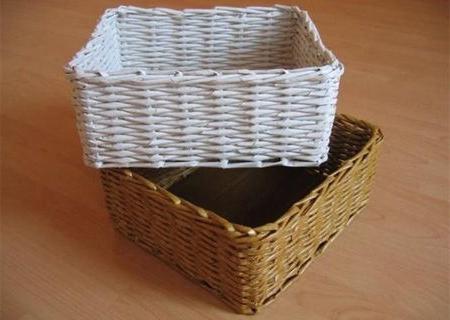
Most often baskets and boxes, photo frames and coasters for mugs, vases and wall panels are woven from newspaper tubes. But a developed imagination allows you to use this material and type of technology almost unlimited.
Quilling
Quilling is another type of paper craft that is gaining popularity. This is a technique of twisting narrow long strips of paper in a spiral and then modifying them to compose flat or voluminous compositions.
Quilling is native to Mediterranean Europe. This hobby is very common in America, England and Germany. It is also called "paper filigree". Despite this name, the technique allows even a child to make simple paper crafts. In skillful hands, paper spirals turn into flowers and patterns used to decorate gift wrappers, handmade cards, albums, photo frames. Products made in are used as wall decorations, and even make jewelry out of them. This is a budget, beautiful and simple type of needlework.
In quilling, colored paper of a special density is used. It is important that both sides and the cut itself are the same color, although sometimes paper with two different colors on both sides of the sheet is used for a special effect.
Sets of ready-made paper are sold in specialized stores, but you can also cut the strips yourself.

Facing
In this technique, you can make three-dimensional figures and images from paper. For trimming, thin and soft paper, for example, corrugated paper, is used. Small squares are cut out of it, which are then rolled up into cones or funnels. The top of this cone is greased with glue and glued to the base. Multi-colored cones glued to the base create a voluminous and beautiful panel. Thus, you can make a picture or a postcard, or you can create an interior topiary.
Iris Folding
This technique of paper art is not very common in Russia, but it has a rich history and unlimited opportunities for self-expression. At its core, it is a technique of folding paper strips in such a way that their pattern resembles a swirling spiral. The drawing is laid out from colored paper or paper with a pattern, carefully selecting shades so that it turns out to be harmonious. From above, the resulting pattern is covered with a frame - a motif or silhouette cut out of paper. As a result, even a child can make an easy craft out of paper - a beautiful panel or a postcard.

Papier mache
Papier-mâché is a simple and affordable technique with great potential for needlework. This technique is used to make caskets and boxes, vases and jewelry, theatrical props, dolls, figurines and figurines of animals, toys, covers with painting, embossing and varnishing. Even interior decoration elements are made of papier-mâché: from decorative panels for walls and doors to architectural stucco moldings for walls and ceilings. Frames for mirrors, candlesticks, lamps and even furniture made using papier-mâché technique are distinguished by their beauty and originality. However, even the lightest paper crafts can be made using this technique.
Papier-mâché (French papier mâché) means "chewed or torn paper". The basis of papier-mâché is paper, which easily turns into a mass that can be formed. Glue, gypsum or starch are added to the composition of the mass.

Three techniques for making papier-mâché products
The first way
A model of the product is being prepared, which will need to be pasted over with paper. It can be made of wood, clay, plasticine or plaster. The model can be greased with glue and fixed under the layers of paper, or it can be removed from the paper layer, for which it is coated with Vaseline in advance. Torn wet paper is applied to the selected model with glue. Alternating a layer of paper with a layer of glue, they are pasted over in layers, the number of which can reach up to a hundred. Previously, a starch-based paste was used for gluing, but now you can purchase a special glue. Gluing paper in layers is called waving.
Second way
The product is formed from a liquid paper pulp, for which the paper is cut or torn into pieces a day before they plan to start work and soaked in hot water. After that, the soaked mass is boiled. Then the water is squeezed out, the pieces of paper are loosened and dried. The dry mass is mixed with chalk and a special glue from the mixture and starch paste is gradually poured into it until a dough with a soft and plastic structure is formed. Such paper dough is poured into a mold or applied to a product.
Third way
This type of papier-mâché requires hard cardboard and PVA glue. The method resembles the technology for making plywood. The model is made by gluing together pieces of hard cardboard. After that, the cardboard is subjected to pressure, the specialists use staples and a stapler to fix the glued plates or a vice and clamps. The dried products are putty, grinded, primed, then painted and varnished or embossed.

Thus, paper is one of the most versatile, inexpensive and easy to use materials for creativity and needlework. You can make an easy craft out of paper, decorate your life, transform the interior, make an original gift that resembles a work of art.
Perhaps there is no more popular craft material than paper. A variety of types and colors of paper, as well as an extensive range of textures and various types of its density allow you to embody original ideas and create memorable origami.
Distinctive advantages of creativity using paper products are its low cost, rich choice of materials, ease of execution. Unlike leather, plastic, metal, even a preschooler can handle paper while creating crafts. Of course, under the supervision of elders.
Many adults, especially those who have not yet had time to start a family, tend to consider paper crafts as the lot of kindergarten workers. But children's applications and postcards are only the initial stage in the creative variety of ideas that can be embodied with paper, scissors, glue and boundless imagination.
To date, quite a few directions in working with paper are being mastered by mature adults. Some use paperwork as a favorite hobby and a way to escape from everyday worries, others turn their favorite pastime into a professional and profitable activity, creating new directions in the development of the art of paper crafts.
There is a wide range of varieties of techniques for working with this material in the world. The possibilities of using paper in needlework are truly endless.Origami and quilling, decoupage and kusudama, papier-mâché and appliqués are all just the tip of the iceberg, because every creatively oriented person is able, sooner or later, to create a new direction and come up with fundamentally new ways of making paper crafts.
We suggest starting the process by mastering the simplest and most understandable ideas for each child. Together with their mother, kids can create a card for their beloved dad, grandmother, friend for their birthday, come up with a themed applique or make a bouquet of flowers from multi-colored napkins.
For more advanced users, we propose to decorate the New Year's interior with toys made of paper and LED elements, to create a masterpiece of decoupage technique by transforming an old box or glass bottle.
If you think that paper art will require considerable financial costs, our resource will easily convince you otherwise. Beautiful and useful products made from toilet paper, cardboard boxes, magazines and newspapers allow you to be creative and decorate your home with improvised tools and unnecessary paper products. The most important thing to be successful is to take some time, be creative, and be patient.
Paper is the most common craft material for several reasons: low cost, availability, ease of use. Of course, paper cannot be called a very simple material, because it all depends on your skills, the type of paper, and the complexity of the craft. It can be a simple applique for children, or it can be origami from modules that little children cannot cope with. In this article I want to offer 10 crafts of varying complexity for children and adults. They are made from several types of paper: plain white A4, colored, corrugated, crepe. He even eats one craft of notes for notes. Let's get down to looking at various options for work.
3D postcard for March 8
You always want to surprise with a gift for the holidays, and such an unusual postcard will not leave anyone indifferent. This craft can quickly and easily be done by a child from 9 to 11 years old with his own hands and presented to his mother or grandmother for the holiday. To learn how to make a 3D postcard, you can see a photo and video description with step-by-step instructions.
You will need:
- Colored paper (4 sheets of white and 1 pink sheet)
- Scissors
- PVA glue
- Ruler
- Pencil
- Double-sided tape
- Paint (lilac and green)
Working process:
- Divide the white sheet in half with a line, and then fold the 4 sheets together and cut along the line. We need 7 halves, set the 8th aside.
- Take half a sheet and fold it in half 2 times. We get a rectangle, two sides are closed, and two are open.
- We bend the corners to the closed long side outward. We do this in both directions.
- Now the bent corners need to be bent again in the opposite direction, this is done only on one side.
- We get a reference point by which we will cut off. Cut along the folded line on one side, then straighten the corner once and cut along the line on the other side. This will give us a leaf-like shape.
- We do this with the remaining six sheets. To keep the shape of all flowers one, just attach the first blank and cut along it.
- Take the resulting flower and cut one petal out of it, and then glue the gap by placing the side petals exactly one on top of the other. You should get 6 petals. We do this with all the flowers.
- Fold the flowers in half. On the side petals of the 1st flower, glue pieces of scotch tape on the very top of the petal.
- We glue the flowers on the side parts, only the side petals, gently applying the petal to the petal.
- Now we glue the 4th flower on 3 flowers, also only in the 4th all the petals should be glued.
- Glue the 5th and 6th flowers on top as 2 and 3 (only on the sides).
- Glue the 7th flower on top of all the others by 3 petals.
- Fold a pink sheet in half like a postcard, now we will finish our composition.
- We put the flower on the half of the postcard and on the upper central petal we attach the tape and cover with another sheet of the postcard. Glue the other side in the same way. Make sure that the sheet lies clearly near the fold line.
- The postcard is ready; all that remains is to paint the middle of the flowers. You can sign the postcard.
Caterpillar made of colored paper
Such a caterpillar is easy to implement and will take very little of your time. The craft is designed for children from 2 years old and their parents. You can spend time with your child pleasantly and useful, and develop the motor skills of children's hands. Let's get down to making the caterpillar with our own hands. 
You will need:
- Colored paper of different colors
- PVA glue
- Scissors
- Ruler
- Pencil
- Markers
Working process:
- Make strips of paper 6 cm long and 1 cm thick (red, green, blue, yellow, purple, brown, blue). The colors should be different to make the caterpillar rainbow and bright.
- We glue each strip to make circles.
- When the circles are ready, we glue them together, alternating colors, You should get a strip of circles. We glue the last one a little higher than the rest, it will be the head.
- With a felt-tip pen, draw a mouth and eyes.
- Cut thin strips of colored paper and twist with scissors. Glue them in place of the antennae.
- From a green leaf, cut out the shape of the leaf, focusing on the caterpillar. Our funny caterpillar is ready!
Corrugated paper valentine
On Valentine's Day, they always give ordinary cards in the form of hearts, but if you want to make a more original card, make it out of corrugated paper. And now I will tell you how to make a Valentine's card with your own hands in stages with step-by-step instructions. 
You will need:
- Cardboard
- Red corrugated paper
- Scissors
- Match
- PVA glue
Working process:
- Cut a heart-shaped card out of cardboard.
- Cut the corrugated paper into squares a little more than 1 cm in size.
- We apply the square with the central part to the tip of the match and wrinkle the paper in a circular motion. Do this with all the squares.
- We put glue on the valentine's card and begin to glue our crumpled blanks. When the glue is dry, fluff the paper to make it fluffier. The postcard for the holiday is ready, you can present it to your loved one.
Bunny in 5 minutes
If you need a kindergarten craft that doesn't take long, then a voluminous bunny will be the perfect option. The most important thing is that you can connect your baby to the execution process. Let's see how to make a simple bunny with your own hands using the detailed instructions. 
You will need:
- Sheet of colored paper
- Scissors
- Ruler
- Pencil
Working process:
- Cut 2 strips about 1.5 cm wide from a sheet of paper.
- Cut one strip into two different strips. The difference is about 3 cm.
- We glue both strips so that we get 2 circles.
- Glue them together.
- Cut the second strip into 3 equal parts. Cut one piece lengthwise. We fold each thin strip in half and glue the ends. These will be our ears.
- We glue the ears on our blank of two circles, on the smaller one.
- We also cut the remaining strips lengthwise. Feet are made like ears. Glued onto the bottom circle.
- From one more strip we make a small circle and make a tail.
- Fold the last strip in half and use scissors to round the edges. Spread and glue to the back of the bottom circle and twist them forward with scissors. The bunny is ready!
Video how to make a paper bunny in 5 minutes
Beautiful flower
To decorate the interior, you can make an unusual flower out of note paper with your own hands. For this, you do not need special skills; a child of 4-7 years old can help with the implementation. To complete the craft, we have made a detailed description for you with step-by-step instructions. 
You will need:
- Note paper
- PVA glue
- Cardboard
- Scissors
Working process:
- Notebook paper is best used without the sticky edge. Take the sheet with the corner up and fold the side corners and sides towards each other. Glue them together. It turns out small bags. Do this with all the leaves.
- Cut out a circle of about 7-8 cm from cardboard. This will create a small flower.
- Now glue the 1st row of petals on the circle with the short side up. The petals should be close to each other.
- In the next row, glue the petals into the gaps of the previous row.
- So we do the subsequent rows, gradually reducing the number of petals in a row.
- Fill the middle with petals without focusing on the rows, see that it is beautiful and voluminous. The flower is ready, you can hang it on the wall, or put it on the table.
DIY flower video
DIY book
If you want to make an unusual craft that will also come in handy for use, you can make a small origami book out of paper. You will not write your poems or compositions into it, but it will come in handy for small notes, and it will not take up much space in your bag. It is very easy to make such a craft, just follow the instructions with a step by step description. 
You will need:
- A4 sheet of paper - 2 pcs of different colors
- Scissors
Working process:
- Fold A4 sheet in half lengthwise. Open the sheet back.
- Next, fold the sides to a center fold.
- Cut the sheet into 4 strips along the folds.
- Take one strip and fold it in half 3 times. You end up with a small rectangle.
- Do this with all the strips.
- Open the resulting triangle and now fold it accordion. Do the same with the rest.
- Now glue all the pieces, folding the last pages one on top of the other of each accordion.
- Using glue, fold the sides that are facing each other and glue. In this way, we make pages.
- Fold A4 sheet of a different color in half in width, and then in length. You will have 4 rectangles. Cut out one of them.
- At the rectangle, fold the long side sides towards the center, but not reaching the center about 0.5 cm.
- Fold the rectangle in half and slightly outline the cent. Now, focusing on the center, make two folds in the center, about 0.5 cm wide. The cover is almost ready.
- Now, when trying on the sheets of the notebook for the cover, fold inward to fit the sheets. Then insert the last pages of the notebook into the cover. You can use glue for better attachment. Our unusual notebook is ready.
Video how to make a mini book with your own hands
Butterflies for decor
Paper butterflies can be used to decorate walls, windows and gift wraps. They create a romantic and light mood, because butterflies are so graceful. A child starting from 3 years old, as well as any beginner, can make butterflies with their own hands. There are many options for making paper butterflies and we want to offer you one of them, quite interesting. Now let's create a beautiful butterfly decoration with our own hands. 
You will need:
- A4 sheet of paper - 2 pcs (yellow and pink)
- The needle is large
- Beads and beads
- Thin wire
- Scissors
- Double tape
Working process:
- Take one sheet and fold it in half, but you don't need to highlight the fold too much.
- We cut off the corners, more on the lower side, and less on the upper side with a smooth bend in the middle.
- We open the sheet and, moving along the fold line, fold it with an accordion. We have made the upper wing.
- For the bottom, we do the same thing only we will cut out the corners of the same size. Next, fold it with an accordion.
- With a needle we pierce the wings of the butterflies in the center, so that in the future it will be easier to fasten them.
- We fold the wire in half and string the wings on it.
- Put a white bead on the wire at the upper wings, on both fibers. Then two gold pieces for each tendril.
- We decorate the rest of the wire with golden beads. To finish the antennae, we need to push the tip of the wire into the last beads two times. We cut off the excess. We also do it with the second mustache.
- Tape the upper and lower wings together with tape.
- On the lower part of the wire we put on white beads of a larger size, about 4 pieces, and then 2 more beads of a smaller size.
- You need to finish the tail like the antennae, but for reliability you can make a few twisting movements and cut off the excess.
- Now spread the wings of the butterfly and you can decorate the interior.
Origami tree made of paper
To decorate your home, office or kindergarten for the new year, you can make an interesting and unusual Christmas tree out of paper with your own hands. For those who love origami, this Christmas tree will love it. To complete this craft, read the step-by-step instructions, as well as a photo and video description. 
You will need:
- Colored paper
- Scissors
Working process:
- We make a square from a sheet of green paper.
- Connect two opposite corners to make a triangle.
- Bend the triangle back into a square and fold the other two opposite corners into a triangle.
- Along the folds along the sides, fold them in the middle, when you fold it into a triangle.
- Now we bend the sides of the triangle to the center, from the beginning on one side, and then on the other. Straighten it again.
- We straighten each resulting triangle along the fold, straighten along the central fold and fold and make a new fold to the left.
- Divide the resulting structure into equal sides.
- Bend the bottom corners up, and then hide inward.
- We get a blank that looks like a Christmas tree. We make three cuts on the sides, a little short of the center.
- Now we need to bend the corner to the inside of each incised piece. Thus, we will get the corners of the Christmas tree. We do this work with all the pages of the tree.
- The Christmas tree is ready, you can decorate your home.
Chamomile paper
If you want to bring a summer and sunny mood to the interior, make paper daisies with your own hands. They can be used not only in the interior, but also as a gift to family and friends. Such interesting and beautiful daisies will not leave anyone indifferent. 
You will need:
- Crepe paper (yellow and white)
- Colored green paper
- Scissors
- Scotch
- Threads
- Toothpick
- Ruler
Working process:
- Divide a sheet of colored paper lengthwise into 4 parts and cut 1/4.
- Using a toothpick, twist our strip into a tube and glue the tip with tape. This will be our stalk.
- Cut out a piece of white crepe paper 10 × 25 cm and yellow 20 × 4 cm.
- Fold the yellow strip 2 times and cut the closed parts on one side with scissors. Now, on both sides along the strip, we make frequent cuts about 1 cm deep.
- Fold the white paper in half and cut the closed part.
- Place the white paper on the table, and the yellow paper on the outermost part of the long side, and relative to the width, it should lie in the middle.
- Starting on the other side, fold the paper with an accordion.
- We tie it in the middle with a rope for fixing.
- Round off the white ends with scissors.
- With the narrow side of the stem, go around the middle of the flower and secure it with tape.
- Spread the center of the petal towards the top to make it fluffy. Also spread the chamomile petals.
Colored paper is an excellent craft material. You can make appliqués, various figures and many other creative things from it. In this article we will look at: how to make crafts from colored paper for children of elementary grades with their own hands.
You will need: thick colored paper, glue gun, ruler, scissors, scotch tape, stationery, pencil, pen spring.
Master Class
- Take a sheet of paper and a pencil, twist the tube diagonally from the corner, then fix it with tape and pull out the pencil.

- Roll the second sheet of paper around the first tube, then pull them apart. The second paper tube should be slightly larger in diameter than the first so that you can shoot from it in the future.
- Secure the second tube with tape, then cut off the edges.
- Twist 2 more paper tubes in the same way.
- Cut the tubes into pieces of the following length: trunk - 2 tubes 15 cm long; handle - 7 tubes 5 cm long; trigger - 1 tube 8 cm long.
- Glue the 5 cm tubing obliquely to form a handle.

- Glue an 8cm tube on top of the handle so that the remaining 3cm protrudes to the right. This is the trigger.
- Glue the two 15cm tubes together and glue them to the top of the gun as a barrel.
- Roll two thin tubes of yellow paper.
- Bend the thin tube into the letter “U” and insert one end into the trigger and the other into the upper tube of the handle. Cut off the excess. This will be the trigger.
- Make a trigger guard from a second thin tube. To do this, place one end of the tube in the handle (in the second tube from the top) and glue the rest of the tube to the bottom of the barrel.

- Twist the pink paper tube, flatten it and glue the handle as shown in the image. It is worth noting that the rear trigger hole must be open.
- Pull the trigger out of the upper handle tube and insert the spring. It should be noted that the spring should rest against the tube covering the back of the handle. Reinsert the trigger.
- Roll up a thin, thick tube of yellow paper, secure with tape and cut off the edges so that they are even.

- Fold over the edge, put on the elastic and secure with glue.
- Insert the rubber tube into the lower tube of the gun barrel and pull the rubber band forward, hooking it between the two tubes.
- Roll paper bullets, load your gun and fire.
You will need: colored cardboard, scissors, glue stick, cotton wool, stapler.
Master Class

The rainbow in the clouds is ready!
Binoculars
You will need: yellow cellophane, scissors, scotch tape, black paint, paintbrush, green and black paper, glue, stationery, wine stopper, string or elastic.
Master Class
- Cut out 2 circles of yellow cellophane and tape on the circumference of the sleeves as binoculars.
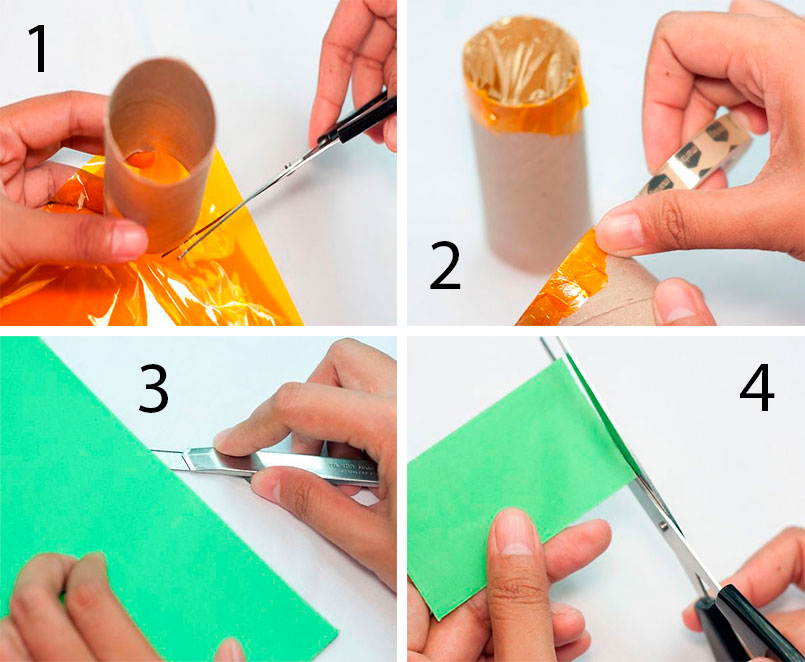
- Paint the circumference of the wine cork with black paint and glue it over with green paper.
- Glue the sleeves with green paper and glue the black stripes as shown in the image.

- Glue the bushings together and fix by putting on a rubber band. After a while, remove the elastic.

- Glue the glued plug between the bushings.
- Prepare a rubber band or rope of the desired length, make a hole in the side of the sleeves and secure the elastic.
The binoculars are ready!
Origami rose
You will need: double-sided colored paper, scissors, a simple pencil.
Master Class
- Fold a sheet of colored paper diagonally as shown in the photo and cut off the extra strip to make a square.
- Bend the square to form the second diagonal.

- Fold the square in half to form snowflake-like lines.
- Move the sides of the workpiece in this way: the top - from the right side to the left, and the bottom - from the left to the right, to make a triangle.
- Bend all 4 vertices to the middle and slide your fingers along the folds.
- Expand the workpiece to a double triangle and bend the top corner back.

- Spread the bud and bend the folded corner inward.
- Gather the double corner back and slide your fingers along the folds.
- Lift the 4 side corners to the top.

- Fold over, then fold each side to center in the middle. You should get a blank with a hole at the bottom.
- Blow vigorously into the hole at the bottom to expand the bud.
- Curl the petals using a simple pencil.

- Take the strip of paper you cut off at the beginning.
- Fold the stem and insert it into the bud.
The origami rose is ready!
Move 3Dfish
You will need: colored paper, scissors, glue, pencil, black felt-tip pen.
Master Class
- Take a sheet of blue paper and make a square.
- Fold the sides to the fold, then unfold the paper.

- Fold the paper in half to form a triangle as shown in the image
- Make cuts along the fold, then open the paper and overlap the uncut portions.
- Flatten the fish's face by cutting off the corner.

- Cut out the fins and tail from the pink, then draw stripes with a felt-tip pen.
- Cut out the eyes out of white paper and draw the pupils with a black felt-tip pen.

- Glue the fins, tail and eyes, and do not forget to draw the eyelashes.

- Cut out the elongated semi-oval and glue as the lower jaw.
You will need: sheet of colored paper, felt-tip pen and scissors.
Master Class
- Fold a piece of colored paper in half.
- Place your palm on the leaf so that your thumb and forefinger touch the edge of the leaf, thereby forming a half heart.
- Circle your palm.
- Cut out the palm and unfold the craft.
The heart in the hands of colored paper is ready!
You will need: white and yellow colored paper, a simple pencil, ruler, glue, coin or compass.
Master Class
- Cut 9 strips of paper to the same size.
- Make 2 circles on yellow paper.
- Cut them out.
- Glue the ends of the stripes together to form petals.
- Glue the petals to the yellow circle, then glue the second circle on top.
You will need: red colored paper, a simple pencil, scissors, a round object.
Master Class
- Trace a round object on colored paper.
- Draw a spiral in the circle.
- Cut out the circle.
- Cut the spiral in such a way that you get a "spring"
- Twist the rose, in the same way make the required number of roses.
Original roses from colored paper are ready! I recommend watching the master class video!
You will need: double-sided colored paper, glue gun, stick or skewer as a stem, button.
Master Class

A creative flower made of colored paper is ready!
You will need: 4 sheets of colored paper, double-sided tape.
Master Class
- Fold each sheet into an accordion.
- Fold each accordion in half to form a fan.
- Glue 4 sheets together in such a way that you get a circle.
A fan flower made of colored paper is ready!
You will need: colored paper, stapler, cut out butterfly (from a magazine, notebook, pictures), felt-tip pen.
Master Class

A case for surprises made of colored paper is ready!
You will need: colored paper, black and yellow, a simple pencil, scissors, a ruler, glue, compasses, glitter.
Master Class
The colored paper owl is ready!
You can also make a cute bunny out of colored paper, but how - see this video!
Sisters from colored paper
You will need: paper of two colors, 2 wooden sticks, buttons for eyes, rubber bands or strings for hands, pencil, glue.